
WHAT IS A BLOG APPLICATION?
This is a platform that is used by people to express their thoughts and feelings concerning a topic.
This platform can be created using various programming technologies Including the python flask micro framework
BRIEF INTRO TO FLASK
Flask is a web framework that is written in python . This means flask provides you with tools, libraries and technologies that allow you to build a web application examples are a few web pages, a blog, a wiki a commercial website.
Flask is part of the categories of the micro-framework. Micro-frameworks are normally frameworks with little to no dependencies to external libraries. Flask However supports extensions ,dependencies that can add application features as if implemented in Flask itself ,This makes Flask one of the easiest web frameworks which can be used in many aspects of web development
In this article i will explain how one can use this framework to build a Blog application
Prerequisites
Before reading further reader should ensure that he or she has the following installed on their local development machine:
1.A code editor (Visual Studio Code)
2.A command line interface
3.Python 3.10.6 installed on their local development machine
4.Flask 2.2.2installed on their local development machine
5.A basic knowledge of HTML, CSS, Python, Bootstrap
Overview
Earlier in this article i mentioned that flask had some dependencies that can add application features these dependencies are Werkzueg and jinja2
Werkzueg
It is a WSGI toolkit, which implements requests, response objects and other utility functions. This enables building a web framework on top of it. The Flask framework uses Werkzeug as one of it bases.
Jinja2
Jinja is a fast, expressive, extensible templating engine. Special placeholders in the template allow writing code similar to Python syntax
LET US BEGIN
Flask -Environment
The first thing to do in this journey is to actualize a virtual environment in your project folder to do that open your command line interface
And run the commands below
mkdir MYPROJECT
cd MYPROJECT
py -3 -m venv venv
The above set of commands is for the purpose of opening a new directory called MYPROJECT , changing your current directory to this new directory and creating the virtual environment venv in this directory
After this Activate the environment
Before you work on your project to activate the corresponding environment run the command below :
venv\Scripts\activate
Now that the virtual environment has been activated we can install flask and other packages for our project.
Let's start with flask by running:
pip install Flask
The above command can be run directly without a virtual environment for system-wide installation,
The purpose of a virtual environment is for specificity it is to know the packages used for a specific project.
Flask-Application
The next thing to do is open your code editor preferably Visual Studio Code or any other code editor if your choice
And go into the directory where the virtual environment was created and activated and in this case it's the MYPROJECT directory
Then you should create some folders and python files as shown below
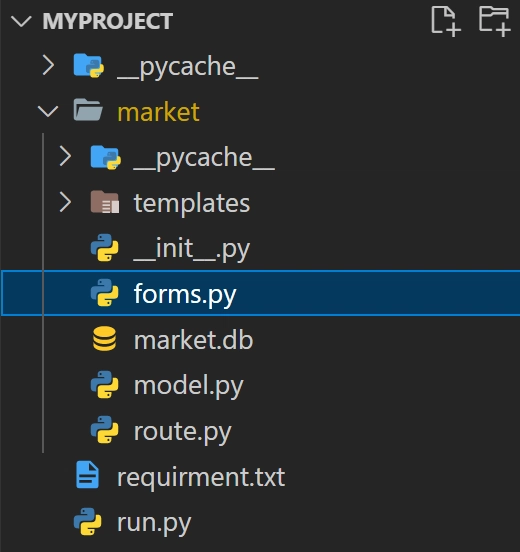
From the image above we inside the MYPROJECT we have the market folder , the requirement.txt file and the run.py file each of these files holds functions or informations that affect our blog application inside the
market folder we have the
templates folder which holds all our html template files,
The market.db file which is the database file which will be created when we move to the database part of our application ,it also holds The init.py file which makes the root directory behave like a python module in which we can import our local codes from it.
So to begin go to the init.py file and type the following code :
from flask import Flask
app = Flask(__name__)
What the code does is to import the flask module into our project and the name
being the name of the current module creates an instance of the flask module which in this case is then assigned to the variable app.
After which you go to your route.py and then create a test route like this
from market import app
@app.route('/')
@app.route('/home')
def home_page():
    return 'hello world'
What is going on in the above code is that due to the
init.py file it is possible to import the app instance from the market folder and use to assign the route to the app.
Then the route()function is being used as a decorator which tells the application which URL should call the function that it is decorating or the associative function
Then the ('/') and the ('/home') URL are then bound with the home_page() function so that when the home page route is called on the webserver and then opened in the browser the function can be rendered in this case it will display the words hello world on the browser.
What we should do next is run the development server and this can be done by going to the run.py file and type in the code
from market import app
if __name__ == '__main__':
     app.run(debug=True)
from the above code we see the if-statement that checks if the __name__ module is the original module or if it was imported
and then the run() method runs the flask app on the local development server.
NOTE :The debug is set to True so that every change you make to the code is put into effect when you reload the browser
Then afterwards you go to your command line and input the following command :
python run.py
Flask – Templates
It is possible to return the output of a function bound to a certain URL in the form of HTML. For instance in the code below, the home_page() function will render ‘Hello World’ with the <h1> tag attached to it
@app.route('/')
@app.route('/home')
def home_page():
    return '<html><h1>hello world<h1><html>'
However, generating HTML content from python code is cumbersome, especially when variable data and python language elements like conditionals or loops need to be put. This would require frequent escaping from HTML.
These is where one can take advantage of Jinja2 template engine, on which Flask is based. Instead of running hardcode HTML from the function , a HTML file can be rendered by the render_template()function just by also importing it from flask as shown in the code below.
from market import app
from flask import render_template

@app.route('/')
@app.route('/home')
def home_page():
    return render_template('home.html')
Flask will try to find the HTML file home.html in the templates folder and it will display what's in the file on the browser
Earlier i had given an overview of the Jinja dependency now i would like to digress a bit and talk in detail about the flask dependency jinja2
Jinja2 is a python HTML template engine. A template engine is a piece of software that combines HTML documents with data from any data source to produce an HTML formatted file that contain the data. Jinja2 is the template engine used in flask, it is built in flask, so you do not need to download a separate package to use jinja2 with flask, it is installed with flask. Even if you are planning to use a different template engine, jinja2 will still be required in order for Flask to run. Jinja2 offers a lot of options when it comes to adding, manipulating or formatting data in the HTML file. Here are some of what Jinja2 offers in your flask app:
• You can pass any data from your flask app to the HTML template.
• Auto escaping (which is enabled by default).
• Filters.
• Context processors.
• Template inheritance.
The Jinja2 template engine uses the following delimiters for escaping from HTML.
• {%...%}: for Statements
• {{…}}: for Expressions to print to the template output
• {#...#}: for Comments not included in the template output
• #...##: for Line Statements
Speaking on the point 2 above involves passing information from the backend of our application to the rendered HTML template.
Flask–WTF
WTF stands for WF Forms that help in providing an interactive user interface. Web applications looks interesting only when they have a nice and convenient user interface with user. In HTML we have tag used for designing interface. It provides various kinds of input to accept such as text, textarea, integer, radio, select, etc. But a big problem with HTML forms is that it is difficult to render the forms elements dynamically. And also there is no way provided by HTML to validate user input.
This is where WTForms come to the rescue. These are the flexible forms with validation and rendering library. With WTForms, you can define the form fields in Python script and then you can render them using an HTML template.
Apart from these cool features, WTForms provides these below-mentioned features also because of which it is very helpful to use this module.
• Provides secure form with CRSF token (Cross-Site Request Forgery)
• Provides integration with WTForms.
• Provides file upload that works with Flask Uploads.
CRSF token
Flask-WTF by default prevent all forms from CRSF attacks. It happens by embedding a token in a hidden element () inside the form. This token is used to check authenticity of the request. So, before flask-wtf can generate a CRSF token, a secret key is added. It is done by adding something like the code below to our init.py file
app.config['SECRET_KEY'] = 'development key'
The development key can be derived by writing the following command in your command line
os.urandom(12).hex()
Now to get started with WTForms you first have to install it by running the command below.
pip install flask-wtf
From these module, you can import a Form class which you can perform all form operations. Some of the standard form fields are:
• TextField: Used to represent the text field HTML form element.
• BooleanField: Used to represent the checkbox.
• IntegerField: Represent text field to display the integer values.
• TextAreaField: Represent text area form element.
• PasswordField: Used to take the password as form input from user.
• SubmitField: It represent the submit button of HTML. It basically replaces the piece of code in HTML.
How to use WTForms?
Now that flask-wtf module has been installed. So, if you want to generate a form using wtforms, you just need to follow these simple steps:
- Import the required form module and form fields like TextAreaField, IntegerField, etc.
- Next step is to create a form model.
- Display the HTML form and validate data submitted through the form, if required. Now before we move to the implementation of the WTForms in the necessary HTML files in our blog app like the login and signup form, let’s quickly talk about the form validation as mentioned in the point 3 above WTF-Validations WTForms already has all built in validators we will need in this project. Here are also some of the WTForms validators:
-
DataRequired(): This validator is used for the field we want to make sure that the user fills in. -
Length(): It is used to check the minimum and maximum length of the inputted data in a field. -
Email(): It is used to validate emails. -
EqualTo():It is used to check if two fields contain same data -
ValidationError(): It is used to raise an error when the inputted data already exist in a a database etc.
Now that you have fully understand WTForms and its validators lets see how it really work. All the forms needed for this project is going to be inside the forms.py folder. Now let start by creating the Registration form, the first thing to do is to import flask_wtf all the necessary Fields and validators from there corresponding modules as shown below.
from flask_wtf import FlaskForm
from wtforms import StringField, PasswordField, SubmitField,IntegerField, HiddenField
from wtforms.validators import Length, EqualTo, Email, DataRequired, ValidationError
The next thing to do is create the registration form by writing the code below
class RegisterForm(FlaskForm):


    username = StringField(label='First Name:', validators=[Length(min=2, max=30), DataRequired()])
    lastname = StringField(label='Last Name:', validators=[Length(min=2, max=30), DataRequired()])
    email_address = StringField(label='Email Address:', validators=[Email(), DataRequired()])
    phone_num = StringField(label='Phone Number:', validators=[Length(min=2, max=30), DataRequired()])
    password1 = PasswordField(label='Password:', validators=[Length(min=6), DataRequired()])
    password2 = PasswordField(label='Confirm Password:', validators=[EqualTo('password1'), DataRequired()])
    submit = SubmitField(label='Sign Up')
As shown in the code above we created a class and passed the FlaskForm as an argument then by assigning the fields to a variable, The label there is represent the label of the field then we can see that all the validations are passed inside the validators Square bracket “[]” then the length there tells us that the minimum data that can be inputted is 2 while the maximum data that can be inputted is 30 and the dataRequired will make it that field compulsory for the user to fill, As we can see in the password variable the EqualTo validator will make sure that the data inputted in password2 must be equal to the one inputted in password1, So we are done with registration form and now to the login form we do the same thing
class LoginForm(FlaskForm):
    username = StringField(label='Username:', validators=[Length(min=2, max=30), DataRequired()])
    password1 = PasswordField(label='Password:', validators=[Length(min=6), DataRequired()])
    submit = SubmitField(label='Log In')
Follow by the form where the user can create a blog
class WriteBlogs(FlaskForm):
    blog_title =  StringField(label='Blog Tiltle:', validators=[DataRequired()])
    blog_content =  StringField(label='Blog Content:', validators=[DataRequired()])
    submit = SubmitField(label='Upload')
Now we are done with the Form creation. The next thing to do is to create a route for each of the form pages and create the HTML pages.
To start with we need to go to our route.py file and import these forms we created so we can send it from the route to the corresponding HTML templates with the help of Jinja2.
In our route folder lets type the codes below
from flask import render_template, redirect, url_for
from market.forms import RegistrationForm, LoginForm, WriteBlogs
The url_for and redirect above are also some packages that were built with flask. The redirect is a key word used when you want a route to redirect to a page after some action has taken place in the route and the url_for() function is very useful for specific function. The function accepts the name of a function as first argument, and one or more keyword argument each corresponding to the variable part of URL.
The next thing is to create the route for each form. You should write the codes below.
@app.route('/Login', methods=['GET', 'POST'])
def Login_page():
    logform = LoginForm()

    return render_template('login.html', form=logform)
@app.route('/Register')
def Register_page():
    form = RegisterForm()

    return render_template('register.html', form=form)
app.route('/writeblog')
def wblogs():
   form = WriteBlogs()

    return render_template('writeblog.html', form=form)
We can all see from the codes above that in each route we passed the corresponding form to a variable, the variable name can be anything then we are able to send it to the corresponding HTML template which the help of jinja2.
Now let design the HTML files. First thing to do is to open our base.html and put code for basic design common to all the pages needed in these project like for example now navigation bar and background color will be common to all the pages so if we put design there then in Flask also with the help of jinja2 we can also call that file in another HTML file and that will make it easier for us to use the base template for all other HTML templates rather than rewriting the codes on all the Html templates.
<!doctype html>
<html lang="en">
   <head>
      <!-- Required meta tags -->
      <meta charset="utf-8">
      <meta name="viewport" content="width=device-width, initial-scale=1, shrink-to-fit=no">
      <!-- Bootstrap CSS -->
      <link rel="stylesheet" href="https://cdn.jsdelivr.net/npm/bootstrap@4.5.3/dist/css/bootstrap.min.css" integrity="sha384-TX8t27EcRE3e/ihU7zmQxVncDAy5uIKz4rEkgIXeMed4M0jlfIDPvg6uqKI2xXr2" crossorigin="anonymous">
      <title>
          {% block title %}

          {% endblock %}
      </title>
   </head>
   <body>
    <nav class="navbar navbar-expand-md navbar-dark bg-dark">
      <a class="navbar-brand" href="#">Blog App</a>
      <button class="navbar-toggler" type="button" data-toggle="collapse" data-target="#navbarNav">
        <span class="navbar-toggler-icon"></span>
      </button>
      <div class="collapse navbar-collapse" id="navbarNav">
        {% if current_user.is_authenticated %}
        <ul class="navbar-nav mr-auto">
            <li class="nav-item">
                <a class="nav-link" href="{{ url_for('blogs_page') }}">Home</a>
            </li>
            <li class="nav-item">
                <a class="nav-link" href="{{ url_for('wblogs') }}">Write Blog</a>
            </li>

            </ul>
         <ul class="navbar-nav">
         <li class="nav-item">
                <a class="nav-link" href="{{ url_for('about_page') }}">About</a>
            </li>
            <li class="nav-item">
                <a class="nav-link" href="{{ url_for('logout_page') }}">Log out</a>
            </li>
         </ul>
         {% else %}
        <ul class="navbar-nav mr-auto">

        <li class="nav-item active">
            <a class="nav-link" href="{{ url_for('home_page') }}">Home <span class="sr-only">(current)</span></a>
        </li>
        </ul>
        <ul class="navbar-nav">
            <li class="nav-item">
                <a class="nav-link" href="{{ url_for('Login_page') }}">Login</a>
            </li>
            <li class="nav-item">
                <a class="nav-link" href="{{ url_for('Register_page') }}">Register</a>
            </li>
        </ul>
        {% endif %}
      </div>
    </nav>
          {% block content %}

      {% endblock %}
      <!-- Future Content here -->


      <!-- Optional JavaScript -->
      <!-- jQuery first, then Popper.js, then Bootstrap JS -->
      <script src='https://kit.fontawesome.com/a076d05399.js'></script>
      <script src="https://code.jquery.com/jquery-3.5.1.slim.min.js" integrity="sha384-DfXdz2htPH0lsSSs5nCTpuj/zy4C+OGpamoFVy38MVBnE+IbbVYUew+OrCXaRkfj" crossorigin="anonymous"></script>
      <script src="https://cdn.jsdelivr.net/npm/popper.js@1.16.1/dist/umd/popper.min.js" integrity="sha384-9/reFTGAW83EW2RDu2S0VKaIzap3H66lZH81PoYlFhbGU+6BZp6G7niu735Sk7lN" crossorigin="anonymous"></script>
      <script src="https://stackpath.bootstrapcdn.com/bootstrap/4.5.2/js/bootstrap.min.js" integrity="sha384-B4gt1jrGC7Jh4AgTPSdUtOBvfO8shuf57BaghqFfPlYxofvL8/KUEfYiJOMMV+rV" crossorigin="anonymous"></script>
   </body>
   <style>
      body {
      background-color: #212121;
      color: white
      }
   </style>
</html>
The code above is the work of bootstrap with some Jinja syntax the code like the ones that can be used to differentiate the pages from each other e.g
{% block title %} which carries the titles of the different pages and the
{%block content%}
Which carries the different content of the different pages.
Now that the base has been written let's move to the register.html file
In your register.html template write the codes below
{% extends 'base.html' %}
{% block title %}
    Register Page
{% endblock %}

{% block content %}
<body class="text-center">
    <div class="container">
        <form  class="form-register" style="color:white">
            {{ form.hidden_tag() }}

            <h1 class="h3 mb-3 font-weight-normal">
                Please Create your Account
            </h1>
            <br>
            {{ form.username.label() }}
            {{ form.username(class="form-control", placeholder="First Name") }}

            {{ form.lastname.label() }}
            {{ form.lastname(class="form-control", placeholder="Last Name") }}

            {{ form.email_address.label() }}
            {{ form.email_address(class="form-control", placeholder="Email Address") }}

            {{ form.phone_num.label() }}
            {{ form.phone_num(class="form-control", placeholder="Phone Number") }}

            {{ form.password1.label() }}
            {{ form.password1(class="form-control", placeholder="Password") }}

            {{ form.password2.label() }}
            {{ form.password2(class="form-control", placeholder="Confirm Password") }}
            <div class="checkbox mb-3">
               <h6>Already have an account?</h6>
               <a class="btn btn-sm btn-secondary" href="{{ url_for('Login_page') }}">Login</a>
            </div>

            <input type="submit" class="btn btn-lg btn-block btn-primary" value="Sign Up">

        </form>
    </div>
</body>
{% endblock %}
In the code above we can also see a jinja2 syntax that is extending the base.html file in register.html and we can see here that inside the block title there is Register Page then in the block content we can see that that is where the content of the page is, now if we look inside the form tag we can see the hidden tag that will avoid the CRSF. So the above code shows how we access the register form in the HTML template just because we sent it from our backend to the template and they are all enclosed in a jinja2 syntax each field has it label a placeholder and the bootstrap CSS also note that the submit button href is pointing to the function we created for login page.
Now let go to our login.html
{% extends 'base.html' %}
{% block title %}
    Login Page
{% endblock %}

{% block content %}
<body class="text-center">
    <div class="container">
        <form  class="form-signin" style="color:white">
            {{ form.hidden_tag() }}
            <h1 class="h3 mb-3 font-weight-normal">
                Please Login
            </h1>
            <br>
            {{ form.username.label() }}
            {{ form.username(class="form-control", placeholder="Email") }}

            {{ form.password1.label() }}
            {{ form.password1(class="form-control", placeholder="Password") }}

            <br>


            <div class="checkbox mb-3">
               <h6>Do not have an account?</h6>
               <a class="btn btn-sm btn-secondary" href="{{ url_for('Register_page') }}">Register</a>
            </div>

            {{ form.submit(class="btn btn-lg btn-block btn-primary") }}

        </form>
    </div>
</body>
{% endblock %}
Now that we have written for the login page let's move to our writeblog.html
% extends 'base.html' %}
{% block title %}
    Home Page
{% endblock %}

{% block content %}
<center>
<div class="col-md-6 col-lg-8"" style="background-color: #343a40!important;
box-shadow: inset 1px -1px 1px #444, inset -1px 1px 1px #444;">
      <form  class="form-signin" style="color:white">
        {{ form.hidden_tag() }}
        <!-- <img class="mb-4" src="https://res.cloudinary.com/jimshapedcoding/image/upload/v1597332609/android-icon-192x192_ove2a7.png" alt=""> -->
        <h1 class="h3 mb-3 font-weight-normal">
            Write Your Blog
        </h1>
        <br>
        {{ form.blog_title.label() }}
        {{ form.blog_title(class="form-control", placeholder="Blog Title") }}

        {{ form.blog_content.label() }}
        {{ form.blog_content(class="form-control", placeholder="Blog Content") }}
        <input type="hidden"  name="time" id="time" value="{{localtime}}">
        <br>

        {{ form.submit(class="btn btn-lg btn-block btn-primary") }}


    </form>

</div>
</center>
{% endblock %}
The last input tag before the submit button is an hidden input that will tell us the time a blog was created.
Now before moving to the database section of these tutorial let talk about HTTP methods.
Flask – HTTP methods
Http protocol is the foundation of data communication in world wide web. Different methods of data retrieval from specified URL are defined in this protocol.
The following summarizes the different http methods:
- GET: Sends data in encrypted form to the server. Most common method.
- HEAD: Same has GET but without response body
- POST: Used to send HTML form data to sever. Data received by POST method is not cached by server.
- PUT: Replaces all current representations of the target resource with the uploaded content.
- DELETE: Removes all current representations of the target resource given by a URL.
Flask – Database
As we all know a database is where information are stored. Flask is already built with a database which is SQLite. SQLAlchemy module is what is being used to interact with SQLite database which is readily available in the standard Python library. Data in SQLite are stored in tables and column.
To get started we have to import sqlalchemy from flask and initialize it by adding the code below our init.py files
from flask_sqlalchemy import SQLALchemy
app.config['SQLAlCHEMY_DATABASE_URI']='sqlite:///market.db'
db=SQLAlchemy(app)
Line one shows the importation of sqlalchemy and line two code is to create a Flask application object and set URI for the database to be used then the last line is initialization of the database. Now the next thing to do is to create an object of SQLAlchemy class with the application object as the parameter. Note that the market.db in line 2 above can be replace with ‘anyname.db’.
from market import db
Now in our models.py files where all our database setup will be the first thing to do is to import the db from the init_.py file by typing the code above. Then
class User(db.Model):
    id = db.Column(db.Integer(), primary_key=True)
    username = db.Column(db.String(length=30), nullable=False, unique=True)
    lastname = db.Column(db.String(length=30), nullable=False, unique=True)
    email_address = db.Column(db.String(length=50), nullable=False, unique=True)
    phone_number = db.Column(db.Integer(), nullable=False)
    password_hash = db.Column(db.String(length=60), nullable=False)


    def __repr__(self):
         f'User {self.username}'
The code above explain how to create an object of SQLAlchemy class with the application object as the parameter. Note the following from the code above:
id: An integer that represent a primary key. This key will get assigned a unique value by the database entry (that is, a, user registration because the class above represent a table in the database and all the variables represent columns that data will be stored)
nullable: It means that particular column cannot be empty.
db.sring() states that it is a string column
db.Integer() states that it is an integer column and
unique means that the data in that column must be unique.
Now let create another table that will store user’s blogs
class Blogs(db.Model):
    id = db.Column(db.Integer(), primary_key=True)
    name = db.Column(db.String(length=30), nullable=False)
    blog_title = db.Column(db.String(length=3000), nullable=False)
    blog_content = db.Column(db.String(length=3000), nullable=False)
    time = db.Column(db.String(length=30), nullable=False)
Now to actually set up the database you have to go your command line and make sure you are in the same directory your project is the execute the code below one by one.
python
from market import db
from market.models import User
db.create_all()

exit()
The first line will enter into the python environment, the second line means you are importing the database in your project, the third line means you are importing the User table in the database, db.create_all() means you are creating the User table in the database and after doing this you have successfully created the database with only one table(User). And lastly exit() will help you exit the python environment. You can repeat the process to create the Blogs table as well. Note that the command db.drop_all() can be used to format database.
Flask – Bycrpt
Flask-Bcrypt is a Flask extension that provides bcrypt hashing for application. In other words what bcrypt does is that instead of saving raw password we can convert them to hash to save them in our database so even if someone hack into the database he can’t see the saved user password. To get started we need to install it by running the code below in our command line.
pip install flask_bcrypt
To use the extension we can simply import the class wrapper and pass the flask object back to here. So in the init.py file add the code below
from flask_bcrypt import Bcrypt
Bcrypt = Bcrypt (app)
Back To Registration Page
Now let’s really configure what should happen is a user fills the registration form and press the submit button because as it is now nothing will happen if a user should click the button. The first thing to do is add the request method in the form tag in the register.html as shown below
<form method="POST" class="form-signin" style="color:white">
Then to the route we created for register and also add the request method there too (in route.py file) and import the database we have created
from market import db
from market.models import User, Blogs
@app.route('/Register', methods=['GET', 'POST'])
The next thing to do is to write the code below
@app.route('/Register', methods=['GET', 'POST'])
def Register_page():
    form = RegisterForm()
    if form.validate_on_submit():
        user_to_create = User(username=form.username.data,
                              lastname=form.lastname.data,
                              email_address=form.email_address.data,
                              phone_number=form.phone_num.data,
                              password=form.password1.data)
        db.session.add(user_to_create)
        db.session.commit()
        flash(f'Account successfully created! Now logged in to your acount', category='success')
        return redirect(url_for('Login_page'))

    if form.errors != {}: #If there are not errors from the validations
           for err_msg in form.errors.values():
            flash(f'There was an error with creating a user: {err_msg}', category='danger')
    return render_template('register.html', form=form)
The ‘if’ statement above will work when the user clack the submit button and seeing that will used the User model means we must first import it by adding the code below in our route.py file
from market.models import User, Blogs
Then we can see from the code that the columns we created for the User table is collecting each data from the form the user fills on the registration page. Then the db.session.add () that is taking the user_to_create variable as an argument mean’s we are adding a new data to the User table in the database and db.session.commit() means we are done then the flash there means is taking the message that will be displayed as a flash to the user if the user successfully registered but before we can use flash we need to import it too from flask because it is a flask module
from flask import render_template, redirect, url_for, flash
We also need to add something in our base.html file as shown below right before the block content after the closing of the nav tag
{% with messages = get_flashed_messages(with_categories=true) %}
{% if messages %}
{% for category, message in messages %}
<div class="alert alert-{{ category }}">
<button type="button" class="m1-2 mb-1 close" data-dismiss="alert" aria-label="Close">
<span aria-hidden="true">×</span>
</button>
{{ message }}
</div>
{% endfor %}
{% endif %}
{% endwith %}
The last ‘if’ statement is checking is there is any error in validation. We can add validation from our form.py file as shown below.
class RegisterForm(FlaskForm):
    def validate_username(self, username_to_check):
        user = User.query.filter_by(username=username_to_check.data).first()
        if user:
            raise ValidationError('Username already exists! Please try a different username')

    def validate_email_address(self, email_address_to_check):
        email_address = User.query.filter_by(email_address=email_address_to_check.data).first()
        if email_address:
            raise ValidationError('Email Address already exists! Please try a different email address')

    def validate_phone_num(self, phone_num_to_check):
        number = User.query.filter_by(phone_number=phone_num_to_check.data).first()
        if number:
            raise ValidationError('Phone number already used Please try using a different phone number ')

    username = StringField(label='First Name:', validators=[Length(min=2, max=30), DataRequired()])
As shown above what the code will do is to check is there is any information the user input is already existing in the User table database then if yes it will raise a validationError (explained earlier at the beginning of this tutorial).
Now to actually save the password bcryptically in our database we need to state that in the User model in our model.py file.
from market import bcrypt
 class User(db.Model):
    id = db.Column(db.Integer(), primary_key=True)
    username = db.Column(db.String(length=30), nullable=False, unique=True)
    lastname = db.Column(db.String(length=30), nullable=False, unique=True)
    email_address = db.Column(db.String(length=50), nullable=False, unique=True)
    phone_number = db.Column(db.Integer(), nullable=False)
    password_hash = db.Column(db.String(length=60), nullable=False)

     @property
    def password(self):
        return self.password

    @password.setter
    def password(self, plain_text_password):
        self.password_hash = bcrypt.generate_password_hash(plain_text_password).decode('utf-8')

    def check_password_correction(self, attempted_password):
        return bcrypt.check_password_hash(self.password_hash, attempted_password)

    def __repr__(self):
         f'User {self.username}'
As shown above we first of all import Bcrypt from our market module .Then the code will actually receive the user password and turn it to crypted form in our database.
Now we move to Login
Flask-Login
Flask-Login provides user management session management for Flask. It handles the common tasks of login in and login out. To get started we need to install it in our command line by running the code below
pip install flask_login
The next thing to do is to create a login manager class for the application in our init.py file as shown below
from flask_login import LoginManager
login_manager = LoginManager(app)
Now the next thing to do is to provide a user_loader() function callback. The callback is used to reload the user inject from the user ID stored in the session. Now we need to add the code below to in our models.py file
from market import db, login_manager

from flask_login import UserMixin

@login_manager.user_loader
def load_user(user_id):
    return User.query.get(int(user_id))
Now let’s talk about Flask-sessions
Flask-Sessions
The main use of session in these tutorial is to enable each client have their own session where their own data will be stored in their session when they are logged in.
Now let structure our login system. The first thing to do is to add the type of request method in the form created for login page just like we did for register page
<form method="POST" class="form-signin" style="color:white">
Then the next thing to do is to import the necessary things as shown below in route.py file
from flask import render_template,  redirect, url_for, flash, request, session
from flask_login import login_user, logout_user
import time
We imported time because we are going to need it to save the time someone post a blog, now to our login route.
@app.route('/Login', methods=['GET', 'POST'])
def Login_page():
    logform = LoginForm()
    if logform.validate_on_submit():
        attempted_user = User.query.filter_by(email_address=logform.username.data).first()
        me = logform.username.data
        session["username"] = me
        if attempted_user and attempted_user.check_password_correction(
                attempted_password=logform.password1.data
        ):
            login_user(attempted_user)
            flash(f'Success! You are logged in as: {attempted_user.username}', category='success')
            return redirect(url_for('blogs_page'))
        else:
            flash('Username and password are not match! Please try again', category='danger')
    return render_template('login.html', form=logform)
What the above code first do is to filter through the User table to check if the information provided as username exist in the database then it saves the username in a session then it also check if the password provide is the same as what is in the database then if it is, It will log the user in and redirect the page to the blogs page using the login_user() and also flashes a success message to the logged in user or it flashes a danger message if information provided does not exist. Now we are done with the login functionalities of our project.
Now let’s setup the route for writing blogs
@app.route('/writeblog', methods=['GET', 'POST'] )
def wblogs():
    localtime = time.asctime( time.localtime(time.time()) )
    form = WriteBlogs()
    if "username" in session:
            oruko = session["username"]
            surname = User.query.filter_by(email_address=oruko).first()
            surn = surname.username
            last = surname.lastname
            realname = surn +' '+last

    if form.validate_on_submit():

        blog_to_create = Blogs(name=realname,
                               blog_title=form.blog_title.data,
                               blog_content=form.blog_content.data,
                               time = localtime)

        db.session.add(blog_to_create)
        db.session.commit()
        return redirect(url_for('blogs_page'))
    return render_template('writeblog.html', localtime=localtime, form = form)
We can see from the above code using the time module python and also retrieving the data of the logged in user in the session. With the session data the code will get the logged in user’s full name and lastly the code saves the data to the Blogs table in our database including the time the blog was created then redirect the page to the blogs page likewise called the home page.
Now for a user to log out the code below is responsible
@app.route('/logout')
def logout_page():
    logout_user()
    flash("You have been logged out!", category='info')
    return redirect(url_for("home_page"))
We just need to create a route for it and then use the logout_user() function.
Now let configure the homepage route and every other necessary route, but before that we need to import our database
from market.models import User, Blogs
Then
@app.route('/')
@app.route('/home')
def home_page():
    blogs = Blogs.query.all()
    return render_template('home.html', blogs = blogs)
The code is making the blogs available to the home.html folder so the home.html file should me should be
{% extends 'base.html' %}
{% block title %}
    Home Page
{% endblock %}

{% block content %}
<center>
<div class="col-md-6 col-lg-8"" style="background-color: #343a40!important;
box-shadow: inset 1px -1px 1px #444, inset -1px 1px 1px #444;">
{% for blo in blogs %}

<p> <span style="font-size: 4ch;margin-right:10px;margin-bottom:0;">{{ blo.name }}</span>  on {{ blo.time }}</p>
<p> <span style="font-size: 4ch;">{{ blo.blog_title }}</span></p>
<p><span  style="margin-top:0">{{ blo.blog_content }}</span></p>


{% endfor %}
</div>
</center>
{% endblock %}
But we should know that the homepage for logged in users should be different from that of a visitor so here's the route for the homepage of a logged in user
@app.route('/signedblog', methods=['GET', 'POST'])
def blogs_page():
    blogs = Blogs.query.all()
    if "username" in session:
            oruko = session["username"]
            surname = User.query.filter_by(email_address=oruko).first()
            surn = surname.username
            last = surname.lastname
            realname = surn +' '+last
    return render_template('signedblog.html',realname=realname, blog=blogs)
The above code still using the data stored in the session of the current user to be able to send it to the HTML template rendered so has to know the particular blog created by the particular user as shown below I the signedblog.html file
 {% extends 'base.html' %}
{% block title %}
    Home Page
{% endblock %}

{% block content %}

<center>
    <a class="btn btn-lg btn-block btn-primary" href="{{ url_for('wblogs') }}">Clich here to write a Blog</a>
<div class="col-md-6 col-lg-8"  style="background-color: #343a40!important;
box-shadow: inset 1px -1px 1px #444, inset -1px 1px 1px #444;">
{% for blo in blog %}
{% if blo.name == realname %}
    <p> <span style="font-size: 4ch;margin-right:10px;padding:0px;" >{{ blo.name }}</span>  on {{ blo.time }}</p>
    <p> <span style="font-size: 4ch;">{{ blo.blog_title }}</span></p>
    <p>{{ blo.blog_content }}</p>
    <a href="/editblog/{{blo.id}}/" class="btn btn-primary">Edit Blog</a>
    <a href="/deleteblog/{{blo.id}}/" class="btn btn-danger">Delete Blog</a>
{% else %}
<p> <span style="font-size: 4ch;margin-right:10px;padding:0px;" >{{ blo.name }}</span>  on {{ blo.time }}</p>
<p> <span style="font-size: 4ch;">{{ blo.blog_title }}</span></p>
<p>{{ blo.blog_content }}</p>
{% endif %}
{% endfor %}
</div>

</center>
{% endblock %}
<style>
    #bod {
    background-color:#343a40!important;
    /* color: white */
    }
 </style>
The above code shows that a blog created by a logged in user has the functionality to edit and delete the blog. Now to delete the blog we can see that the link is sending the logged in user id in the database to a route that is shown below
@app.route('/deleteblog/<int:id>/', methods=['GET', 'POST'])
def delete(id):
    blog_to_delete = Blogs.query.get_or_404(id)

    db.session.delete(blog_to_delete)
    db.session.commit()
    return redirect(url_for('blogs_page'))
Now to delete it the function takes the id has an argument and search the Blogs table with the same id the delete it by using the db.session.delete().
As for the edit route the code below is responsible
@app.route('/editblog/<int:id>/', methods=['GET', 'POST'])
def edit(id):
    blog_to_update = Blogs.query.get_or_404(id)
    if request.method == "POST":


        blog_to_update.blog_title = request.form.get('blog_title')
        blog_to_update.blog_content = request.form.get('blog_content')

        db.session.commit()
        return redirect(url_for('blogs_page'))
    return render_template('editblog.html', blo =blog_to_update)
We can see that the route is rendering the below HTML template which is our editblog.html file
 {% extends 'base.html' %}
{% block title %}
    Home Page
{% endblock %}

{% block content %}
<center>
<div class="col-md-6 col-lg-8"" style="background-color: #343a40!important;
box-shadow: inset 1px -1px 1px #444, inset -1px 1px 1px #444;">
<form action="/editblog/{{blo.id}}/" method="POST">
    <label for="Blog Title">Blog Title</label>
    <input id="blog_title" class="form-control" value="{{blo.blog_title}}" name="blog_title">
    <label for="Blog Content">Blog Content</label>
    <input id="blog_content" class="form-control" value="{{blo.blog_content}}" name="blog_content">
    <input type="submit" class="btn btn-outline btn-success" value="Save" >
</form>
</div>
</center>

{% endblock %}
The form in the above code takes an action pointing to the edit route. However this is also giving the html access to all information in that route then it presented the blog information associated with that id the route is carrying in an editable input field then after making changes the user can click save
@app.route('/deleteblog/<int:id>/', methods=['GET', 'POST'])
def delete(id):
    blog_to_delete = Blogs.query.get_or_404(id)

    db.session.delete(blog_to_delete)
    db.session.commit()
    return redirect(url_for('blogs_page'))
Now to delete it the function takes the id has an argument and search the Blogs table with the same id the delete it by using the db.session.delete().
As for the edit route the code below is responsible
@app.route('/editblog/<int:id>/', methods=['GET', 'POST'])
def edit(id):
    blog_to_update = Blogs.query.get_or_404(id)
    if request.method == "POST":


        blog_to_update.blog_title = request.form.get('blog_title')
        blog_to_update.blog_content = request.form.get('blog_content')

        db.session.commit()
        return redirect(url_for('blogs_page'))
    return render_template('editblog.html', blo =blog_to_update)
After clicking the save button the function searches through the Blog table in the database with the id provided from the route then gets the data changes from the form in the editblog.html then save it only instead of adding a new data in the Bogs database.
Lastly in other to document all the various Flask libraries and modules you should run the code below to create the requirement file which automatically adds up all extension
pip freeze > requirements. txt
Since it's a blog application there won't be a need for an about me page but if you want to it shouldn't be too difficult to do .
Conclusion
I believe this article should be able to explain the basics of flask micro-framework and it's dependencies and extensions.

Top comments (0)