
This post is appeared in my blog.
Intro
I saw an interesting post in my favorite community Dev. "Do you track your achievements?" and I visited Florin Pop's timeline page. It's a very cool way to track achievements. I think tracking achievements is a great idea. By using the timeline, it's so easy to check out what I'm doing. But, one point to improve the timeline. I can give some effect to the timeline with React. Ok, let me bring that into my blog. First, I need to figure out how to deploy React in the GitHub pages.
Procedure
Required
I assume that you have a GitHub account. You might be familiar with a command-line interface (terminal or console). In your device, the npm and create-react-app are installed.
Create a repository
There's nothing special about this step. The traditional way to create a repository. We don't need .gitignore, license, and README.md. Frankly, it's up to your decision. To show a working example, I created a test-timeline2 repository. https://github.com/devjunhong/test-timeline2
Clone
Clone the created repository in your local device using this command.
$ git clone https://github.com/devjunhong/test-timeline2
Create react app
$ create-react-app test-timeline2
After this, the tool prints "Happy hacking!". By running it, we can check everything works properly.
$ cd test-timeline2
$ npm start

If we can see the first example page by create-react-app package like this, it works.
Add timeline component
We are going to use a timeline component to create our own. I found this component is applicable in our case. Here is a demo of this component. Looks pretty good. Let's bring the component in our project. We need 2 packages to run it.
current working directory) path/to/test-timeline
$ npm i react-vertical-timeline-component
$ npm install @material-ui/icons
The 'i' means 'install'. [1] Let's update the code. Open the "test-timeline2/src/App.js" and update the code like below.
import logo from './logo.svg';
import './App.css';
import { VerticalTimeline, VerticalTimelineElement }  from 'react-vertical-timeline-component';
import 'react-vertical-timeline-component/style.min.css';
import WorkIcon from '@material-ui/icons/Work';
import StarIcon from '@material-ui/icons/Star';

function App() {
  return (
    <div className="App">
      <VerticalTimeline className="vertical-timeline-custom-line">
        <VerticalTimelineElement
          className="vertical-timeline-element--work"
          contentStyle={{ background: 'rgb(33, 150, 243)', color: '#fff' }}
          contentArrowStyle={{ borderRight: '7px solid  rgb(33, 150, 243)' }}
          date="2011 - present"
          iconStyle={{ background: 'rgb(33, 150, 243)', color: '#fff' }}
          icon={<WorkIcon />}
        >
          <h3 className="vertical-timeline-element-title">Creative Director</h3>
          <h4 className="vertical-timeline-element-subtitle">Miami, FL</h4>
          <p>
            Creative Direction, User Experience, Visual Design, Project Management, Team Leading
        </VerticalTimelineElement>

        <VerticalTimelineElement
          iconStyle={{ background: 'rgb(16, 204, 82)', color: '#fff' }}
          icon={<StarIcon />}
        />
      </VerticalTimeline>
    </div>
  );
}

export default App;
Try to see the result.
$ npm start

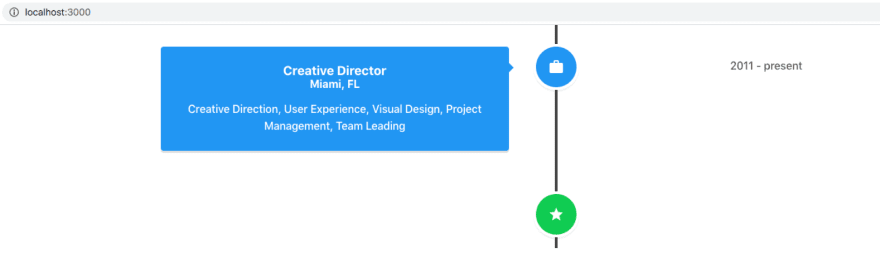
Do you recognize something strange? As we see in the demo, there's one vertical white line and date. In our example, those are missing. Actually, the color of those components are white same as the background color. We can solve this by using two approaches. One is changing the background of the page. Two is to change the color of the line and the date. Here I introduce the second one.
Let's open "test-timeline2/src/App.css" and add the following in below.
/* The line */
.vertical-timeline.vertical-timeline-custom-line::before {
  background: #424242;
}

/* date color */
.vertical-timeline-element-date {
  color: black;
}
Then, you'll see the line color and date are presented. Nice.
Publish using Github Page
Ok, we are sure that it runs in the local environment. Next, we are going to publish using the Github Page. And then, going to fill the contents in.
To publish our work, we need to install one more package.
$ npm i gh-pages --save-dev
The "--save-dev" option will save the package under devDependencies which is useful when installing only development packages that you may not want to ship in production. [2]
We need to update "test-timeline2/package.json" file.
"homepage": "http://replace_your_github_user_name.github.io/replace_repository_name"
The value of the homepage key should be like this. For example, mine is
"homepage": "https://devjunhong.github.io/test-timeline"
One more editing here under the "scripts". We should add two keys("predeploy" and "deploy").
"scripts": {
  "predeploy": "npm run build",
  "deploy": "gh-pages -d build"
}
Okay. It's time to publish. We need to enter this command.
$ npm run deploy

Fill the contents in
To fill the timeline with your story, we need to make copy of code and update the h3, h4 tags like this. Look what I change for content of the h3 tag and the h4 tag. I copied and change "Creative Director" to "UI Designer".
function App() {
  return (
    <div className="App">
      <VerticalTimeline className="vertical-timeline-custom-line">
        <VerticalTimelineElement
          className="vertical-timeline-element--work"
          contentStyle={{ background: 'rgb(33, 150, 243)', color: '#fff' }}
          contentArrowStyle={{ borderRight: '7px solid  rgb(33, 150, 243)' }}
          date="2011 - present"
          iconStyle={{ background: 'rgb(33, 150, 243)', color: '#fff' }}
          icon={<WorkIcon />}
        >
          <h3 className="vertical-timeline-element-title">Creative Director</h3>
          <h4 className="vertical-timeline-element-subtitle">Miami, FL</h4>
          <p>
            Creative Direction, User Experience, Visual Design, Project Management, Team Leading
        </VerticalTimelineElement>

        <VerticalTimelineElement
          className="vertical-timeline-element--work"
          contentStyle={{ background: 'rgb(33, 150, 243)', color: '#fff' }}
          contentArrowStyle={{ borderRight: '7px solid  rgb(33, 150, 243)' }}
          date="2007 - 2011"
          iconStyle={{ background: 'rgb(33, 150, 243)', color: '#fff' }}
          icon={<WorkIcon />}
        >
          <h3 className="vertical-timeline-element-title">UI Designer</h3>
          <h4 className="vertical-timeline-element-subtitle">Miami, FL</h4>
          <p>
            Design web page, User Experience, Project Management
        </VerticalTimelineElement>

        <VerticalTimelineElement
          iconStyle={{ background: 'rgb(16, 204, 82)', color: '#fff' }}
          icon={<StarIcon />}
        />
      </VerticalTimeline>
    </div>
  );
}
Pitfalls
In the publishing stage, I got stuck by 404 error on the GitHub page. I fixed it by changing the repository option. I tried to change the source of branch into master and then back to gh-pages. I see the expected result and the 404 error is gone.

Outro
In this post, I didn't update my achievements. Next time, I'm going to update mine and link from this blog to the timeline. If you have a problem or are stuck at some point. Please let me know you can leave a reply by hitting the reaction in the below. Also, you can endorse me to write more. Thank you.
Reference
[1] https://stackoverflow.com/a/49564133/5742992

Top comments (0)