
Testing a smart contract before deployment is important because smart contracts are immutable after deployment. Fortunately, Remix IDE from https://remix.ethereum.org has made this easy by providing us with an environment to test our smart contract without any extra setup. It provides us with test accounts and ethers that we can use to perform transactions on an ethereum test network.
In this article, we would be deploying and testing a logistics smart contract. To understand the concept of the smart contract and how it was built, you can check my previous article here.
Deploying our smart contract
Open Remix on your browser, and create a new file "Logistics.sol", if you haven't done that before.
Here is the full source code for our logisitics smart contract,
https://gist.github.com/Doctordrayfocus/8177bd086097ace3c5c6429bba0182d5We need to compile our code so that we can deploy it on the ethereum network. To do that, go to Remix and switch to the solidity compiler tab on the left. You don't need to make any extra setup, the default language should be "Solidity". Now, click on the "Compile logistics.sol" button to compile the code. You should see something similar to the image below.

- Lets proceed to deploy our compiled script. Switch to the deploy tab on Remix. Here, you can select the test environment but can also leave it at the default - "JavaScript VM (London)".

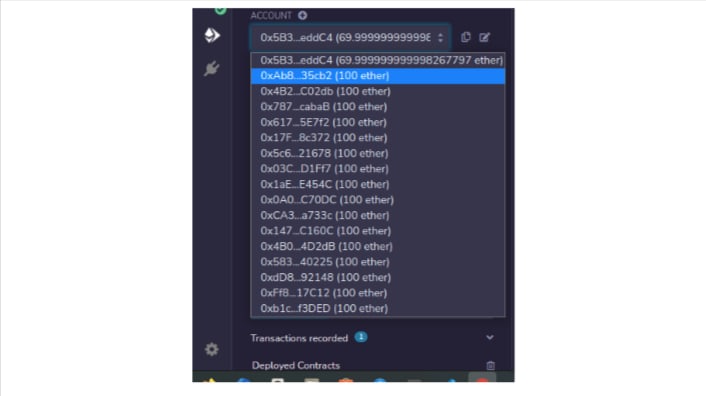
Next is the account drop down. Here, Remix has provided you with 15 test accounts. Select the first account. This account will serve as the Initiator and will be used to deploy the smart contract.
After the account field, the gas limit allows us limit the amount of gas that can be spent during the transaction. You can leave it at its default. Below the gas limit is a field allowing you set the cryptocurrency value to be sent along with a transaction. You can set the value to "30 ether".

- Next, click on the "deploy" button to deploy the smart contract. On the console, at the bottom rigth corner of your IDE, Just below the code area, you will see the transaction progress and success logs similar to the image below.

Also, your smart contract will be added to the list of deployed contracts as shown below.

Expand logistics contract and you will see buttons and text fields with names similar to the public state data and functions defined in the smart contract.
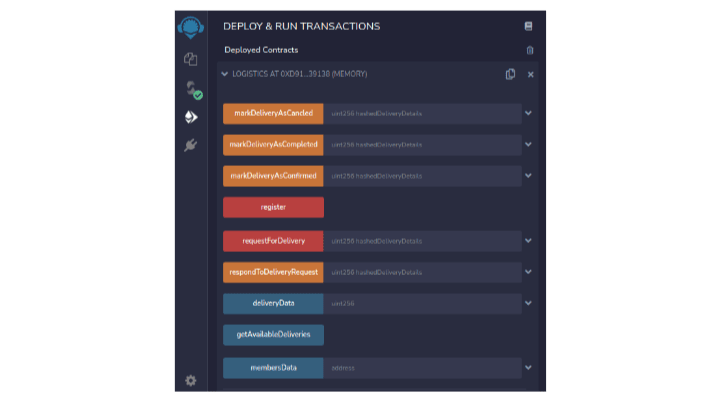
These buttons and text fields enable you to easily pass in data and call the smart contract functions directly from Remix.
Now, let's start testing by registering members to the smart contract using the test account Remix provided.
Testing our smart contract
Register a new member
We can achieve this by calling the register function in the smart contract. To register the first member, select a new account from the list of test account. Set the cryptocurrency value to 10 or above (This is a requirement that needs to be met to register a new member based on the smart contract code).
Move to the deployed logistics smart contract session and click on the Register button to invoke the register function of the smart contract which will register the account as a new member. The transaction will be logged in the console as shown below.

Copy the account address of the new member and paste it into a note and label it logistics1. Select a new account and repeat the same step to register the second member on the smart contract. Also, copy the account address and label it logistics2.

You can inspect the data of each member created by passing their account address and calling the membersData,

Request for delivery assistance
Let's make logistics1 request for a delivery assistance. To acheive that, switch back the selected account to that of logistics1. Call the requestForDelivery function of the smart contract by passing in the hashedDeliveryDetails as a random digit e.g (6905597967) and an ether value e.g (20 ether). Click on the **requestForDelivery **in the deployed smart contract. You can inspect the transaction in the console.

For futher testing, you can get the details of the delivery by passing in the hashedDeliveryDetails e.g (6905597967) and clicking the deliveryData button as shown below.

Respond to delivery request
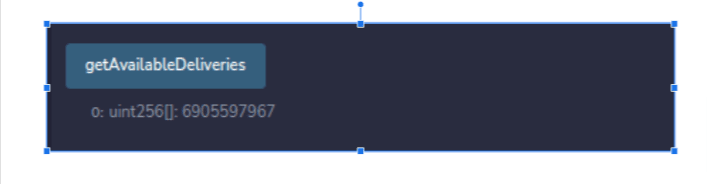
Let's make logistics2 respond to the delivery request. We would need to call the respondToDeliveryRequest function of our smart contract. To do that, we need to provide the hashedDeliveryDetails. We can easily retrieve all available deliveries by calling the getAvailableDeliveries function. This will return an array of the hashedDeliveryDetails of deliveries that are pending.
Change the selected account to that of logistics2, pass in the hashedDeliveryDetails and click on respondToDeliveryRequest button to call the equivalent function. You can inspect the transaction in your console.

After the response has been sent, the delivery will be removed from the available delivery. You can confirm by calling the getAvailableDeliveries again. It will not contain the hashedDeliveryDetails again.

Mark delivery as completed
Here, logistics2 will mark the selected delivery as completed by passing the hashedDeliveryDetails and calling the markDeliveryAsCompleted function. This can only be done by logistics2 and the initiator. You can inspect the transaction in your console.


Mark delivery as confirmed
Switch back the selected account to that of logistics1. Then call the markDeliveryAsConfirmed function by passing the hashedDeliveryDetails. This can also be called by the initiator on behalf of logistics1.


After the delivery has been confirmed, the reputation of logistics2 would increase and the delivery fee would be added to logistics2 balance. You can verify that by passing the account address and calling the membersData.

Unfortunately, I can't write tests for every possible scenario in this article. The tests above are positive tests i.e test made by passing in the correct data. You can perform the negative test by passing in the wrong data or using the wrong account to call a function, then inspect the response.
Conclusion
The goal of this article was to make you familiar with deploying and testing a smart contract using Remix IDE. I hope it was achieved.
You can connect to me on Twitter @drayfocus , and Linkedin Akinola Ayomide .
Cheers!

Top comments (0)