
How to Build a REST API CRUD App in Five
CRUD is a commonly used acronym in software and application development. The acronym describes the four basic operations that can be performed on a database: Create, Read, Update, and Delete.
As developers or database administrators, we are often tasked with creating user roles that carry different CRUD permissions.
Goals & Outcomes: Creating a REST API CRUD App in 4 Steps
In this how-to guide, we will go through the 4 steps of creating a REST API CRUD App. These steps are:
- Creating a New Application With Five.
- Using The Connection Wizard
- Using your API as a Data Source.
- Assigning CRUD Permissions.
Our final result will be a responsive REST API CRUD app for end-users to interact with.
- How to Build a REST API CRUD App in Five
- What Are CRUD Operations in SQL?
- How to Create A REST API CRUD Application in 4 Steps
- Conclusion
What Are CRUD Operations in SQL?
CRUD refers to Create, Read, Update, and Delete. Assigning and managing CRUD permissions is a very common task in programming.
CRUD describes the four basic operations that a user can perform in a database. Users can
- Create or insert new records into a table,
- Read or select existing records from a table,
- Update or modify existing records stored inside a table, or
- Delete or remove existing records from a table.
Permissions in a CRUD App
CRUD permissions refer to the permissions granted to anyone having access to a database to perform all or part of the four basic operations on data: Create, Read, Update, and Delete. By assigning CRUD permissions, developers control and govern access to data stored in a database.
In SQL, CRUD permissions are often managed by granting or revoking permissions to specific users or roles. These permissions are typically set at the database level or on individual tables within the database.
It’s essential to carefully manage CRUD permissions in a web app to protect data from unauthorized access, modification, or deletion.
By granting the appropriate permissions to trusted users or roles and denying them to others, application developers ensure that only authorized users can interact with the data in the database. This approach helps to maintain data integrity, security, and privacy.
Let’s say you are a restaurant owner and you’d like to make sure your staff can enter the kitchen, but your guests can only stay in the dining room. How would you solve this problem? Easy! You have two roles: staff and guest. Each role has its own permission to enter different parts of the restaurant.
This is what CRUD permissions do for databases: they are used to govern access. By using CRUD operations, developers can make sure that data stays safe and is only accessed as intended. CRUD permissions are a useful tool in a developer’s access control toolbox!
Now let’s dive in!
How to Create A REST API CRUD Application in 4 Steps
Step 1: Creating a New Application With Five.
Let’s start by creating a new application with Five. To do so, download Five from our website free of charge and launch it on your computer. The first screen you will see looks like this.

Here’s how to create a new web application using Five:
- Start by clicking on Applications in the top left corner.
- Next, click on the yellow Plus button.
- Give your application a descriptive name in the Title field, and save it by clicking the tick mark in the top right.
- Done: You have successfully created your first application in Five. Here’s what this should look like before clicking Save.

You will now see your new application in the list of all applications that you have created with Five.
Next, click on the blue “Manage” button that has appeared in the top right corner to access all of Five’s development features.

Step 2: Using The Connection Wizard
Let’s dive straight into connecting our API. For this tutorial, we’ll utilize the Dummy JSON API, which offers sample data for various products
We can start by clicking on Data and then navigating to Connection Wizard

After clicking on the Wizard, you’ll be presented with an interface that has some similarities to Postman. Start by selecting ‘New’ from the WebService lookup, then assign it a WebService ID and Name. For our purposes, we’ll use the name “DummyProducts.”
Next, apart from general, you’ll notice several other tabs at the top:
- Read List Mapping: This expects an endpoint that returns all records from the API using a GET method.
- Read Single Mapping: Requires an endpoint that provides a single record.
- Create Single: Here, you’ll need an endpoint where you can send a POST request to add a new record.
- Update Single: This is for an endpoint where you can use a PUT or PATCH method to update an existing record.
- Delete Single: This tab expects an endpoint that, through a DELETE request, allows you to remove a record from the API.
Setting up the Endpoints:
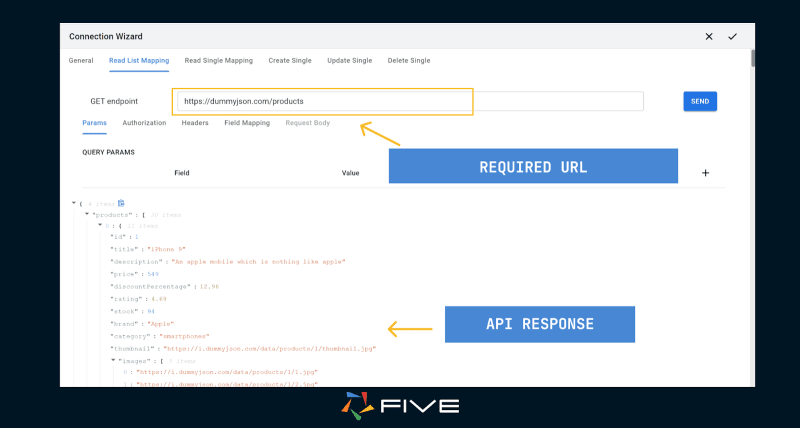
For the “Read List Mapping“, we’ll input the endpoint that fetches all records. Since we are Utilizing the Dummy JSON API, the relevant URL is: https://dummyjson.com/products (as mentioned on their official website)
Once you’ve entered the endpoint, click “Send” to view the returned results.
If your API mandates authorization or specific headers, you can set these up in the adjacent ‘Authorization’ and ‘Headers’ tabs.
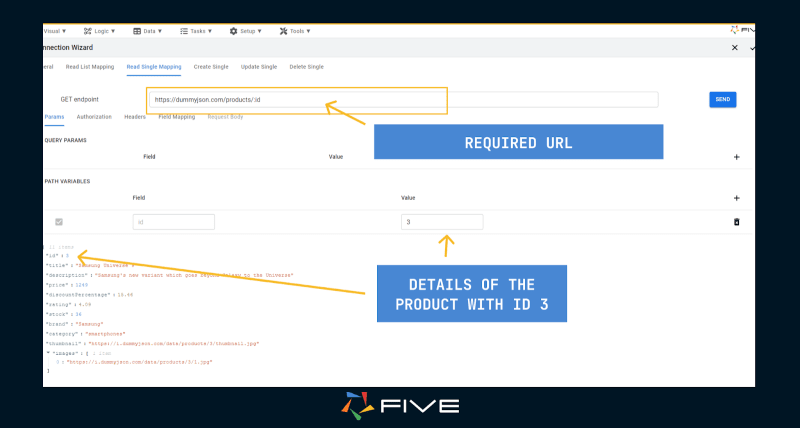
For “Read Single Mapping“, “Update Single“, and “Delete Single“, we’ll utilize an endpoint that fetches a specific record. According to the Dummy JSON website, the relevant URL structure is https://dummyjson.com/products/{productID}, where {productID} represents the product’s ID.
Let’s use this in the connection wizard now our URL should look something like this: https://dummyjson.com/products/:id where ‘id’ is the variable where we will pass the product’s ID
For the “Create Single Mapping“, we’ll use the endpoint https://dummyjson.com/products/add. This endpoint enables us to add new records to the API via a POST request.
Finally, we can click on save to store the connection
Step 3: Using API As a Data Source
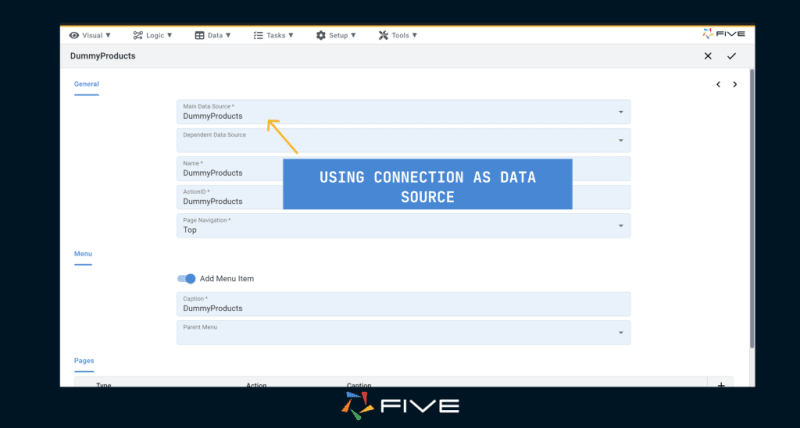
Now that we’ve established a connection in Five, it can be utilized as a data source. For the purpose of this tutorial, we’ll construct a basic form using this connection.
First, click on “Visual” followed by “Form Wizard”. In the primary data source lookup, choose “DummyProducts” (or any other name you might have given your connection).
Five will take care of populating most of the details for you. At this stage, you’re welcome to modify any settings as you see fit.
Click ‘Save’ to store the form, and then we can finally run our application

In your end-user application, you now have a form that contains all of the products from the API. You can click on each record to view their details, even make changes, add new records, and delete them as well.

Congratulations! You’ve successfully built an application on Five that uses an API as a data source in just three simple steps.
Step 4: CRUD Permissions
Once we’ve built our app it’s now time to assign CRUD permissions as outlined in this video:
-
Multi-User Conversion:
- Access the application settings within Five.
- Enable the “Multi-User” toggle, which automatically adds essential features like a login page, user management capabilities, and a default admin account setup.
-
Admin Account Setup:
- Upon running the multi-user app for the first time, log in using the default “admin” username and password.
- Immediately update the password to secure the admin account.
-
User Role Creation:
- Navigate to the “Roles” section under application settings.
- Create new roles (e.g., “Managers”) and define their permissions, focusing on what CRUD operations they can perform on specific tables or sections of the app.
-
Assigning Menus to Roles:
- Organize the app’s navigation by creating new menus or adjusting existing ones.
- Assign menus to specific roles, ensuring users only see navigation options relevant to their permissions.
-
Adding and Managing Users:
- Through the “Users” menu, add new users by providing details like username, email, and assigning them a role.
- Set initial passwords for these users, with an option for them to update upon first login.
In the video we use our order management template the process. For instance, “Managers” might have read and update access to order details but not the ability to alter product information.
To view the rest of our use cases click here
Five automatically creates a clean and intuitive admin panel user interface on top of your data for you.
Running along the top and the left-hand side, Five gives you a menu that lets end-users navigate through your application. On the top, you have icons for in-app help or a user avatar that is particularly handy for multi-user applications. And in the center, there is a main area for your users to interact with your application, its forms, charts, dashboards, or any other element that you decide to develop for them.
This user interface is customizable through themes, buttons, or custom front-end components. It also handles more complex data structures very well, by letting you add pages, drill downs, or parent-child menus.
Conclusion
Five is capable of building even complex applications. Follow this guided YouTube tutorial to delve deeper into Five’s features.
Whatever you wish to build with Five: Happy coding!

Top comments (0)