What are websockets?
Firstly, we know that HTTP is a unidirectional communication protocol that uses a request and response cycle. Each time a new request or response is sent, a new connection must be established. We see this often in fetch calls to RESTful APIs.
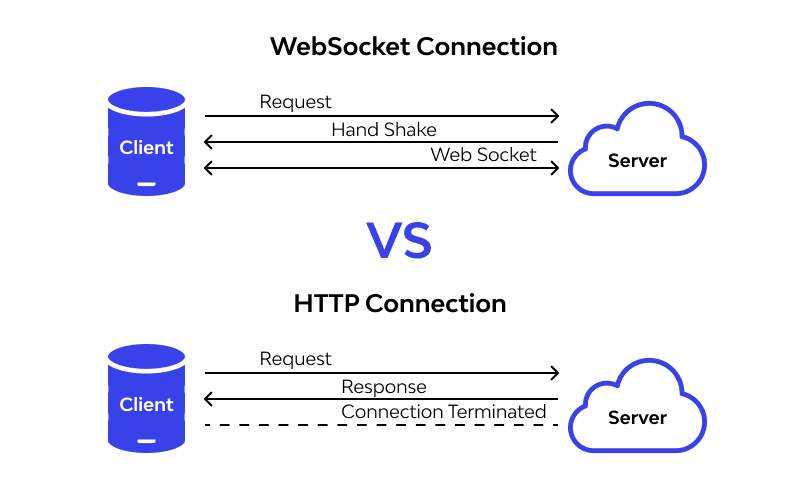
Just like HTTP protocol uses http:// and https://, websockets use ws:// and wss://. This diagram shows the major difference between HTTP and websocket connections.
After the request is sent in a websocket connection, instead of the connection closing and a response being initiated, the client and server have a handshake that allows the connection to be upgraded to websocket. This communication link is bidirectional, or full-duplex, and remains open so that messages can freely be exchanged between server and client without interruption until the connection is closed by either side.
What can we do with them?
Websockets are used in all sorts of real-time applications. I recently developed a full stack application that lets users create event boards to follow hashtags, and use those boards to stream live tweets from Twitter by connecting to Twitter's Streaming API endpoint. I wanted to share how I got started using Ruby on Rails ActionCable for websockets on the back end and @rails/actioncable npm package for the React front end.
Ruby on Rails comes with a built in package called ActionCable which provides seamless websocket integration on the back end. Once a channel has been established, we are able to easily call on ActionCable to broadcast anything we'd like!
To create this project I signed up for Twitter Developer Credentials and stored my API Keys in an config/application.yml file which I hid with a .gitignore file. I had decided on using Twitter's Filtered Stream endpoint, so I went to the Twitter-API-v2-sample-code repo to get started. The repo contains examples of all of the different streaming endpoints and sample code in multiple languages.
The filtered stream endpoint group enables developers to filter the real-time stream of public Tweets. This endpoint group’s functionality includes multiple endpoints that enable you to create and manage rules, and apply those rules to filter a stream of real-time Tweets that will return matching public Tweets. This endpoint group allows users to listen for specific topics and events in real-time, monitor the conversation around competitions, understand how trends develop in real-time, and much more.
developer.twitter.com
The sample Ruby code for connecting to the streaming endpoint looks like this:
# Connects to the stream and returns data (Tweet payloads) in chunks
def stream_connect(params)
  @options = {
    timeout: 20,
    method: 'get',
    headers: {
      "User-Agent": "v2FilteredStreamRuby",
      "Authorization": "Bearer #{@bearer_token}"
    },
    params: params
  }

  @request = Typhoeus::Request.new(@stream_url, @options)
  @request.on_body do |chunk|
    puts chunk
  end
  @request.run
end
At this point I was able to connect to the stream in my Rails console by running TwitterStream.stream_connect() which was very exciting. Further configuration is required to make use of the raw data our connection is receiving.
First we need to create the TweetChannel, which can be done manually or by running rails g channel tweet to have Rails generate one for you. Then we need to add in a little more information to let the channel know where to stream from. I go over this more below in the section on the front end setup.
class TweetChannel < ApplicationCable::Channel
  def subscribed
   stream_from "tweet_#{params[:rule]}"
  end
end
In my EventsController, I have an action that is triggered by a front end fetch request, that calls TwitterStream.stream_connect(event) and passes in an event object with some properties that I use to modify the way this application connects to the Twitter streaming endpoint. The starter docs provided by Twitter are a great place to start but of course every application will have unique needs, and there is so much more we can add in ourselves.
 def self.stream_connect(event)
    puts "Connecting to Twitter Stream"
      params = {
          "expansions": "attachments.media_keys,author_id,entities.mentions.username,geo.place_id,in_reply_to_user_id,referenced_tweets.id,referenced_tweets.id.author_id",
          "tweet.fields": "author_id,created_at,entities,attachments,geo,id,in_reply_to_user_id,lang,public_metrics",
          "user.fields": "name,username,verified,profile_image_url",
          "media.fields": "preview_image_url,alt_text,url"

      }

      options = {
          timeout: event.timeout,
          method: 'get',
          headers: {
              "User-Agent": "v2FilteredStreamRuby",
              "Authorization": "Bearer #{BEARER_TOKEN}"
          },
          params: params
      }

      request = Typhoeus::Request.new(STREAM_URL, options)
      request.on_body do |chunk|
        ActionCable.server.broadcast("tweet_#{event.rule_id}", { body: chunk});
      end
      request.run
  end
So we can see that above in the original sample code, Twitter had puts chunk which printed to the console any incoming data, which I replaced with ActionCable.server.broadcast("tweet_#{event.rule_id}", { body: chunk});, which is sending the params event.rule_id to the TweetChannel we created above, and also sending the chunk of raw data out to make its way to our front end. That single line of code is the game changer here, allowing us to simply broadcast anything coming through the websocket from Twitter, directly to the TweetChannel, and then on to our React front end.
Lastly, let's make sure to put mount ActionCable.server => '/cable' into our config/routes.rb to make sure we have somewhere to send a request for a websocket connection.
The Ruby on Rails docs has a lot of great information on how to use ActionCable in different parts of your application. But lets move over to the front end to see how all of this fits together.
Front end
The first step is to install the @rails/actioncable npm package so that we can connect the front end with our rails back end. Run npm install @rails/actioncable and we are ready to go.
import { createConsumer } from "@rails/actioncable";
import { useRef } from "react";

export default function Event() {
  const cable = useRef();

  useEffect(() => {
    if (!cable.current) {
      cable.current = createConsumer("ws://localhost:3000/cable");
    }

    // lets the back end know the channel to broadcast on
    const channelObj = {
      channel: "TweetChannel",
      rule: event.rule_id,
    };

  const handlers = {
      received(data) {
      // here you can add code to do something with
      // the data received from the websocket connection
         },
      connected() {
        console.log("connected");
         },
      disconnected() {
        console.log("disconnected");
        cable.current = null;
         },
      };

    const subscription =
      cable.current.subscriptions.create(
      channelObj,
      handlers
    );

    return function cleanup() {
      subscription.unsubscribe();
      cable.current = null;
    };
}, []);
Above is some very basic boilerplate code for getting started. Consumers require an instance of the connection on the client side. Using createConsumer() will get a connection to /cable ready on the server by default. But it won't actually do anything until you have specified a subscription. With our handlers and our channel object we are getting our parameters ready to be passed in to cable.current.subscription.create(). At the top of the file we create a variable cable and assign it to useRef(). This, combined with the code checking for !cable.current, ensure that we do not create a new subscription every time the component is re-rendered. This is going to help avoid glitchy behavior, and especially if in use with a chat style app, this will help avoid duplicate or out of order messages. The useEffect will make sure that this subscription is created, or found, on component renders.
The channelObject has 2 key/value pairs channel: "TweetChannel" and rule: event.rule_id, which correspond to the TweetChannel that we created earlier. When the subscription is created on the front end, it sends the information to the TweetChannel which it uses to stream_from the correct websocket connection.
class TweetChannel < ApplicationCable::Channel
  def subscribed
   stream_from "tweet_#{params[:rule]}"
  end
end
In the received method of the handlers variable, I take the incoming data, create a new Tweet object, where it is then added to a Tweets array, and animated onto the screen.
This project was the absolute most fun to create, and if you would like to see more details about it, check out this demo video.
Github repositories:
Front end: https://github.com/e-papanicolas/tweet-front-end
Back end: https://github.com/e-papanicolas/tweet-back-end

Oldest comments (0)