
As some of you might know, I've been doing live coding on Twitch for a couple months now, and so far I was able to do many experiments and try a lot of different settings with my OBS setup.
Twitch is a fun platform with loads of features and details that I'm still getting used to. The one thing I wanted to incorporate in my stream to be included in the video was the live chat, but after searching for ready-made solutions, I've realized that OBS for Linux doesn't have all the features that are available for other platforms. That didn't prevent me from getting it done, of course! I always find a way ;)
In this guide, I'll share how I implemented a Twitch Chatbot in PHP using Minicli, a dependency-free framework for PHP in the command line. I'll also share how I incorporated that into my live stream setup.
This implementation was based on the Twitch Guide for Chatbots.
If you'd rather just clone a repo and try it out, check Minichat's github repository or download the 0.1.0 release.
About Twitch's Stream Chat
Twitch uses an IRC server for all chats. Your stream chat is actually a channel with the same name of your twitch's username. The chatbot will connect to Twitch's IRC server, authenticate, and join the stream channel. From there, you can read the messages sent by other users and print them to the terminal or do more advanced things.
Prerequisites
To follow up, you'll need:
-
php-cli, 7.2 or higher - Composer to create a new Minicli project
- a Twitch account
Step 1: Bootstrapping the Application
Use Composer to bootstrap a new project based on Minicli:
composer create-project --prefer-dist minicli/application
Now access the newly created directory:
cd minichat
If you look into the minichat directory, here's what you'll find:
app composer.json composer.lock LICENSE minicli README.md vendor
Important directories and files:
-
app: your custom application files should be here. This is where the Commands folder is located by default. -
minicli: the minicli script is the executable you'll call from the command line. This is where the application is bootstrapped.
You can rename the minicli script for whatever you want. This is typically the name of the application, so we'll rename it to minichat:
mv minicli minichat
Run the help command to make sure everything is working as expected:
./minichat help
You should see output like this:
Available Commands

help
└──table
└──test
The application comes with three demo commands. This is where you can find each command controller:
-
help:app/Command/Help/DefaultController.php -
help table:app/Command/Help/TableController.php -
help test:app/Command/Help/TestController.php
This gives you an idea of how command autoloading works with Minicli.
We'll now create a new command called twitch. First, we'll create a directory called Twitch inside app/Command:
mkdir app/Command/Twitch
Open a new file called DefaultController.php inside this folder. Place the following bootstrap content in there:
<?php
#label app/Command/Twitch/DefaultController.php

namespace App\Command\Twitch;

use Minicli\Command\CommandController;

class DefaultController extends CommandController
{
    public function handle()
    {
        $this->getPrinter()->info("Starting Minichat...");
    }
}
After saving the file, you can run the new command with:
./minichat twitch
This will show the info text we defined in the handle method inside the command controller class.
Step 2: Obtaining a Twitch OAuth key
The oauth token is used as password to authenticate in Twitch's IRC server and give you access to your stream chat.
To quickly get a token for your account, use this Twitch Chat OAuth Password Generator (provided by Twitch).
Once you obtain your oauth token, open the minichat script located in the root of the application folder and include two configuration items that we'll access later from our command controller - twitch_user and twitch_oauth:
#!/usr/bin/php
<?php

if (php_sapi_name() !== 'cli') {
    exit;
}

require __DIR__ . '/vendor/autoload.php';

use Minicli\App;

$app = new App([
    'app_path' => __DIR__ . '/app/Command',

    #Twitch
    'twitch_user' => 'YOUR_TWITCH_USERNAME',
    'twitch_oauth' => 'YOUR_TWITCH_OAUTH_TOKEN'
]);

$app->setSignature("Minichat for Twitch.\n./minichat twitch");
$app->runCommand($argv);
With these credentials in place, you can now move on to connecting to the server.
Step 3: Connecting to the Server Using Sockets
To connect to Twitch's IRC server, we'll use sockets. Working with sockets is very similar to working with files, except that you'll be establishing a connection to a remove server in a specific port. These are the methods we're going to use:
- socket_create : creates a new socket using the address and port provided in the method call.
- socket_read : reads from the socket.
- socket_write : writes to the socket.
- socket_last_error : obtains last error from socket.
- socket_close : closes socket.
The following class provide methods to connect to the Twitch IRC server via sockets, authenticate with the provided nick and oauth password, and join the stream channel. It can read and write messages from/to the server:
<?php
#app/TwitchChatClient.php

namespace App;

class TwitchChatClient
{
    protected $socket;
    protected $nick;
    protected $oauth;

    static $host = "irc.chat.twitch.tv";
    static $port = "6667";

    public function __construct($nick, $oauth)
    {
        $this->nick = $nick;
        $this->oauth = $oauth;
    }

    public function connect()
    {
        $this->socket = socket_create(AF_INET, SOCK_STREAM, SOL_TCP);
        if (socket_connect($this->socket, self::$host, self::$port) === FALSE) {
            return null;
        }

        $this->authenticate();
        $this->setNick();
        $this->joinChannel($this->nick);
    }

    public function authenticate()
    {
        $this->send(sprintf("PASS %s", $this->oauth));
    }

    public function setNick()
    {
        $this->send(sprintf("NICK %s", $this->nick));
    }

    public function joinChannel($channel)
    {
        $this->send(sprintf("JOIN #%s", $channel));
    }

    public function getLastError()
    {
        return socket_last_error($this->socket);
    }

    public function isConnected()
    {
        return !is_null($this->socket);
    }

    public function read($size = 256)
    {
        if (!$this->isConnected()) {
            return null;
        }

        return socket_read($this->socket, $size);
    }

    public function send($message)
    {
        if (!$this->isConnected()) {
            return null;
        }

        return socket_write($this->socket, $message . "\n");
    }

    public function close()
    {
        socket_close($this->socket);
    }
}
Save this class in a file named TwitchChatClient.php inside the app folder.
We'll now use the TwitchChatClient class in the controller that handles the twitch command:
<?php
# app/Command/Twitch/DefaultController.php

namespace App\Command\Twitch;

use App\TwitchChatClient;
use Minicli\Command\CommandController;

class DefaultController extends CommandController
{
    public function handle()
    {
        $this->getPrinter()->info("Starting Minichat...");

        $app = $this->getApp();
        #obtains twitch credentials from app config
        $twitch_user = $app->config->twitch_user;
        $twitch_oauth = $app->config->twitch_oauth;

        if (!$twitch_user OR !$twitch_oauth) {
            $this->getPrinter()->error("Missing 'twitch_user' and/or 'twitch_oauth' config settings.");
            return;
        }

        $client = new TwitchChatClient($twitch_user, $twitch_oauth);
        $client->connect();

        if (!$client->isConnected()) {
            $this->getPrinter()->error("It was not possible to connect.");
            return;
        }

        $this->getPrinter()->info("Connected.\n");

        while (true) {
            $content = $client->read(512);
            $this->getPrinter()->out($content . "\n", "dim");
            sleep(5);
        }
    }
}
When you run the twitch command again, you should be able to connect to your chat and print messages coming from it:
./minichat twitch
You'll get output like this:
Starting Minichat...

Connected.

:tmi.twitch.tv 001 erikaheidi :Welcome, GLHF!
:tmi.twitch.tv 002 erikaheidi :Your host is tmi.twitch.tv
:tmi.twitch.tv 003 erikaheidi :This server is rather new
:tmi.twitch.tv 004 erikaheidi :-
:tmi.twitch.tv 375 erikaheidi :-
:tmi.twitch.tv 372 erikaheidi :You are in a maze of twisty passages, all alike.
:tmi.twitch.tv 376 erikaheidi :>

:erikaheidi!erikaheidi@erikaheidi.tmi.twitch.tv JOIN #erikaheidi
:erikaheidi.tmi.twitch.tv 353 erikaheidi = #erikaheidi :erikaheidi
:erikaheidi.tmi.twitch.tv 366 erikaheidi #erikaheidi :End of /NAMES list
Now if you access your Stream Manager on Twitch (inside the Creator Dashboard) and send messages in the chat window, you will receive the messages here like this:
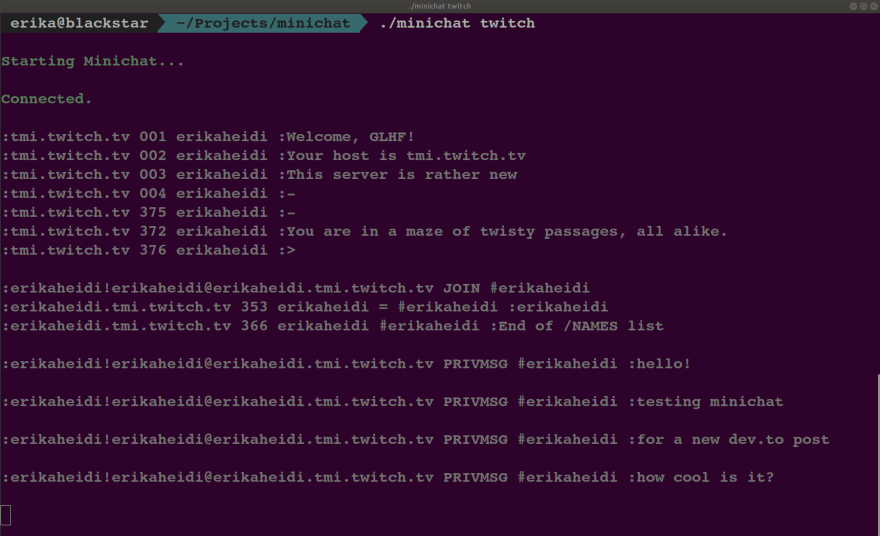
To exit, you must hit CTRL+C.
We don't need all that information, so in the next step we'll start parsing the messages before output.
Another thing you'll notice if you leave it open for a while, is that the server will regularly send you a PING message, and to stay connected, you gotta reply with a PONG. We'll also implement that in the next step.
Step 4: Parsing Messages
Parsing messages is important to:
- Know who sent the message (for recognition, for ignoring users and moderate the chat, etc)
- Recognize certain strings and handle message differently if necessary (like, to implement bot commands)
Let's have a look at the output produced by a new message sent to the chat:
:erikaheidi!erikaheidi@erikaheidi.tmi.twitch.tv PRIVMSG #erikaheidi :testing minichat
Two important things: we can recognize messages that aren't from the server like a 'PING' if we look for the string PRIVMSG in the text. Also, we can use the special characters : and ! in the string to filter it out and obtain nick + message.
This is the updated controller, now with an additional method to print the messages nicely:
<?php
#app/Command/Twitch/DefaultController.php

namespace App\Command\Twitch;

use App\TwitchChatClient;
use Minicli\Command\CommandController;

class DefaultController extends CommandController
{
    public function handle()
    {
        $this->getPrinter()->info("Starting Minichat...");

        $app = $this->getApp();

        $twitch_user = $app->config->twitch_user;
        $twitch_oauth = $app->config->twitch_oauth;

        if (!$twitch_user OR !$twitch_oauth) {
            $this->getPrinter()->error("Missing 'twitch_user' and/or 'twitch_oauth' config settings.");
            return;
        }

        $client = new TwitchChatClient($twitch_user, $twitch_oauth);
        $client->connect();

        if (!$client->isConnected()) {
            $this->getPrinter()->error("It was not possible to connect.");
            return;
        }

        $this->getPrinter()->info("Connected.\n");

        while (true) {
            $content = $client->read(512);

            //is it a ping?
            if (strstr($content, 'PING')) {
                $client->send('PONG :tmi.twitch.tv');
                continue;
            }

            //is it an actual msg?
            if (strstr($content, 'PRIVMSG')) {
                $this->printMessage($content);
                continue;
            }

            sleep(5);
        }
    }

    public function printMessage($raw_message)
    {
        $parts = explode(":", $raw_message, 3);
        $nick_parts = explode("!", $parts[1]);

        $nick = $nick_parts[0];
        $message = $parts[2];

        $style_nick = "info";

        if ($nick === $this->getApp()->config->twitch_user) {
            $style_nick = "info_alt";
        }

        $this->getPrinter()->out($nick, $style_nick);
        $this->getPrinter()->out(': ');
        $this->getPrinter()->out($message);
        $this->getPrinter()->newline();
    }
}
After updating your controller, run the ./minichat twitch command again and you will see only the actual chat messages, nicely formatted. Remember to go back to your Stream Manager on Twitch and send some messages in the chat.
This is how it looks on my terminal (with ZSH):
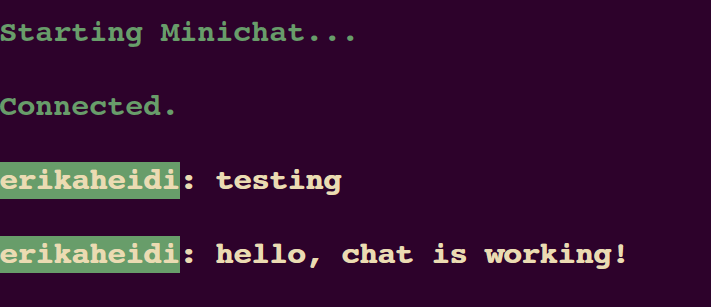
From here, you can improve the parsing of the messages so to implement chat commands, ignore lists, and recognition for your frequent viewers.
Step 5: Creating OBS Overlay
Now that you have the chat running on your terminal, you can use a window source on your OBS Studio to create the overlay.
What I usually do is I create a scene with the stream background and the elements I want to be fixed, like the chat window and possibly the webcam. You'll probably need to tweak the size of your terminal window and settings such as terminal theme and font size, so that it looks nice on your stream.
What I do is to create a custom profile for the chat window, so I can have a fully transparent background and a more custom font.
Hope you have enjoyed this tutorial, and feel free to suggest new tweaks and OBS hacks that you'd like to see :)

Top comments (0)
Some comments may only be visible to logged-in visitors. Sign in to view all comments.