
Introduction
There are several articles about how to create Symbol nodes connecting to Symbol Testnet or Mainnet networks. But, what if you want to create your own fully decentralized Symbol network for fun/testing?
If you want to test a Symbol network locally you can just use symbol-bootstrap. Run:
symbol-bootstrap start -p bootstrap -a multinode
This command will create a Symbol network bundled in a unique docker-compose. The compose runs 2 peers nodes, 1 API node, and a rest gateway.
This private network is great when testing new features, like a new transaction or new rest endpoint before the feature is deployed into a shared Testnet. Private local networks are also great for E2E testing, when you want to start a network in a given or "empty" state, run some operations, assert the new states and reset the network.
A local private network is not production-ready. Running multiple Symbol nodes in one machine is not recommended, it's not decentralized, other people cannot connect to the network easily.
In this guide, I'm going to explain how you can create your Symbol network, how you can create multiple 'seed' nodes, and how you can share the network configuration so other people can connect to it. The name of this Testnet is FerNet.
This guide uses a a new cli tool called symbol-network. The symbol-network cli scales symbol-bootstrap to create and manage multiple nodes, for new or existing networks.
Installation
Before starting, let's install the required tooling. The tolling required is the same as the standard symbol-bootstrap.
This guide assumes an Ubuntu distribution, other OSs would be similar.
1) Node, Docker, and Compose
curl -fsSL https://download.docker.com/linux/ubuntu/gpg | sudo apt-key add -
curl -sL https://deb.nodesource.com/setup_14.x | sudo -E bash -
apt-get update
apt-cache policy docker-ce
apt-get install -y unzip gcc g++ make nodejs unzip docker.io
docker --version

curl -L "https://github.com/docker/compose/releases/download/1.27.4/docker-compose-$(uname -s)-$(uname -m)" -o /usr/local/bin/docker-compose
chmod +x /usr/local/bin/docker-compose
docker-compose --version
2) Install symbol-bootstrap
npm install -g symbol-bootstrap
symbol-bootstrap version
symbol-bootstrap verify
3) Install symbol-network
npm install -g symbol-network
symbol-network version
symbol-network verify
Network Layout
Before running symbol-network, it's good to think about the network layout we want initially for our network. My fernet network would be:
- Based on Symbol Tesnet
- Single currency, named,
fernet.branca, same initial supply. - Network domain
fernet.wtf. No hostname prefix. - Network Type
Testnet - HTTP and HTTPS nodes
- 2 Voting Peers - 3M balance
- 1 Voting Dual - 3M balance
- 2 Harvesting Dual Nodes - 1M balance
- Explorer and Faucet (services)
- Some additional genesis block accounts for testing.
Network Configuration
Now that we know how the network should look, let's run the tool!
Init:
The first step is the init wizard:
mkdir symbol-fernet
symbol-network init --ready
The first questions are about the basic network configuration. These questions are the most common, advance tuning can be manually done later by changing the yml files this command creates.

This command asks for a 'master' password. The master password is used to encrypt the generated network and node keys.
The command skips this section if you are creating nodes for an existing network. For example, you want to create and maintain dozens of Testnet/Mainnet nodes.
The second part asks how many nodes you want to create for a new or existing network. We are going to fill in the numbers defined above.

Once the init command finishes, you can see that 3 files have been created:
-
network-input.yml: the not-expanded network layout. It defines how many of each node we want. If you pre-create this file,
symbol-network initwon't ask you any questions and just run. -
key-store.yml: The file that contains the network keys, nodes keys, and voting files the tool generates. The private values are encrypted using the provided
masterpassword. You can decrypt the file usingsymbol-bootstrap decrypt --source key-store.yml --destination key-store-plain.ymlcommand. Remember to removekey-store-plain.ymlafter use! -
custom-network-preset.yml: The network preset your nodes would use when running. These files are like the
-p mainnetand-p bootstrapfor your network. This is NOT the custom preset of a given node. You can tweak it, for example, change the network supply or inflation.
The cli tool will recommend the different commands you can run next to continue the network creation process.
Expand nodes:
The second automatic step 'expands' the nodes so each node can be customized independently.
symbol-network expandNodes
This command creates the following file:
-
network.yml: It contains each node configuration, including their custom preset. It's possible to tune it by changing the default hostnames, friendly names or adding new custom preset properties like
logLevel: Debug
Generate Nemesis:
The third automatic step is to 'generate' the nemesis block for your new network. The nemesis block includes all the seed nodes accounts, link transactions, faucet, and 'founder' accounts. The founder account is the account that keeps the remaining supply after the node and faucet account distribution. All these accounts can be found encrypted in the key-store.yml.
symbol-network generateNemesis
This command generates:
- nemesis-seed: A folder containing the nemesis block of your network.
-
nemesis-target: A folder containing a temporary node used to generate the nemesis block. You can validate the generated network configuration in
nemesis-target/nodes/node/server-config/resourcesandnemesis-target/reportsfiles.
The nemesis-seed block along the custom-network-preset.yml could be shared so other people can connect to the network after launch.
Try the Nemesis Node:
Before creating the nodes to be published in your VPC infrastructure, you can try how everything looks by running:
symbol-bootstrap start -t nemesis-target --noPassword --detached --healthCheck --report --pullImages
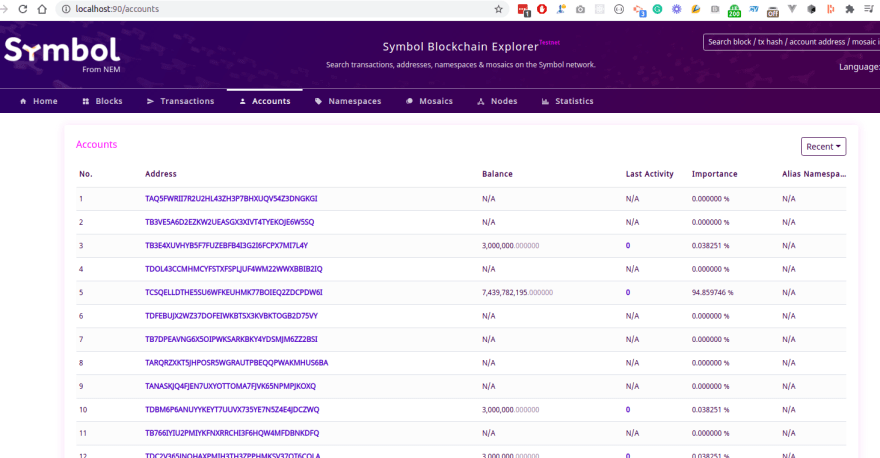
Go to the local explorer at http://localhost:90.
Explorer shows the nemesis block, the seed accounts, the nodes' link transaction, etc.


Once you are happy, just stop the node:
symbol-bootstrap stop -t nemesis-target
Node generation:
Finally, to create the nodes' target folders and zip distributions ready to be deployed in your infrastructure.
symbol-network configureNodes --offline --zip
This command will ask for a new password, the 'node' password. The node password is used to encrypt each node individually. It's the password symbol-bootstrap asks when running the different commands. Use a different password than the master password.
This last command generates:
- nodes: the generated configuration for each node.
- distribution: the zip files of the nodes ready to be pushed to the VPC boxes.
Configuration backups:
It's recommended you version the different created files. I use git to commit and backup the files.
git init
My .gitignore file:
nemesis-target/databases/
nemesis-target/nodes/node/logs/
nemesis-target/nodes/node/data/
nemesis-target/gateways/rest-gateway/logs/
logs.log
Then commit all the other files for future reference. You may or may not want to backup in a remote github repository. Node and network private keys are encrypted in the key-store.yml file.
Network Deployment
The symbol-network doesn't handle the deployment. It is outside the current scope of the tool. The possible infrastructures, cloud providers, and options are limitless.
This is up to the developer to script it. You can use bash and scp, you can use Terraform and S3 buckets or Ansible scripts, etc.
The required process is fairly simple though:
- Install symbol-bootstrap and its dependencies on each node VPC.
- SCP or Pull the zip to each node VPC, unzip.
- Update firewalls opening ports 80, 7900, 3000, 3001, 443 depending on the node type.
- Update the DNS values linking nodes' hostnames with the VPC IPs.
The deployment process is similar to this guide although the zips for all the nodes are pre-created, you just need to deploy and symbol-bootstrap run -d them.
Network launch:
To run the network, connect to each box and run:
symbol-bootstrap run -d
YES! You have just launched a new full Symbol Network!
Node update:
The general process to upgrade a node is installing a new version of the symbol-bootstrap, and probably a custom-network-preset.yml (global change) or a custom-preset.yml (node change) upgrade. Then run:
symbol-bootstrap stop
symbol-bootstrap start -c custom-preset.yml --upgrade
Allow new nodes to connect:
If you want another person to connect to your network, share with him the custom-network-preset.yml and nemesis-seed folder. Then this person can run:
symbol-bootstrap start -p custom-network-preset.yml -a dual -c my-new-node-custom-preset.yml
Note that official Symbol networks have the network preset and seed bundled on symbol-bootstrap. That's why you can just run -p testnet or -p mainnet. The process for the custom testnet network is the same, just that the network preset and nemesis seed are externally provided.
Contabo deployment
I deployed FerNet to contabo's VPCs. The nodes were located in:
- dual-001.fernet.wtf
- dual-002.fernet.wtf
- dual-003.fernet.wtf
- beacon-001.fernet.wtf
- beacon-002.fernet.wtf
- Faucet
- Explorer
They have been shut down to save costs!
Contabo costs around 12 USD per node.
The cost is quite lower than Hetzner although Contabo's console is not nearly as nice.
You may need to upgrade storage or processing power depending on how much the network is used.
Conclusion
I've created Symbol Network from my experience creating the initial Mainnet and latest Testnets' nodes. It bundles the original private tooling in a user-friendly and open-source cli that uses and scales Symbol Bootstrap.
This new cli tool allows you to create and maintain new Symbol networks quickly as well as nodes for existing networks without losing the configurability.
Have a look! Feedback is always appreciated!

Top comments (0)