
If you’ve been online lately, you’ve probably heard of Three.js, a web framework for 3D graphics. What you can do with it is absolutely stunning. However, if you want to display any complicated models which go beyond what a cube or a sphere can do, it’s best to create the model in a graphics application and then import it in Three.js. That’s where Spline comes in.
People have already built incredible things with Three.js. Here are a few examples: My room in 3D by Bruno Simons
Atmos by Leeroy
Joshua’s world
What is Spline?
Spline is a new online-based 3D software that allows just about any designer to create with intuitive tools. It doesn’t overwhelm you with menus and tools, it has just the basics. It has both a free and a paid version, but for most, the free tier does enough.
Creating a 3D model in Spline
To show what can be done, I decided to make a simple model: a “Roundel” – a circular disk with my logo which I was planning on using as part of my website identity.

To start off, create an account in Spline and open a new project. It will show you an window with a rectangle and a light, an empty slate if you will.
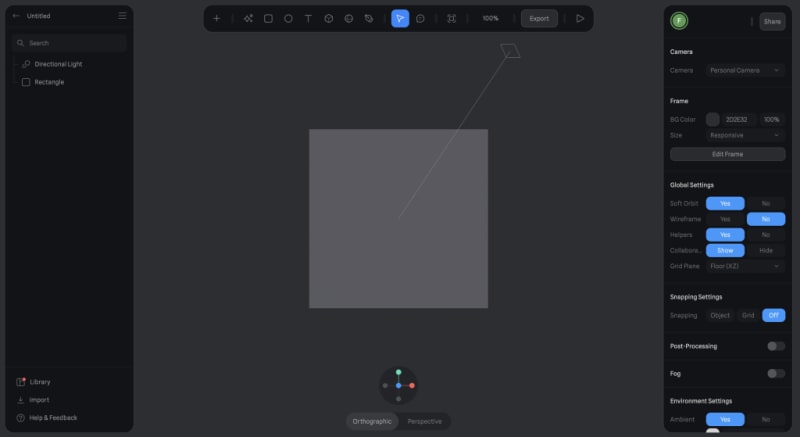
Opening a new project in Spline
If you’ve already used a 3D editor before, this should feel like child’s play. Otherwise, it’s a bit like using a 2D graphics editor like Figma or Sketch, except that everything is now in 3D.
There are four main sections to the editor:
- On the left, the items list shows the objects you have in your 3D scene.
- On the top center, a toolbar has options for adding shapes and lights, exporting, and previewing.
- On the right, the edit panel allows you to change attributes of the selected object.
Most of the commands are intuitive and explained by the onboarding process, but here are the most important ones:
- Alt + Drag – pan around the 3D scene
- Scroll – Shift around the 3D scene
- Alt + Scroll – Shift around on one axis only
In order to make my roundel, I started off by adding a circle. This is done by selecting “+” on the toolbar and selecting ellipse (O). Click and drag in the scene to place the circle. In order to make the ellipse circular, hold shift while dragging to constrain proportions.
We now have a 2D circle. To make it have volume and convert it to a cylinder, we can “extrude” it: Select the circle and add a value to the “extrusion” slider, under the shape menu. It might not look like we’ve changed much at first, but if you Alt+Drag, you’ll see that the circle now has a volume.

My extruded cylinder
I found the corners a little too sharp for my liking, so I decided to add a bevel to the cylinder’s vertices. This can be done by dragging the “Bevel” slider right under the extrusion slider.
Next, it’s time to add some text. This is delightfully easy in Spline, and I wish other 3D editors had the same ease-of-use. Select the “T” icon in the toolbar, and click on one of the surfaces of the cylinder. Each surface should highlight in red as you hover over it, indicating that the text will snap to it.

Each surface highlights when you hover it with the text tool.
Type your text and don’t worry if you don’t see anything – Every object you add to the scene has a default dull gray color – we’ll tweak the colors next!
Select the ellipse and add the color you want in the “Material” section of the object editor. I decided to go with my site’s pastel orange. I colored the text in black in the same way.

My colored cylinder and text
I wanted to change the font to reflect my site’s wordmark. This was extremely easy to do: select the text, go to the “font” menu. You can even upload a custom font!
My cylinder with cusomized font, rescaled
Next, to make everything 3D, I also extruded the text.
The last part is lighting. Since we’ll be exporting the design in a file format that lacks support for lighting, you don’t have to worry about this part, but I still believe this deserves mentioning. In the physical world, multiple cues exist to give us information about an object’s physical location: The stereoscopic information from our eyes, the texture of the object and the shadows it casts. Since we don’t get stereoscopic information on screens, we need to rely more heavily on other cues such as the reflectivity of the object and the shadows it casts. That’s where different lights come in play.

The three different light types in Spline
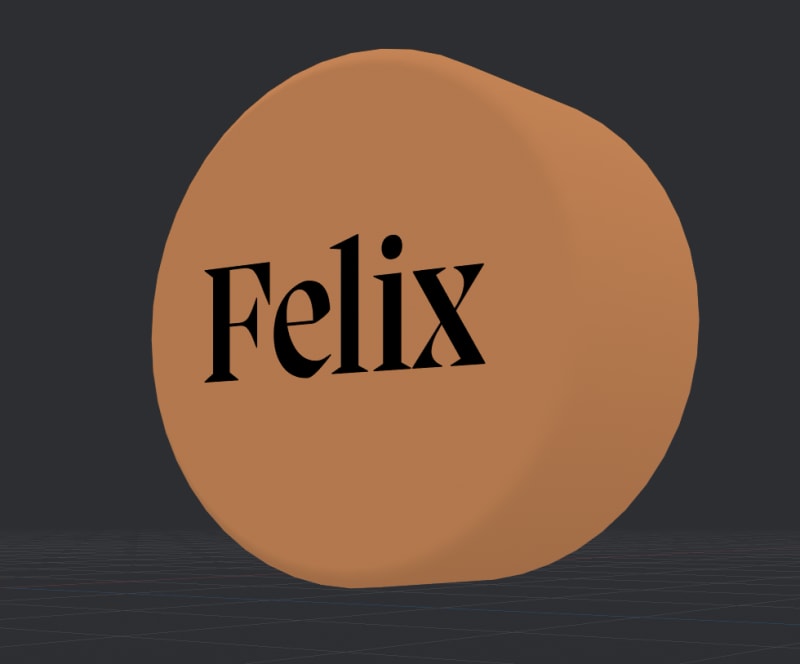
I won’t dive into the specifics of each light as it’s beyond the scope of this article, but you can play around with the different lights and see which one looks best. Most of the time I use a point light which is a single source of omnidirectional light. I like to position it so that it casts nice shadows – this is why I extruded the “Felix” lettering. When you’re in the editor, lights are represented by wireframes. Below you can see my model with a light in the top left corner casting shadows from my lettering.

My point light
Exporting
There are multiple formats you can export your 3D file in, some are free and others aren’t (for instance, you can export in formats suited for 3D printing or augmented reality). The easiest way for displaying the 3D model on the web is to use the embedded viewer or the code export, which provides you with code to import the model and display it in your web application.
However, I try to be careful about the technology I use, so I don’t get locked up in a proprietary “ecosystem”, and as Spline is closed-source, I feel more comfortable exporting the model to an open-source file format, even though it does complicate things a bit. To combat this, I’ll show you how you can do this in a React/Node.js project for free. After much trial and error, here’s the workflow I came up with:
Export the model as GLTF or GLB (It’s best to use GLB in production as it’s a compressed version of GLTF, GLTF being just JSON). It’s one of the free exports and is supported by Three.js. Save that to the public directory of your web project. The issue with spline exports to GLTF/GLB is that it doesn’t retain lighting or materials, only geometries are exported, however there is a workaround for that.
I use Next.js for my projects, this is what I found for that but a lot of it applies to other frameworks!
In order to see the different export options, click the “Exports” button on the middle toolbar.

The exports panel
If you go back to the “Exports” panel of your spline file and select the “Code export” tab, Spline automatically generates the positioning as well as the lighting in Three.js format. You can select which flavor of Three.js you use (I use react-three-fiber), and copy the code. For instance, here’s the code for my model:
/*
Auto-generated by Spline
*/
import useSpline from ‘@splinetool/r3f-spline’
import { PerspectiveCamera } from ‘@react-three/drei’
export default function Scene({ …props }) {
const { nodes, materials } = useSpline(‘https://[external spline URL]’)
return (
<>
<color attach="background" args="{['#74757a']}"></color>
<group dispose="{null}">
<pointlight name="Point Light" castshadow intensity="{0.82}" distance="{1379}" shadow-mapsize-width="{1024}" shadow-mapsize-height="{1024}" shadow-camera-near="{100}" shadow-camera-far="{100000}" position="{[-254.65,"></pointlight>
<group name="Group">
<mesh name="Text" geometry="{nodes.Text.geometry}" material="{materials['Text" castshadow receiveshadow position="{[-46.56," rotation="{[0,"></mesh>
<mesh name="Ellipse" geometry="{nodes.Ellipse.geometry}" material="{materials['Ellipse" castshadow receiveshadow position="{[-8.73," rotation="{[0," scale="{1}"></mesh>
</group>
<perspectivecamera name="1" makedefault="{true}" far="{100000}" near="{70}" fov="{45}" position="{[-949.88," rotation="{[-0.46," scale="{1}"></perspectivecamera>
<hemispherelight name="Default Ambient Light" intensity="{0.75}" color="#eaeaea"></hemispherelight>
</group>
>
)
}
Add the code provided from your Spline file as a new component (make sure to add the code provided by your project and not the one above as it’s project-specific!). You’ll notice that in the code there’s an external link to your project hosted on Spline servers, but don’t worry about that, we’ll get to it.
Next, you’ll want to install the following repositories to your project using npm or yarn:
@react-three/fiberthree@react-three/drei
We’re going to alter the code provided by Spline to import the self-hosted GLTF file. Replace the line with useSpline with the following code:
//Replace ‘/felix_roundel.glb’ with the path to your gltf/glb file
const gltf = useLoader(GLTFLoader, ‘/felix_roundel.glb’, loader => {
const dracoLoader = new DRACOLoader();
  dracoLoader.setDecoderPath(‘/draco/gltf/’);
  loader.setDRACOLoader(dracoLoader);
})
const { nodes, materials } = gltf;
This uses a “loader” which is a function that loads your 3D file. We use DRACOLoader as well, as it’s an optimization library for importing point clouds and meshes.
Next, you’ll want to head to the following path of your project: /node_modules/three/examples, and copy the draco file to the public folder of your project. This is one of the quirks of the dracoLoader: It not only needs a library import, but it needs to import a decoder using the setDecoderPath method (see https://stackoverflow.com/questions/56071764/how-to-use-dracoloader-with-gltfloader-in-reactjs). You can supply it with a local decoder hosted in your project’s public folder as I describe above, or alternatively you can link it to an externally-hosted library.
Remove the default export in the Scene function, and wrap it around a <Canvas> element. This is needed to prevent errors with paths (see https://stackoverflow.com/questions/75950437/nextjs-react-three-drei-typeerror-failed-to-parse-url). I know, there’s a lot of quirks to navigate around, but it’ll be worth it in the end! This is what your code should look like for now:
import { Canvas } from “@react-three/fiber”;
import { GLTFLoader } from “three/examples/jsm/loaders/GLTFLoader”;
import { DRACOLoader } from ‘three/examples/jsm/loaders/DRACOLoader’
import { PerspectiveCamera } from ‘@react-three/drei’
import { useLoader } from “@react-three/fiber”;
export function Object(){
const gltf = useLoader(GLTFLoader, ‘/felix_roundel.glb’, loader => {
const dracoLoader = new DRACOLoader();
dracoLoader.setDecoderPath(‘/draco/gltf/’);
loader.setDRACOLoader(dracoLoader);
})
const { nodes, materials } = gltf;
return (
<>
<color attach="background" args="{['#74757a']}"></color>
<group dispose="{null}">
<pointlight name="Point Light" castshadow intensity="{0.82}" distance="{1379}" shadow-mapsize-width="{1024}" shadow-mapsize-height="{1024}" shadow-camera-near="{100}" shadow-camera-far="{100000}" position="{[-254.65,"></pointlight>
<group name="Group">
<mesh name="Text" geometry="{nodes.Text.geometry}" material="{materials['Text" castshadow receiveshadow position="{[-46.56," rotation="{[0,"></mesh>
<mesh name="Ellipse" geometry="{nodes.Ellipse.geometry}" material="{materials['Ellipse" castshadow receiveshadow position="{[-8.73," rotation="{[0," scale="{1}"></mesh>
</group>
<perspectivecamera name="1" makedefault="{true}" far="{100000}" near="{70}" fov="{45}" position="{[-949.88," rotation="{[-0.46," scale="{1}"></perspectivecamera>
<hemispherelight name="Default Ambient Light" intensity="{0.75}" color="#eaeaea"></hemispherelight>
</group>
>
)
}
export default function Scene(){
return (
<canvas>
<object></object>
</canvas>
)
}
If you run the code, you’ll notice that everything looks a bit sad and gray. This is because react-three-fiber can’t find the materials in the GLTF/GLB file (exporting textures is a premium feature). We’ll add our own materials for the meshes. There are different materials available in Three.js, the most useful one I find is MeshPhongMaterial. It’s realistic and allows for shininess and shadows, and responds well to different types of lights. This is how you can define a material:
const material = new THREE.MeshPhongMaterial({
    color: 0x000000,
    transparent: false, opacity: 0.5,
    specular: 0x050505,
    shininess: 100
});
The color is provided in hexadecimal format, for instance if one wanted a bright red one would type 0xff0000. I had a few issues with color fidelity in my model (my oranges looked yellow, many colors appeared washed out), to combat this I used THREE.Color:
const color = new THREE.Color(‘#FF9A03’).convertSRGBToLinear();
const material = new THREE.MeshPhongMaterial({
    color: color.getHex(),
    transparent: false, opacity: 0.5,
    specular: 0x050505,
    shininess: 100
});
Create as many materials as you need and replace add them to the materials attribute of each mesh. As I wanted my model to have a transparent background, I also decided to remove the <color> tag.
You should be done! This is the final code for my model. You can view the output it generates here.
import { Canvas } from “@react-three/fiber”;
import { GLTFLoader } from “three/examples/jsm/loaders/GLTFLoader”;
import { DRACOLoader } from ‘three/examples/jsm/loaders/DRACOLoader’
import { OrbitControls, PerspectiveCamera } from ‘@react-three/drei’
import { useLoader, } from “@react-three/fiber”;
import * as THREE from ‘three’
export function Object(){
const gltf = useLoader(GLTFLoader, ‘https://felixrunquist.com/felix_roundel_2.glb’, loader => {
const dracoLoader = new DRACOLoader();
dracoLoader.setDecoderPath(‘https://raw.githubusercontent.com/mrdoob/three.js/dev/examples/js/libs/draco/’);
loader.setDRACOLoader(dracoLoader);
})
const { nodes, materials } = gltf;
const color = new THREE.Color(‘#FF9A03’).convertSRGBToLinear();
const ellipseMaterial = new THREE.MeshPhongMaterial({
color: color.getHex(),
transparent: false, opacity: 0.5,
specular: 0x050505,
shininess: 100
});
const textMaterial = new THREE.MeshPhongMaterial({
color: 0x000000,
transparent: false, opacity: 0.5,
specular: 0x050505,
shininess: 100
});
return (
<>
<group dispose="{null}">
<pointlight name="Point Light" castshadow shadow-mapsize-width="{1024}" shadow-mapsize-height="{1024}" shadow-camera-near="{100}" shadow-camera-far="{100000}" position="{[-254.65,"></pointlight>
<group name="Group">
<mesh name="Text" geometry="{nodes.Text.geometry}" material="{textMaterial}" castshadow receiveshadow position="{[-46.56," rotation="{[0,"></mesh>
<mesh name="Ellipse" geometry="{nodes.Ellipse.geometry}" material="{ellipseMaterial}" castshadow receiveshadow position="{[-8.73," rotation="{[0," scale="{1}"></mesh>
</group>
<perspectivecamera name="1" makedefault="{true}" far="{100000}" near="{70}" fov="{45}" position="{[-949.88," rotation="{[-0.46," scale="{1}"></perspectivecamera>
<hemispherelight name="Default Ambient Light" intensity="{0.75}" color="#eaeaea"></hemispherelight>
</group>
>
)
}
export default function Scene(){
return (
<div style="{{width:" height:>
<canvas shadows>
<orbitcontrols></orbitcontrols>
<object></object>
</canvas>
</div>
)
}
If you aren’t seeing any shadows, add the shadows attribute to your \<\Canvas\> tag.
All done! I hope this helps you get started with Spline and Three.js. Let me know if you have any issues and what 3D projects you make!
This article was retrieved from felixrunquist.com.

Top comments (0)