
Universal Analytics will no longer process new data in standard properties beginning July 1, 2023. It's not worth waiting for the last minute. We updated our Gatsby Starters to handle Google Analytics v4, and the below steps describe how we do this.
As Google says
Universal Analytics will no longer process new data in standard properties beginning July 1, 2023. Prepare now by setting up and switching over to a Google Analytics 4 property.
It's not worth waiting for the last minute. Also, the Google Analytics 4 offers some exciting features. If you use Universal Analytics (UA-* tracking code) in your Gatsby website, you should update your configuration.
We updated our Gatsby Starters to handle Google Analytics v4, and the below steps describe how we do this.
1. Change the Gatsby analytics plugin
This article assumes that you use the popular gatsby-plugin-google-analytics plugin. As its documentation says
Google has a guide recommending users upgrade to gtag.js instead. There is another plugin, gatsby-plugin-gtag, which uses gtag.js, and we recommend it.
So the first step is to replace the gatsby-plugin-google-analytics with gatsby-plugin-google-gtag.
yarn remove gatsby-plugin-google-analytics
yarn add gatsby-plugin-google-gtag
Next, replace the configuration in the "gatsby-config.js" file with new values:
module.exports = {
    plugins: [{
        // replace 'gatsby-plugin-google-analytics' with the new one
        resolve: 'gatsby-plugin-google-gtag',
        options: {
            trackingIds: [
                process.env.GA_MEASUREMENT_ID, // GA Measurement
            ],
            gtagConfig: {
                optimize_id: 'OPT_CONTAINER_ID',
                anonymize_ip: true,
                cookie_expires: 0,
            },
            pluginConfig: {
                head: true,
                respectDNT: true,
            },
        },
    }, // ...
    ]
}
To see possible configuration values check the official plugin documentation.
As you can see in the above snippet, we changed the GA_TRACKING_ID to GA_MEASUREMENT_ID. It's unnecessary, but it is more evident that we use GA v4 here. So, remember to update your .env files with a new variable.
GA_MEASUREMENT_ID=G-xxxx
How to get your new G-xxxx code? Read in the next section.
2. Generate a Measurement tag instead of a Tracking ID
In the next step, we replace the old tracking key (which starts with "UA-xxx") with the new key (named "Measurement Tag", which begins with "G-xxx").
Google supplies "Analytics 4 Property Setup Assistant", which helps us create a new tracking key. Follow the instructions below:
- Go to your current Google Analytics account.
Click the GA4 Setup Assistant for your Property.
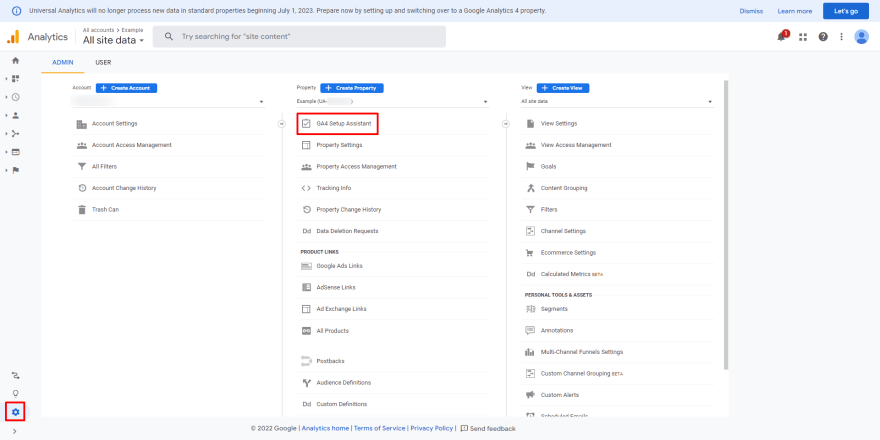
Confirm that you want to create a new Google Analytics 4 Property.

- Read the information in the confirmation box, and click the "Create Property" button

Now it's time to see your new property dashboard. Click "See your GA4 property".

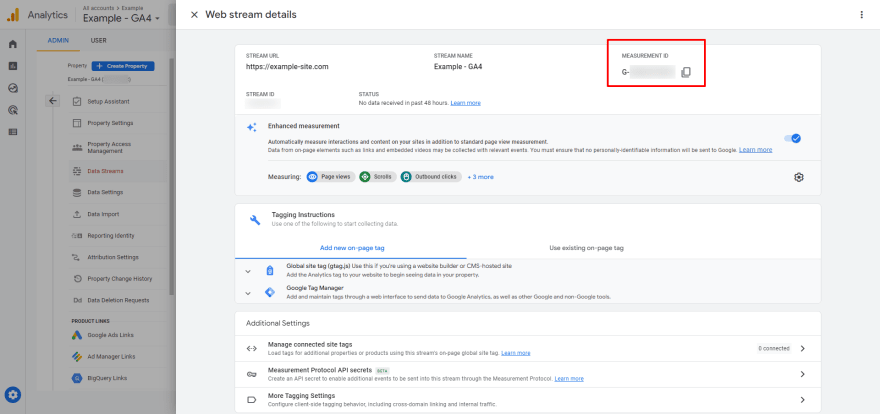
You can notice in the navigation bar that you are in the new dashboard. To get your tag, expand the "Tag installation" section.
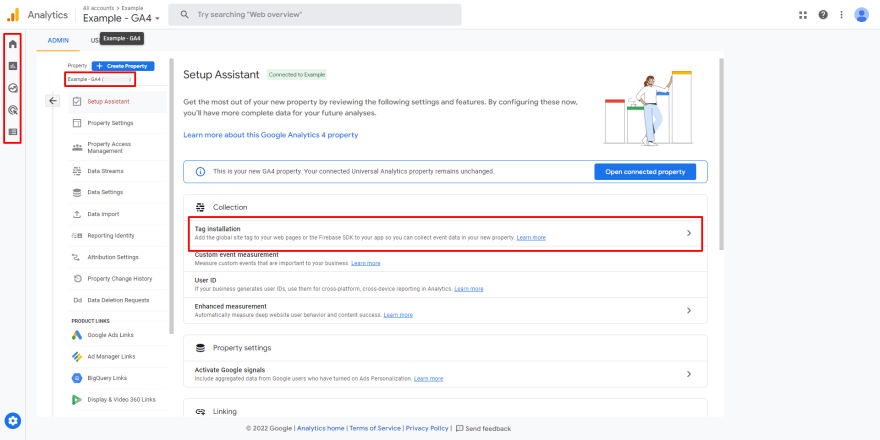
Now you can see your "Data streams". Your new entry should be present on the list. Click on it.
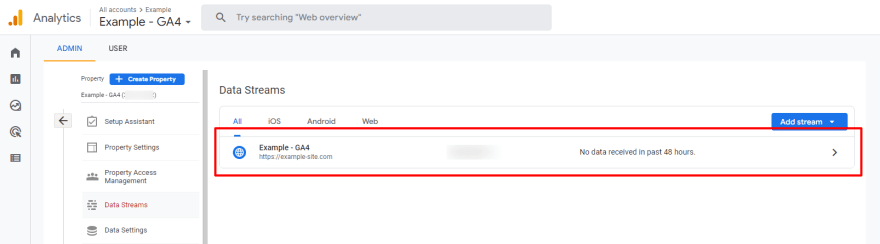
Here is the dashboard with all information required to integrate a new GA4 property with your site. For Gatsby Plugin Google Analytics, we need only copy the measurement id as our GA_MEASUREMENT_ID (to the .env file).
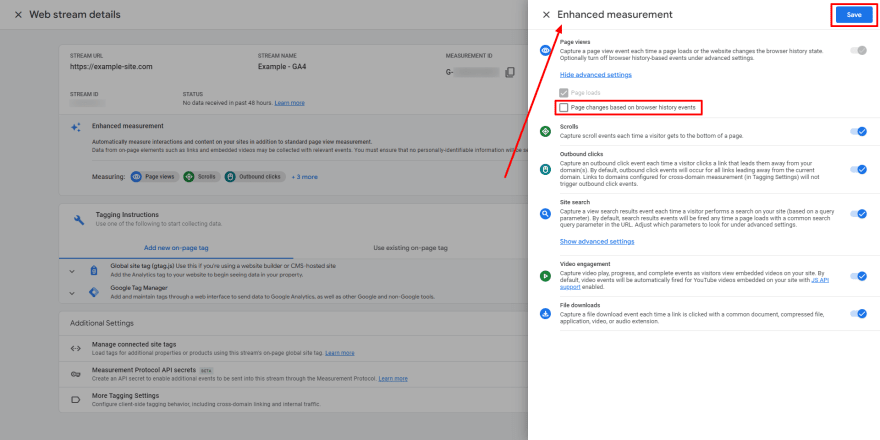
Its' almost done, but make sure to do one more thing.
As you remember, the Gatsby site is a single page application (routes are changed without site reload). We need to customize the configuration to track pageviews correctly, without doubled data.
In the "Enhanced measurement" section, click the settings "cog", "Show advanced settings", and uncheck "Page changes based on browser history events".
Now it's time for testing.
3. Test your Gatsby site with Analytics v4
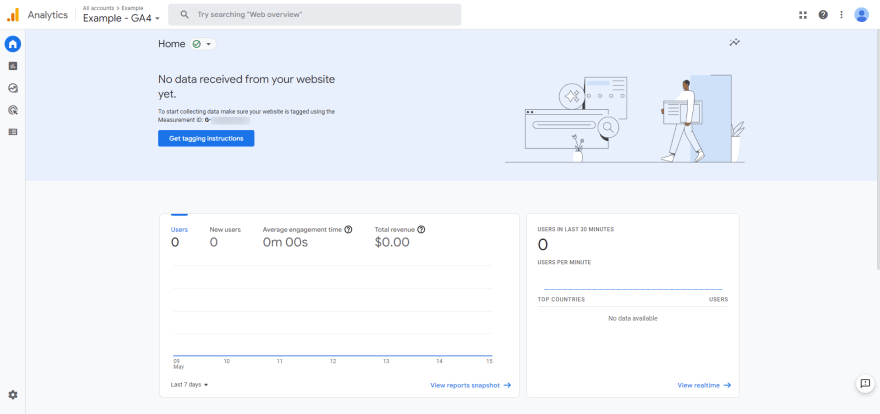
To check our integration, go to the Analytics Dashboard. Now we can see that no events are present.
Remember that the Gatsby Google Analytics Plugin will work correctly only in production mode. To test it, run the "build" and "serve" commands.
gatsby build
gatsby serve
Now go to http://localhost:9000 and wait a few seconds for the data.
Next steps
If you want to deep-dive into the differences between old analytics.js and new gtag.js, see the official Google Analytics migration guide. If you want to see GA v4 in action, check our Gatbsy Starters with Google Analytics (and much more) included.
If you decide to make a significant change to Google Analytics and think about a new website, then don't forget to check out the Flotiq Starters Gallery. You can find there and create a new project with free starters and boilerplates for any purpose, such as an online store, blog, recipe site, portfolio or even a calendar.

Top comments (0)