Public SPA challenge when it comes to use OAuth 2.0, is you cannot store any type of secrets of credentials in your code. This is why OAuth provided a special flow to be used by SPA: Authorization Code Grant & PKCE. We are going to describe this flow in details here.
Summary of the process:
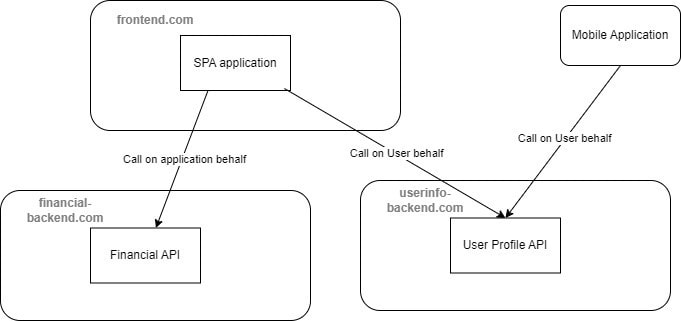
To describe the flow briefly, when the SPA requires to get a token it will direct the application to an Authorization Server (AS), which will use that server login page and UI, and the user will run the login process on the AS server website, then that server will return back to the original client website using a callback url passing the token to the SPA.
So the client SPA has no idea about the credentials and the client cannot intercept those credentials because the login run on Authorization Server website.
Let us imagine we have this setup and see how we will do that. I am going to use Auth0 service as an example:
How to configure Auth0
Before we start writing code, we should configure our API and our SPA application on Auth0.
I am not going to show the details on how to do it in Auth0, and assume you know how to do it.
- Create an API in Auth0, and configure its audience to be something like :
https://myapiserver.com" - Create an SPA application and get its
Client Id.
From Auth0 we need two values:
- the audience you used to create the API.
- the Client Id for the SPA application.
Details of the OAuth Authorization Code flow:
Here are the steps to achieve getting token from Authorization Code flow.
Step 1: call authorize endpoint
The process start when the SPA application will find it needs a token to access the remote resource, so it start the process by navigating to the Authorize end point: https://<your-tenant-id>.us.auth0.com/authorize passing the following information to this end point:
GET /authorize?
response_type=code
& client_id=<client_id>
& state=<state>
& scope=<scope>
& redirect_uri=<callback uri>
& resource=<API identifier>
& code_challenge=<PKCE code_challenge>
& code_challenge_method=S256 HTTP/1.1
Host: authorizationserver.com
The parameters are as follows:
- client_id: it is the application (SPA) you create on Auth0.
- audience: is the audience used in configuring API in Auth0. Other OAuth providers use the term
resourceinstead of audience, but it play the same function. - redirect_uri: the callback URL to your application. This call back should be one of the allowed url registered in your SPA Auth0 application.
- scope: this setting could be use to define the scope or permissions requested by the client. In OpenID Connect it can be only the value
openid profile, and in OAuth 2.0 usually it is the list:openid profile email offline_access. - response_type: should be "code" because Authorization Code flow * response_mode: should be "query" which means the code will return as query parameter.
- code_challenge: a value generated by PKCE code verifier to protect the code. code_challenge_method: S256, it is the recommended encryption to use.
- state: is an encrypted auto-generated string used to track calls during authorization process.
Step 2:
The Authorization Server find there is no valid token for this session, so it redirect it to its own login UI page:
GET /login?state=<state>
Step 3:
You provide your credentials in the login screen, and the Authorization server might take you to a consent page.
After Submit login, the page will do a post call to login as follows:
POST /login?state=<state>
Inside the post there is a form of the credentials:
- username
- password
Step 4:
The Authorization server will call back your SPA with the callback url you provided with the code as query parameter
HTTP/1.1 302 Found
Location: https://clientapplication.com/callback?
code=<authorization code>
& state=<state>
Last Step Step 5: generate token
Last step is you call the Authorization Server token endpoint with POST with the authorization code that generated from pervious step:
POST /token HTTP/1.1
Host: <auth0 tenant authorization url>
Content-Type: application/x-www-form-urlencoded
grant_type=authorization_code
& code=<authorization_code>
& client_id=<client id>
& code_verifier=<code verifier>
& redirect_uri=<callback URI>
The server will response with json with the token and refresh token, and maybe id_token (in case of OpenID Connect):
"access_token":"<refresh token>",
"token_type": "Bearer",
"expires_in":<token expiration>,
 "refresh_token":"<refresh_token>"
"id_token": "<id token>",
"scope": "openid profile email"
}

Top comments (0)