In the previous article on the best cache plugins, we introduced the most popular cache techniques and object cache is one of them. This technique is often combined with supporting software such as Redis, Memcached. In this article, let's find out what is Redis cache and how to use it to speed up your WordPress site.
What is Redis Cache and Its Benefits?
Redis stands for Remote Dictionary Server. It's an open-source, in-memory key-value data store. It can be used as a database, message broker, and of course, cache. Redis stores data in RAM, so its accessing speed is quite fast.
Redis cache is based on object cache. It stores data about objects that are usually requested by clients into RAM. Thus, web servers can use these data without accessing the database. This reduces the server load and makes your site run more smoothly (to get more details about how the web server handles requests, refer to this article).
Normally, Redis cache is used for websites having huge traffic or web server services. It's designed for Linux servers so you can install it easily on Linux distributions (CentOS, Ubuntu, Debian, ...). In this article, we'll install Redis cache on CentOS and Ubuntu.
How to Install Redis Cache on Your WordPress Website
To install Redis cache on your WordPress site, follow these steps:
- Install Redis on your web server
- Install Redis PHP Extension
- Install Redis Caching plugin
- Verify Redis Caching on WordPress
If you implement these steps exactly, it won't be difficult. Now let's do it!
Step 1: Install Redis on Your Web Server
First, make sure you installed WordPress on your server and it runs on Ubuntu / CentOS VPS. Additionally, you have to activate repo EPEL (Extra Packages for Enterprise Linux) on your server.
After that, install Redis on your web server by running these following commands:
To install Redis on Ubuntu VPS, run this command:
apt-get install redis-server
To install Redis on CentOS VPS, run this command:
yum install redis
Next, start and activate Redis on system boot by the following command:
systemctl start redis.service

systemctl enable redis.service
Step 2: Install Redis PHP Extension
Along with installing Redis, you need to install its PHP extension. This extension will allow WordPress to contact the Redis key-value store. To install this extension, run these following commands:
On Ubuntu VPS:
apt-get install php-redis
On CentOS VPS:
yum install php-pecl-redis
Step 3: Installing Redis Caching Plugin
Next, you have to install the Redis Caching plugin on your WordPress site. This plugin is available on wordpress.org. So you just need to install and activate it as usual (To get more details, refer to this article).
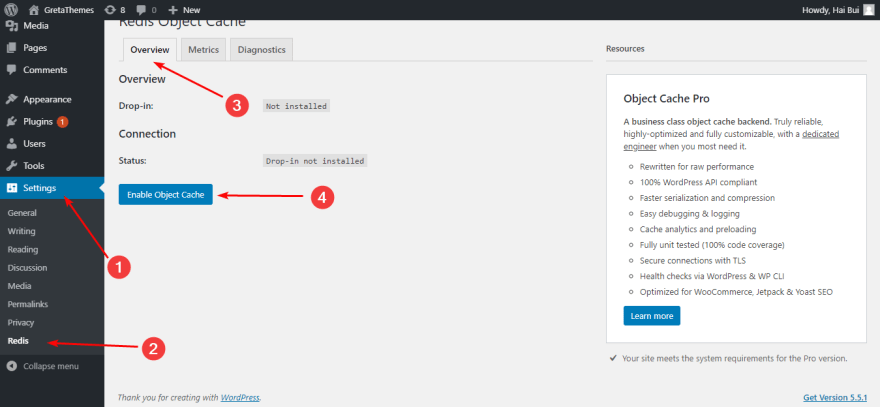
After that, go to Settings > Redis > Overview, set the default Redis listening address as 127.0.0.1 and the default listening port as 6379. Next, click Enable Object Cache.
Now you've finished installing Redis Caching plugin on your WordPress site!
Step 4: Verify Redis Caching on WordPress
To check if Redis cache works well on your website or not, connect to the web server via SSH and run this command:
redis-cli monitor
The above command will show all requests handled by Redis cache on your site. Therefore, you will know what is happening to your database. If requests appear as below, Redis cache is running on your site.
# redis-cli monitor

OK

1510415208.863435 [0 127.0.0.1:50076] "PING"

1510415208.865491 [0 127.0.0.1:50076] "GET" "wp_:default:is_blog_installed"

1510415208.870259 [0 127.0.0.1:50076] "GET" "wp_:options:notoptions"

1510415208.870433 [0 127.0.0.1:50076] "GET" "wp_:options:alloptions"

1510415208.871197 [0 127.0.0.1:50076] "GET" "wp_:site-options:1:notoptions"

1510415208.875126 [0 127.0.0.1:50076] "GET" "wp_:options:uninstall_plugins"

1510415208.882241 [0 127.0.0.1:50076] "GET" "wp_:wordfence:alloptions"

1510415208.913368 [0 127.0.0.1:50076] "GET" "wp_:site-options:1:notoptions"

1510415208.913547 [0 127.0.0.1:50076] "GET" "wp_:site-options:1:notoptions"

1510415208.916283 [0 127.0.0.1:50076] "GET" "wp_:site-options:1:notoptions"

1510415208.916434 [0 127.0.0.1:50076] "GET" "wp_:site-options:1:notoptions"

1510415208.947299 [0 127.0.0.1:50076] "GET" "wp_:site-options:1:notoptions"

1510415208.947480 [0 127.0.0.1:50076] "GET" "wp_:options:can_compress_scripts"

1510415208.947637 [0 127.0.0.1:50076] "GET" "wp_:site-options:1:notoptions"

1510415208.954565 [0 127.0.0.1:50076] "GET" "wp_:posts:last_changed"
That's all, now your website is powered with Redis cache.
Last Words
From now on, whenever your web server receives database requests, it can send cached data from Redis cache to save time and effort. If the requested data isn't cached by Redis, the web server will retrieve and process data from the database as usual. Thus, Redis cache will reduce the server load and make your website run more smoothly.
If you have any questions about Redis cache, feel free to share it with us in the comment section!


Latest comments (0)