In a world where every person, business and service requires a means to use infrastructure to create applications without having to set up servers to store data, serverless databases come into place.
This can be advantageous for engineers and developers as they can handle less infrastructure since serverless databases are made to handle unpredictable and varying sizes of data.
This article demonstrates how to integrate Xata - a serverless database, and its out-of-the-box features for storing and distributing sensitive data in React applications.
The complete source code of this project is on GitHub. Fork it to get started quickly. A live demo of the application is also available on Netlify.
Prerequisite
To comfortably follow along in this article, it would be helpful to have the following:
- Adequate knowledge of JavaScript and React.
- Node and its package manager,
npm. Run the commandnode -v && npm -vto verify that you have them installed, or install them from here. - A Xata account - Create one here.
- A Cloudinary account - Create one here.
NOTE: Do not share your Xata or Cloudinary API Key and API Secret with anyone.
Getting Started
Project setup and installation
To create a new project, we’ll run the following command in our terminal:
npx create-react-app <project-name>
Navigate into the project directory and install the necessary dependencies, @xata.io/client to integrate Xata and dotenv to access sensitive credentials.
cd <project-name> && npm install @xata.io/client dotenv -g
Running npm run dev will start the development server by default at http://localhost:3000 in our browser.
NOTE:
<project-name>above stands for the name of your app. Call it whatever name you want.
Setting up our Cloudinary image
Cloudinary is a cloud-based picture and video management service that offers tools to manage media-related assets such as uploading, storing, editing, optimizing, and distributing in web applications.
After successfully creating an account, Cloudinary redirects us to our account's dashboard. Click on the Upload button to select the image file to be uploaded.
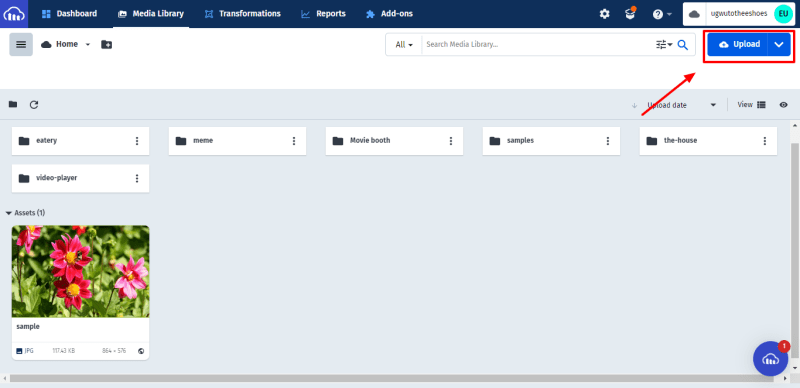
After uploading the images, copy the image’s URL, and we'll use it in our application.
Setting up a Xata project
Xata is a serverless data platform that provides an abstraction layer on top of several data stores to simplify the development and administration of applications.
Behind the scenes, Xata uses the PostgreSQL database, regarded as one of the best tools based on Postgres - a highly scalable relational database. Xata’s RESTful API also offers advanced search and analytics from a search engine/column store, Elasticsearch.
We'll push our application data to Xata’s database. To get started, create an account in Xata here.
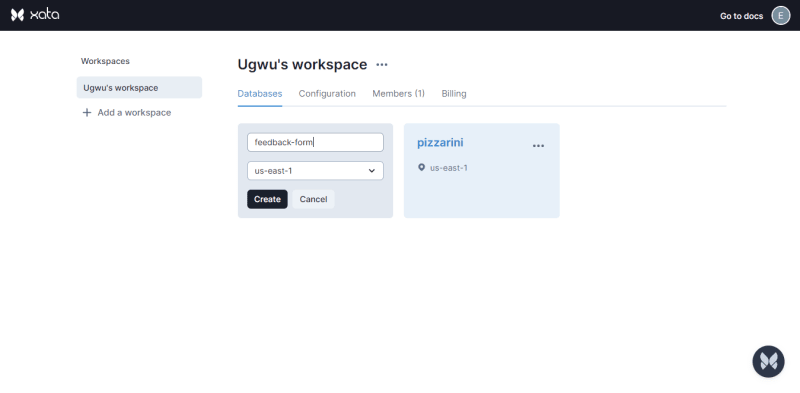
After logging in, we’ll be redirected to Xata’s workspace dashboard, as shown below, where we’ll create a new Xata database for the demo application. Click the Add a database button and add a suitable name for the database.


Click the + icon to define the schema of the table. All the tables have a required column - the id column, which provides a unique identity for each row.

Let’s also create other columns - name, email, favorite_car, and message. These columns will house the data we’ll get from our application.
Integrating Xata into our application
Using Xata CLI, let’s integrate and authenticate Xata into our application. Run the following command in our terminal:
npm install @xata.io/client -g && xata auth login
The command, xata auth login will prompt a message to either Create a new API key or Use an existing API key.
In this tutorial, we will use an existing key. However, to create a new API key, click the profile icon on Xata’s dashboard and select Account Settings.

After creating the API key, Xata CLI will authenticate with our application. We will also initialize a Xata project in our application.
xata init
Xata will present us varieties of options from which we can choose. This generates files such as .xatrc and .env. After the code generation process, we’ll add our credentials - API Key and Database URL in the .env file generated at the root directory of our project to hide them as they are sensitive information.
XATA_API_KEY="OUR_API_KEY"
XATA_DATABASE_URL="OUR_DATABASE_URL"
Building the form Component
While still in development, replace the default syntax in the App.js file with the code snippet below.
<div className="App">
   <div className="icon">
        <h2>Autopedic</h2>
   </div>
   <div className="homepage">
        <h1>Wanna win free car?</h1>
        <button>Click me!</button>
   </div>
</div>
Also, add this piece of code in the App.css file to apply a background image hosted on Cloudinary.
.homepage {
   margin: 6rem 0;
   padding-top: 7rem;
   background-image: url("OUR_CLOUDINARY_IMAGE");
   height: 40vh;
   background-position: center;
   background-repeat: no-repeat;
   background-size: cover;
 }
This is what our application will look like:

Pushing data to Xata’s database
In this tutorial section, we want to hide the current page, display a form, and push the form data to Xata’s database when we click the click me button. Let’s create a form which holds the data values in our application.
function App() {
  return (
   <div className="App">
      //navbar
      // homepage
       <form>
         <div className="container">
            <div className="label">
               <label>Name</label>
               <input type="text" name="name" />
            </div>
            <div className="label">
               <label>email</label>
               <input type="text" name="email" />
            </div>
            <div className="label">
                <label>What is your dream car?</label>
                <input type="text" name="favorite" />
            </div>
            <div className="label">
                <label>What can a car do for your right now?</label>
                <textarea type="text" name="message" />
                <button>submit</button>
            </div>
         </div>
       </form>
    </div>
}
Next, we’ll use conditional rendering to make the form available only when a user wants to give a feedback and vice versa.
const [isOpen, setIsOpen] = useState(false);
const toggle = (e) => {
     e.preventDefault();
     setIsOpen(true);
   };
const trigger = (e) => {
     e.preventDefault();
     setIsOpen(false);
   };
   return (
   <div className="App">
       <div className="icon">
          <h2>Autopedic</h2>
   {isOpen ? <button onClick={trigger}>go back</button> : ""}
       </div>
   {!isOpen ? (
       <div style={isOpen ? { marginTop: 0 } : { marginTop: 280 }}>
          <h1>Wanna win free car?</h1>
          <button onClick={toggle}>Click me!</button>
       </div>
          ) : ( "" )}
    {isOpen ? (
       <div className="section">
          <p>Stand a chance to win a free car from AutoPedic. Fill the form below to participate in the draw.
          </p>
       <form onSubmit={handleSubmit}>
                ...
       </form>
     ) : ( "" )}
    )
This is what our application will look like after applying the configurations mentioned above:

Let’s also assign a variable to our input values to get the data values of our form.
const [formData, setFormData] = useState({
    name: "",
    email: "",
    favorite: "",
    message: "",
   });
const handleChange = (e) => {
    e.preventDefault();
    setFormData({ ...formData, [e.target.name]: e.target.value });
      };
Then, we will make a request using Xata’s REST API that creates a new record in our database every time the form is submitted.
const updateData = () => {
const options = {
      method: "POST",
      headers: {
        Authorization: `"Bearer ${process.env.XATA_API_KEY}"`,
        "Content-Type": "application/json",
      },
      body: `{"name":"${formData.name}","email":"${formData.email}", "car":"${formData.favorite}","message":"${formData.message}"}`,
      };
      fetch(`"${process.env.XATA_DATABASE_URL}"`, options)
      .then((response) => response.json())
      .then((response) => console.log(response)).catch((err) =>
       console.error(err));
      };
We then need to reset our input elements whenever our form is submitted and transmit the user's feedback to Xata. To accomplish this, we'll build a handleSubmit method, reset our form, and then update our Xata database with fresh user feedback.
const handleSubmit = (e) => {
    e.preventDefault();
    updateData();
    setFormData({ name: "", email: "", favorite: "", message: "" });
    };
After applying the configurations, our demo application will look like this:

Conclusion
This article discussed using Xata's serverless tools to store sensitive information and, more importantly, integrating Xata into web applications built with Next.js.

Top comments (0)