This article was originally written by Farhan Hasin Chowdhury on the Honeybadger Developer Blog.
Web applications and software are generally satisfactory when they are fast. However, some tasks take time, such as sending an automated email or creating a detailed report by analyzing thousands of data points. Has a website ever made you wait on a loading screen while it sent a verification email to you? Probably not, because most web applications, at least the good ones, perform long-running tasks asynchronously in the background, which is what Laravel Queues allows you to do.
In this article, you'll learn how to process jobs asynchronously using queues and workers in Laravel. This article assumes that you have PHP, Composer, MySQL and Redis installed on your system, and you know how to bootstrap and start a new Laravel project.
Table of Contents
-
A Complete Guide to Queues and Workers in Laravel
- Table of Contents
- Introduction to Jobs, Queues, and Workers
- Queue Back-ends
- Queue Workers
- Job Classes and Dispatch Modes
- Dispatch Modes
- Connections and Queues
- Working with Multiple Connections
- Working with Multiple Queues
- More Common Configuration Options
- Job Failures and Retries
- Automatic Retries
- Automatic Retry Interval
- Catching Job Failures
- Chains and Batches
- Chains
- Batches
- Laravel Horizon
- Running Workers in Production
- Running Laravel Horizon in Production
- Conclusion
Introduction to Jobs, Queues, and Workers
Before diving into code, I would like to present you with a real-life analogy of doing things asynchronously. Imagine that you're the owner of a local grocery shop that takes orders by phone and then delivers the goods to the customer's doorstep.
Now, imagine that you get a phone call from a customer and take a new order. You then go to the storeroom, look for the individual products, put them in a box, and send them out for delivery. When using this approach, you cannot receive any new orders until you send out the current one. This is synchronous, and it blocks your I/O until you finish processing a long-running task.
Instead of taking a synchronous approach, you could hire an additional worker for the storeroom. This way, you can take a new order, note it down on a piece of paper (let's call it a job), and put the order in a queue.
One of the storeroom workers will pick one of the queued jobs, prepare the order, and send it out for delivery. The worker will then return to the queue, pick the next job, and start processing it. This is an asynchronous approach. Although hiring additional workers will require more resources, you'll be able to process more orders without blocking the I/O, resulting in better performance and customer satisfaction.
Now, let's see how you could implement the idea of a job, a worker, and a queue in Laravel. I hope you have already created a new Laravel project somewhere on your computer. Open the project in your favorite IDE and update the code for the routes/web.php file as follows:
Route::get('/', function () {

    dispatch(function() {
        sleep(5);
        logger('job done!');
    });

    return view('welcome');
});
The dispatch() helper function in Laravel sends a new job to a queue. Here, a job is regular PHP code in the form of a closure or class. You'll use a closure for now, but I'll introduce you to job classes very soon.
To simulate a long-running task, I've put an explicit delay of five seconds using the sleep function in the job closure. Then, I've used the logger() helper function to print the line "job done!" in the project's log file.
Start the project by executing the php artisan serve command or any other method you like and visit the / route. You'll see the browser hanging in a loading state for five seconds, and then the welcome page will show up. If you view the storage/logs/laravel.log file at this point, you'll see the line "job done!" printed there.
[2021-08-23 14:37:50] local.DEBUG: job done!
This means that the job ran successfully after the five-second delay, but there was a problem. The job was supposed to run asynchronously without blocking the I/O, but as you just observed, the browser was in a loading state for five seconds.
To understand why this happened, open up the project's .env file and look for the QUEUE_CONNECTION variable. This variable indicates the connection to the backend queue service in use. By default, Laravel sets the value of this variable to sync, which means that the framework will process all the jobs synchronously.
Queue Back-ends
To make asynchronous job-processing possible, you'll have to use a different backend. You can get a list of the pre-configured back-ends inside the config/queue.php file:
    'connections' => [

        'sync' => [
            'driver' => 'sync',
        ],

        'database' => [
            'driver' => 'database',
            'table' => 'jobs',
            'queue' => 'default',
            'retry_after' => 90,
            'after_commit' => false,
        ],

        'beanstalkd' => [
            'driver' => 'beanstalkd',
            'host' => 'localhost',
            'queue' => 'default',
            'retry_after' => 90,
            'block_for' => 0,
            'after_commit' => false,
        ],

        'sqs' => [
            'driver' => 'sqs',
            'key' => env('AWS_ACCESS_KEY_ID'),
            'secret' => env('AWS_SECRET_ACCESS_KEY'),
            'prefix' => env('SQS_PREFIX', 'https://sqs.us-east-1.amazonaws.com/your-account-id'),
            'queue' => env('SQS_QUEUE', 'default'),
            'suffix' => env('SQS_SUFFIX'),
            'region' => env('AWS_DEFAULT_REGION', 'us-east-1'),
            'after_commit' => false,
        ],

        'redis' => [
            'driver' => 'redis',
            'connection' => 'default',
            'queue' => env('REDIS_QUEUE', 'default'),
            'retry_after' => 90,
            'block_for' => null,
            'after_commit' => false,
        ],

    ],
As you can see, all Laravel projects come with five predefined back-end configurations. I'll introduce you to all of them, but for simplicity, let's use the database connection first. To do so, open the project's .env file and change the value of QUEUE_CONNECTION to database from sync and save the file.
QUEUE_CONNECTION=database
Next, execute the php artisan queue:table command to generate the migration script for creating the jobs table and migrate the database by running the php artisan migrate command. This table will hold all the queued jobs until a worker processes them. Now, clear the storage/logs/laravel.log file and view the / route.
This time, you'll see no delay in code execution, and the page will render almost immediately, indicating that the job is running in the background. After waiting for five seconds, if you check the storage/logs/laravel.log file, you'll find it empty.
Queue Workers
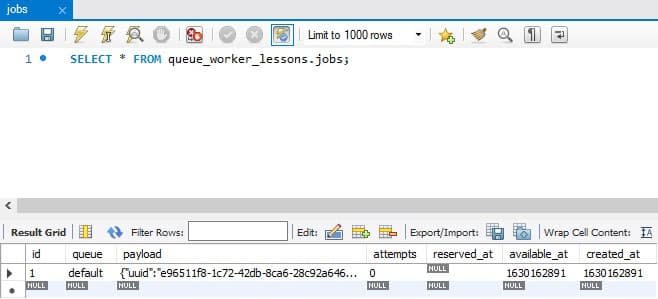
At this point, you may think that there must be something wrong, while the reality is that everything's working as expected. If you use a database client tool and look at the jobs table in your database, you'll see that the framework has indeed pushed a new job to the queue, but there are no workers to process it.
A queue worker is a regular process that runs in the background and polls the queue backend for unprocessed jobs. To start a new worker, execute the php artisan queue:work command inside your project directory. The worker will start and begin processing the unprocessed job immediately.
[2021-08-23 15:30:34][1] Processing: Closure (web.php:18)
[2021-08-23 15:30:39][1] Processed:  Closure (web.php:18)
Look at the storage/logs/laravel.log file, and you'll see the "job done!" line printed again. If you use a job class instead of a closure, the worker will print the job name instead of the word closure in the output. To process jobs automatically in the future, you'll have to keep the worker running. I'll show you how to keep the process running in the background in a later section.
Job Classes and Dispatch Modes
Now that you're familiar with fundamental concepts like jobs, queues, and workers, it's time to create your first job class. You can do this by executing the php artisan make:job <name> command. Create a new job and name it something like SendVerificationEmail for now.
php artisan make:job SendVerificationEmail

# Job created successfully.
The job classes in Laravel reside inside the app/Jobs directory. Open the app/Jobs/SendVerificationEmail.php file in your IDE.
<?php

namespace App\Jobs;

use Illuminate\Bus\Queueable;
use Illuminate\Contracts\Queue\ShouldBeUnique;
use Illuminate\Contracts\Queue\ShouldQueue;
use Illuminate\Foundation\Bus\Dispatchable;
use Illuminate\Queue\InteractsWithQueue;
use Illuminate\Queue\SerializesModels;

class SendVerificationEmail implements ShouldQueue
{
    use Dispatchable, InteractsWithQueue, Queueable, SerializesModels;

    /**
     * Create a new job instance.
     *
     * @return void
     */
    public function __construct()
    {
        //
    }

    /**
     * Execute the job.
     *
     * @return void
     */
    public function handle()
    {
        //
    }
}
Every job class implements the ShouldQueue interface and comes with constructor and handle() methods. The class also comes with four traits by default: Dispatchable, InteractsWithQueue, Queueable, and SerializesModels. You'll learn about these later on.
As you may have already guessed, the handle() method is where the magic happens. So, go ahead and update the handle() method as follows:
    /**
     * Execute the job.
     *
     * @return void
     */
    public function handle()
    {
        sleep(5);
        logger('email sent!');
    }
Now that you've moved the job code from the routes/web.php file, you'll have to update the route closure to use the job class. Open the routes/web.php file and update its code as follows:
<?php

Route::get('/', function () {
    dispatch(new \App\Jobs\SendVerificationEmail());

    return view('welcome');
});
The change is simple. Instead of passing a closure to the dispatch() helper method, you now pass an instance of the SendVerificationEmail class. Alternatively, you can also dispatch a job using the following syntax:
Route::get('/', function () {
    \App\Jobs\SendVerificationEmail::dispatch();

    return view('welcome');
});
The dispatch() method on the class itself comes from the Dispatchable trait that I mentioned earlier. Apart from the regular dispatch() method, the trait provides a few other methods allowing you to process a job in different ways:
-
dispatchIf()— Dispatch the job with the given arguments if the given truth test passes. -
dispatchUnless()— Dispatch the job with the given arguments unless the given truth test passes. -
dispatchSync()— Dispatch a command to its appropriate handler in the current process. -
dispatchAfterResponse()— Dispatch a command to its appropriate handler after the current process. -
withChain()— Set the jobs that should run if this job is successful.
I've taken these short descriptions directly from the trait's source code. Let's see a few of these methods in action.
Dispatch Modes
The dispatchIf() method, for example, lets you dispatch a job based on a conditional. Update the code of the routes/web.php file as follows:
Route::get('/', function () {
    $userSignedUp = false;

    \App\Jobs\SendVerificationEmail::dispatchIf($userSignedUp);

    return view('welcome');
});
One thing to remember is that you must restart the queue worker whenever you make some changes to your job code; otherwise, the queue will not pick up the changes and will run the previous code. Now, if you revisit the / route, you'll see no new jobs running. However, if you change the value of the $userSignedUp variable to true and revisit the / route, the job will run immediately. Just like the dispatchIf() method, the dispatchUnless() method lets you run a job based on a conditional. The difference is that the dispatchUnless() method only dispatches a job if the given conditional evaluates to false, such as sending a verification email unless a user signs up (which is a weird condition). To test this method, keep the value of the $userSignedUp variable set as true and replace the SendVerificationEmail::dispatchIf($userSignedUp); line with SendVerificationEmail::dispatchUnless($userSignedUp);. Save the file, revisit the / route, and you will not see any new jobs running.
The dispatchSync() and dispatchAfterResponse() methods let you run a job synchronously. The difference between the two methods is that the dispatchSync() method runs the job immediately, whereas the dispatchAfterResponse() method first returns the response to the user and then runs the job before closing the connection. Neither of these methods require a worker to be running in the background, and you can use them to run short-running jobs.
The withChain() method lets you run a chain of additional jobs if the current job succeeds. I'll discuss the concept of chains and batches in a later section. You may find it daunting to memorize all these methods, and the truth is you don't have to. You can look at the source code of the Illuminate\Foundation\Bus\Dispatchable trait or visit the Laravel API reference whenever you want.
Connections and Queues
You've already seen in a previous section that Laravel comes with several pre-configured back-end connections, and you've been using the database connection so far. In this section, you'll learn a bit more about the other ones, as well as go deeper into queues. To begin, let's go back to the config/queue.php file again and have a look at the available connection configurations.
    'connections' => [

        'sync' => [
            'driver' => 'sync',
        ],

        'database' => [
            'driver' => 'database',
            'table' => 'jobs',
            'queue' => 'default',
            'retry_after' => 90,
            'after_commit' => false,
        ],

        'beanstalkd' => [
            'driver' => 'beanstalkd',
            'host' => 'localhost',
            'queue' => 'default',
            'retry_after' => 90,
            'block_for' => 0,
            'after_commit' => false,
        ],

        'sqs' => [
            'driver' => 'sqs',
            'key' => env('AWS_ACCESS_KEY_ID'),
            'secret' => env('AWS_SECRET_ACCESS_KEY'),
            'prefix' => env('SQS_PREFIX', 'https://sqs.us-east-1.amazonaws.com/your-account-id'),
            'queue' => env('SQS_QUEUE', 'default'),
            'suffix' => env('SQS_SUFFIX'),
            'region' => env('AWS_DEFAULT_REGION', 'us-east-1'),
            'after_commit' => false,
        ],

        'redis' => [
            'driver' => 'redis',
            'connection' => 'default',
            'queue' => env('REDIS_QUEUE', 'default'),
            'retry_after' => 90,
            'block_for' => null,
            'after_commit' => false,
        ],

    ],
As you can see, the connections array contains individual configurations for the different queue back-ends. These configurations have distinct options, but the driver, queue, and after_commit options are the most commonly used.
People often get confused about the difference between the driver and the connection name. The connection name can be anything. Just because a queue connection uses a database as its back-end, you don't have to name it database. You can name it anything you want. The driver, however, must match one of the names the framework ships.
Now, does this mean you're limited to just these five driver options? What if you want to use RabbitMQ as the queue back-end? In such cases, Laravel allows you to use third-party queue drivers. Take the very popular vyuldashev/laravel-queue-rabbitmq, for example. It lets you use RabbitMQ as a queue back-end like the built-in ones.
Working with Multiple Connections
I've already explained how to set the default queue connection on the project's environment .env file using the QUEUE_CONNECTION variable, but what if you want to have multiple connections? You can do that as well. By default, when you dispatch a job, the framework will push it into the default queue connection. However, if you want to push a job into another queue connection, such as redis, you can use the onConnection() method.
Route::get('/', function () {
    \App\Jobs\SendVerificationEmail::dispatch()
    ->onConnection('redis');

    return view('welcome');
});
Working with Multiple Queues
Apart from multiple connections, there can also be different queues. The queue option indicates the default queue for a connection. Thus, if you dispatch a job without specifying a queue, the framework will push the job into the default queue. Imagine a scenario where you have jobs that must be processed before any of the others, regardless of which one comes first. To do so, update the route closure as follows:
Route::get('/', function () {
    \App\Jobs\SendVerificationEmail::dispatch();

    \App\Jobs\SendVerificationEmail::dispatch()
    ->onQueue('high-priority');

    return view('welcome');
});
You are dispatching the same job twice: on the default queue and then on the high priority queue. The name high-priority is made-up, and you can name a queue whatever you want. First, start the application and visit the / route without starting any workers. Then, look at the jobs database table.

As you can see, the first job is in the default queue, and the second one is in the high-priority queue. Dispatching a job in the high priority queue will not tell the framework which job to process first. You'll have to change the 'queue' => 'default' line for the database connection to 'queue' => 'high-priority,default' inside the config/queue.php file. Now, start a queue worker by executing the php artisan queue:work command, and the worker will prioritize the queue that comes first in the configuration value.
[2021-08-28 15:25:26][2] Processing: App\Jobs\SendVerificationEmail
[2021-08-28 15:25:31][2] Processed:  App\Jobs\SendVerificationEmail
[2021-08-28 15:25:31][1] Processing: App\Jobs\SendVerificationEmail
[2021-08-28 15:25:36][1] Processed:  App\Jobs\SendVerificationEmail
Indeed, the worker processes job 2 first and then processes job 1 because it has a low priority. Instead of setting the queue priority in the config/queue.php file, you can set it in the queue:work command by writing it as php artisan queue:work --queue="high-priority,default", which will have the same effect.
More Common Configuration Options
The third most common option among all the configurations is the after_commit option. If you dispatch a job within a database transaction, it's possible that while the job is running, the framework has not yet committed changes to the database. In such situations, especially if the job depends on values from the database, things can get out of hand. Setting the after_commit option to true will ensure that the framework dispatches the job only after committing database changes. You can set this option globally or for each job, which I'll teach you in a later section.
The retry_after configuration option is present in all of the back-end configurations except one. Amazon SQS uses SQS Visibility Settings instead. By setting the value of this option to 90 seconds, you're telling the framework that if a job doesn't succeed or fails within 90 seconds of being processed, the framework should consider it failed and try again. Typically, you should set this value to the maximum number of seconds your jobs should reasonably take to complete processing.
There are also worker timeouts that you can set by executing the php artisan queue:work --timeout=60 command. Setting the timeout to 60 means that if a job doesn't succeed or fails within 60 seconds, the worker will throw an error and exit. The official docs recommend setting the timeout to less than the retry interval. Otherwise, the framework may end up running your job twice before the worker timeout kicks in.
The effects of retry_after and timeout can be confusing, but they'll become clearer once you've dealt with them a few times. Apart from these four configuration options, the others in the sqs and beanstalkd back-end are mostly related to the back-end connection, such as the hostname and secret keys. However, I would like to discuss two options from the redis connection in a bit more detail.
The first one is the block_for option. When you set this option to 5, the worker will first open a connection with Redis and check for unprocessed jobs. If it doesn't find any, the worker will wait for 5 seconds before checking again. This option can save you some valuable CPU resources if you tune it properly.
The second one is the connection option. Seeing default as the value often makes people confused about whether it's multiple queue connections or something else. To understand this option, first, open the config/database.php file in your project, scroll to the bottom, and find code similar to the following:
    'redis' => [

        'client' => env('REDIS_CLIENT', 'phpredis'),

        'options' => [
            'cluster' => env('REDIS_CLUSTER', 'redis'),
            'prefix' => env('REDIS_PREFIX', Str::slug(env('APP_NAME', 'laravel'), '_').'_database_'),
        ],

        'default' => [
            'url' => env('REDIS_URL'),
            'host' => env('REDIS_HOST', '127.0.0.1'),
            'password' => env('REDIS_PASSWORD', null),
            'port' => env('REDIS_PORT', '6379'),
            'database' => env('REDIS_DB', '0'),
        ],

        'cache' => [
            'url' => env('REDIS_URL'),
            'host' => env('REDIS_HOST', '127.0.0.1'),
            'password' => env('REDIS_PASSWORD', null),
            'port' => env('REDIS_PORT', '6379'),
            'database' => env('REDIS_CACHE_DB', '1'),
        ],

    ],
As you can see, there are two separate Redis connection configurations here. One is the default connection, and the other is the cache connection. By default, the framework uses the default connection as the queue back-end, but you can define new ones here if you want. Thus, the connection option under redis inside the config/queue.php file refers to the default database connection for Redis.
Job Failures and Retries
So far, you've worked with jobs that have succeeded, but this will not always be the case. Like other code, jobs may fail, and based on your requirements, you can either retry a failed job or ignore it. A job can fail because of a timeout or an exception. Let's have a look at timeouts first.
To demonstrate this, go back to the app/Jobs/SendVerificationEmail.php file and update its code as follows:
<?php

namespace App\Jobs;

use Illuminate\Bus\Queueable;
use Illuminate\Contracts\Queue\ShouldQueue;
use Illuminate\Foundation\Bus\Dispatchable;
use Illuminate\Queue\InteractsWithQueue;
use Illuminate\Queue\SerializesModels;

class SendVerificationEmail implements ShouldQueue
{
    use Dispatchable, InteractsWithQueue, Queueable, SerializesModels;

    public $timeout = 1;

    // ...

    /**
     * Execute the job.
     *
     * @return void
     */
    public function handle()
    {
        sleep(5);
        logger('email sent!');
    }
}
The timeout public property indicates how long the queue worker should allow a job to keep running. Setting the timeout of a job to 1 indicates to the worker that this job should not run more than 1 second. Inside the handle() method, I've left the sleep() statement intact. So, theoretically, the worker will terminate the job after 1 second and mark it as a failed job. Restart the queue worker and revisit the / route. Look at the output from the worker, and you should see something similar to the following:
[2021-09-13 06:42:22][2] Processing: App\Jobs\SendVerificationEmail
[2021-09-13 06:42:22][2] Failed:     App\Jobs\SendVerificationEmail
fish: Job 1, 'php artisan queue:work' terminated by signal SIGKILL (Forced quit)
The last line in the output indicates that the queue worker has exited. I hope you understand by now that setting the $timeout to 1 inside a job is similar to setting it via the queue:work --timeout=1 command. In a production environment, a process manager, like a supervisor, will be in charge of restarting the queue worker.
The other way a job can fail is by simply throwing an exception. Open the app/Jobs/SendVerificationEmail.php file and update its content as follows:
<?php

namespace App\Jobs;

use Exception;
use Illuminate\Bus\Queueable;
use Illuminate\Contracts\Queue\ShouldQueue;
use Illuminate\Foundation\Bus\Dispatchable;
use Illuminate\Queue\InteractsWithQueue;
use Illuminate\Queue\SerializesModels;

class SendVerificationEmail implements ShouldQueue
{
    use Dispatchable, InteractsWithQueue, Queueable, SerializesModels;

    // ...

    /**
     * Execute the job.
     *
     * @return void
     */
    public function handle()
    {
        throw new Exception();

        sleep(5);
        logger('email sent!');
    }
}
The throw statement will simulate a typical code execution failure. I've also removed the timeout. If you restart the queue worker and revisit the / route, you'll see the following output from the worker:
[2021-09-13 06:32:26][1] Processing: App\Jobs\SendVerificationEmail
[2021-09-13 06:32:26][1] Failed:     App\Jobs\SendVerificationEmail
The worker attempted the job and marked it as failed as soon as the exception was thrown. You might wonder where these failed jobs go; they are stored the database. If you take a look at your database, you'll see there is a table called failed_jobs, which is responsible for holding all the jobs that didn't succeed for one reason or another.

The table stores important information, such as the connection, queue, payload, exception, and time of the failure. Instead of exploring the database directly, you can also use the php artisan queue:failed command to get a list of all the failed jobs.
+--------------------------------------+------------+---------+--------------------------------+---------------------+
| ID                                   | Connection | Queue   | Class                          | Failed At           |
+--------------------------------------+------------+---------+--------------------------------+---------------------+
| d10fbacb-7cce-444f-ab56-c78bf7612f32 | database   | default | App\Jobs\SendVerificationEmail | 2021-09-14 15:53:54 |
| 978ce868-90b5-49c4-a202-9038b20d745b | database   | default | App\Jobs\SendVerificationEmail | 2021-09-14 15:53:22 |
+--------------------------------------+------------+---------+--------------------------------+---------------------+
You can retry jobs stored in this table either manually or automatically. To manually retry a job, use the php artisan queue:retry command. The command takes a job ID as an argument.
php artisan queue:retry d10fbacb-7cce-444f-ab56-c78bf7612f32

# The failed job [d10fbacb-7cce-444f-ab56-c78bf7612f32] has been pushed back onto the queue!
The framework has released the job back to the queue. Start a queue worker, and it will process the job immediately. The job will fail again because you've programmed the job to always fail. Even if you remove the $timeout value, the job will remember the old configuration and repeat it.
The queue:retry command has some alternate syntaxes as well. It can take multiple job IDs or even a range of IDs. You can even retry all jobs at once by executing the php artisan queue:retry --all command. Alternatively, if you want to retry failed jobs from a certain queue, you can execute the php artisan queue:retry --queue=high-priority command. You can even remove failed jobs from the database by executing the php artisan queue:forget command. Just like the queue:retry command, this one also takes the job ID as an argument.
Automatic Retries
I know that retrying jobs using an artisan command in a production environment seems awkward, and I personally have never done it. You'll either use a GUI (which I'll talk about in a later section) or configure the jobs to retry automatically. To retry a job automatically, set the $tries public property on the job class. Update the app/Jobs/SendVerificationEmail.php file's content as follows:
<?php

namespace App\Jobs;

use Exception;
use Illuminate\Bus\Queueable;
use Illuminate\Contracts\Queue\ShouldQueue;
use Illuminate\Foundation\Bus\Dispatchable;
use Illuminate\Queue\InteractsWithQueue;
use Illuminate\Queue\SerializesModels;

class SendVerificationEmail implements ShouldQueue
{
    use Dispatchable, InteractsWithQueue, Queueable, SerializesModels;

    public $tries = 5;

    // ...

    /**
     * Execute the job.
     *
     * @return void
     */
    public function handle()
    {
        throw new Exception();

        sleep(5);
        logger('email sent!');
    }
}
Now, restart a queue worker and visit the / route. You'll see that instead of considering the job failed on the first exception, the worker automatically retried it five times.
[2021-09-26 14:42:13][1] Processing: App\Jobs\SendVerificationEmail
[2021-09-26 14:42:13][2] Processing: App\Jobs\SendVerificationEmail
[2021-09-26 14:42:13][3] Processing: App\Jobs\SendVerificationEmail
[2021-09-26 14:42:13][4] Processing: App\Jobs\SendVerificationEmail
[2021-09-26 14:42:13][5] Processing: App\Jobs\SendVerificationEmail
[2021-09-26 14:42:13][5] Failed:     App\Jobs\SendVerificationEmail
As you can see in the output, the worker marked the job as failed only after the fifth retry. If you set the value of the $tries to -1, the worker will retry the job an unlimited number of times. Apart from setting the number of retries, you can also configure the job so that the worker retries a specific number of times. Update the app/Jobs/SendVerificationEmail.php file's content as follows:
<?php

namespace App\Jobs;

use Exception;
use Illuminate\Bus\Queueable;
use Illuminate\Contracts\Queue\ShouldQueue;
use Illuminate\Foundation\Bus\Dispatchable;
use Illuminate\Queue\InteractsWithQueue;
use Illuminate\Queue\SerializesModels;

class SendVerificationEmail implements ShouldQueue
{
    use Dispatchable, InteractsWithQueue, Queueable, SerializesModels;

    public $tries = -1;

    // ...

    /**
     * Execute the job.
     *
     * @return void
     */
    public function handle()
    {
        throw new Exception();

        sleep(5);
        logger('email sent!');
    }

    public function retryUntil()
    {
        return now()->addSeconds(2);
    }
}
The retryUntil() method returns the number of times the job should be retried. Restart the queue worker and and revisit the / route. This time, you'll see that the worker retries the job for only 2 seconds and then declares it failed.
# ...
[2021-09-26 15:02:32][160] Processing: App\Jobs\SendVerificationEmail
[2021-09-26 15:02:32][161] Processing: App\Jobs\SendVerificationEmail
[2021-09-26 15:02:32][162] Processing: App\Jobs\SendVerificationEmail
[2021-09-26 15:02:32][163] Processing: App\Jobs\SendVerificationEmail
[2021-09-26 15:02:32][164] Processing: App\Jobs\SendVerificationEmail
[2021-09-26 15:02:32][165] Processing: App\Jobs\SendVerificationEmail
[2021-09-26 15:02:32][166] Processing: App\Jobs\SendVerificationEmail
[2021-09-26 15:02:32][167] Processing: App\Jobs\SendVerificationEmail
[2021-09-26 15:02:33][168] Processing: App\Jobs\SendVerificationEmail
[2021-09-26 15:02:33][168] Failed:     App\Jobs\SendVerificationEmail
Automatic Retry Interval
You may have thought that 2 seconds is a very brief length of time, but within this timespan, the worker has retried the job 168 times on my local computer. You may not want this to happen. You may want the worker to wait for 1 second before retrying the job. The $backoff public property does this. To see it in action, update the app/Jobs/SendVerificationEmail.php file as follows:
<?php

namespace App\Jobs;

use Exception;
use Illuminate\Bus\Queueable;
use Illuminate\Contracts\Queue\ShouldQueue;
use Illuminate\Foundation\Bus\Dispatchable;
use Illuminate\Queue\InteractsWithQueue;
use Illuminate\Queue\SerializesModels;

class SendVerificationEmail implements ShouldQueue
{
    use Dispatchable, InteractsWithQueue, Queueable, SerializesModels;

    public $tries = -1;
    public $backoff = 1;

    // ...

    /**
     * Execute the job.
     *
     * @return void
     */
    public function handle()
    {
        throw new Exception();

        sleep(5);
        logger('email sent!');
    }

    public function retryUntil()
    {
        return now()->addSeconds(30);
    }
}
Restart the queue worker and revisit the / route. This time, the worker will wait 1 second before processing the job. Within 30 seconds, the worker will only retry the job 10 times:
[2021-09-26 15:16:25][1] Processing: App\Jobs\SendVerificationEmail
[2021-09-26 15:16:28][2] Processing: App\Jobs\SendVerificationEmail
[2021-09-26 15:16:32][3] Processing: App\Jobs\SendVerificationEmail
[2021-09-26 15:16:35][4] Processing: App\Jobs\SendVerificationEmail
[2021-09-26 15:16:38][5] Processing: App\Jobs\SendVerificationEmail
[2021-09-26 15:16:41][6] Processing: App\Jobs\SendVerificationEmail
[2021-09-26 15:16:44][7] Processing: App\Jobs\SendVerificationEmail
[2021-09-26 15:16:47][8] Processing: App\Jobs\SendVerificationEmail
[2021-09-26 15:16:50][9] Processing: App\Jobs\SendVerificationEmail
[2021-09-26 15:16:53][10] Processing: App\Jobs\SendVerificationEmail
[2021-09-26 15:16:53][10] Failed:     App\Jobs\SendVerificationEmail
The $backoff property is one of the most interesting ones. Assume that you want the job to be tried 5 times and want the worker to wait 1 second before making the first attempt, 2 seconds before making the second attempt, 3 seconds before making the third attempt, 4 seconds before making the fourth attempt, and 5 seconds before making the fifth attempt. To do so, update the app/Jobs/SendVerificationEmail.php file as follows:
<?php

namespace App\Jobs;

use Exception;
use Illuminate\Bus\Queueable;
use Illuminate\Contracts\Queue\ShouldQueue;
use Illuminate\Foundation\Bus\Dispatchable;
use Illuminate\Queue\InteractsWithQueue;
use Illuminate\Queue\SerializesModels;

class SendVerificationEmail implements ShouldQueue
{
    use Dispatchable, InteractsWithQueue, Queueable, SerializesModels;

    public $tries = 5;
    public $backoff = [1, 2, 3, 4, 5];

    // ...

    /**
     * Execute the job.
     *
     * @return void
     */
    public function handle()
    {
        throw new Exception();

        sleep(5);
        logger('email sent!');
    }
}
I guess you can understand what the $tries and $backoff values indicate. Restart the queue worker and revisit the / route. This time, you'll see the backoff time increasing with each attempt. Now, if you set the $tries to 10 and leave the $backoff as-is, the last duration will persist for the rest of the retries. Thus, after the fifth attempt, the rest of the attempts will have a 5-second backoff.
Catching Job Failures
There are two more concepts that I would like to discuss regarding job failures and retries. The first one is the failed() public method. You can use this function to execute a piece a code after a job has failed. It's like a catch statement for jobs. The second one is the maximum number of allowed exceptions. You can achieve some quite interesting results by combining these methods and properties.
Consider a scenario where you want to release a failed job back to the queue based on a certain condition, but you also want to limit the number of allowed exceptions. To see this in action, update the app/Jobs/SendVerificationEmail.php file's content as follows:
<?php

namespace App\Jobs;

use Exception;
use Illuminate\Bus\Queueable;
use Illuminate\Contracts\Queue\ShouldQueue;
use Illuminate\Foundation\Bus\Dispatchable;
use Illuminate\Queue\InteractsWithQueue;
use Illuminate\Queue\SerializesModels;
use Illuminate\Support\Facades\Log;

class SendVerificationEmail implements ShouldQueue
{
    use Dispatchable, InteractsWithQueue, Queueable, SerializesModels;

    public $maxExceptions = 5;

    // ...

    /**
     * Execute the job.
     *
     * @return void
     */
    public function handle()
    {
        throw new Exception('Failed!', 999);

        sleep(5);
        logger('email sent!');
    }

    public function failed(Throwable $th)
    {
        if ($th->getCode() == 999) {
            $this->release();
        } else {
            logger($th->getMessage());
        }
    }
}
Inside the failed() method, I'm releasing the job back to the queue if it has encountered the 999 error code. The release() method comes from the InteractsWithQueue contract, and the 999 error code is made up. I've also set the maximum number of allowed exceptions to 5, so if the the job throws 5 consecutive exceptions, the worker will consider it failed.
I could've used the $tries property here, but in this case, the worker would've retried the job regardless of the exception code. If you use $tries and $maxExceptions in the same job, the $maxExceptions will override the $tries property. Restart the queue worker and revisit the / route. You'll see the job being retried 5 times and declared failed.
Chains and Batches
So far in this article, you've worked with stand-alone jobs, but jobs can also be arranged in chains or batches. Both of these are multiple jobs grouped together. The main difference between a batch and chain is that jobs in a batch are processed simultaneously, whereas jobs in a chain are processed sequentially.
Chains
In a chain, a job is dependent on the previous one. Thus, if you build a job chain with three jobs, the worker will process them sequentially; if any of the jobs fail, the worker will not process any subsequent jobs. To see this in action, create three new jobs inside the project. To do so, execute the following commands inside your project directory:
php artisan make:job EncodeVideoClip
php artisan make:job GenerateSubtitles
php artisan make:job PublishVideoClip
Now, open the routes/web.php file and update the code for the / route handler:
use App\Jobs\EncodeVideoClip;
use App\Jobs\GenerateSubtitles;
use App\Jobs\PublishVideoClip;

Route::get('/', function () {

    \Illuminate\Support\Facades\Bus::chain([
        new EncodeVideoClip,
        new GenerateSubtitles,
        new PublishVideoClip,
    ])->dispatch();

    return view('welcome');
});
This imaginary snippet of code could be a part of some video sharing platform, and it describes the steps necessary for publishing a new video clip on the platform. There are three steps in the publishing process:
- Encode the video clip to an optimized format.
- Generate subtitles by analyzing the audio stream.
- Publish the video on the platform.
These three steps are handled within three separate jobs in the back-end, and if any of them fails, the remaining jobs will not be processed. The chain() method inside the Illuminate\Support\Facades\Bus facade returns an instance of the Illuminate\Foundation\Bus\PendingChain class, which is like an array of multiple jobs and encapsulates methods, such as the dispatch() method. To see this in action, start a new queue worker and revisit the / route:
[2021-09-28 15:33:05][1] Processing: App\Jobs\EncodeVideoClip
[2021-09-28 15:33:05][1] Processed:  App\Jobs\EncodeVideoClip
[2021-09-28 15:33:05][2] Processing: App\Jobs\GenerateSubtitles
[2021-09-28 15:33:05][2] Processed:  App\Jobs\GenerateSubtitles
[2021-09-28 15:33:05][3] Processing: App\Jobs\PublishVideoClip
[2021-09-28 15:33:05][3] Processed:  App\Jobs\PublishVideoClip
As you can see from the output, the worker indeed processed the three jobs sequentially. Now, open the app/Jobs/GenerateSubtitles.php file and update its code as follows:
<?php

namespace App\Jobs;

use Exception;
use Illuminate\Bus\Queueable;
use Illuminate\Contracts\Queue\ShouldBeUnique;
use Illuminate\Contracts\Queue\ShouldQueue;
use Illuminate\Foundation\Bus\Dispatchable;
use Illuminate\Queue\InteractsWithQueue;
use Illuminate\Queue\SerializesModels;

class GenerateSubtitles implements ShouldQueue
{
    use Dispatchable, InteractsWithQueue, Queueable, SerializesModels;

    // ...

    /**
     * Execute the job.
     *
     * @return void
     */
    public function handle()
    {
        throw new Exception();
    }
}
Throwing an exception in the second job should theoretically stop the worker from processing the later jobs in the queue. Restart the queue worker and revisit the / route.
[2021-09-28 15:36:08][4] Processing: App\Jobs\EncodeVideoClip
[2021-09-28 15:36:08][4] Processed:  App\Jobs\EncodeVideoClip
[2021-09-28 15:36:08][5] Processing: App\Jobs\GenerateSubtitles
[2021-09-28 15:36:08][5] Failed:     App\Jobs\GenerateSubtitles
As you can see, the worker stopped as soon as it encountered the exception in the second job. The Illuminate\Foundation\Bus\PendingChain also encapsulates a chain() method for handling job failure in chains. Open the routes/web.php file again and update the code for the / route handler:
use App\Jobs\EncodeVideoClip;
use App\Jobs\GenerateSubtitles;
use App\Jobs\PublishVideoClip;

Route::get('/', function () {

    \Illuminate\Support\Facades\Bus::chain([
        new EncodeVideoClip,
        new GenerateSubtitles,
        new PublishVideoClip,
    ])->catch(function (Throwable $th) {
        Log::error('The job failed with code: ' . $th->getCode());
    })
    ->dispatch();

    return view('welcome');
});
Now, look inside the storage/logs/laravel.log file and you should see something like the following code:
[2021-09-28 15:50:23] local.ERROR: The job failed with code: 0
[2021-09-28 15:50:23] local.ERROR:  {"exception":"[object] (Exception(code: 0):  at D:\
epos\\laravel\\queue-worker-lessons\\app\\Jobs\\GenerateSubtitles.php:33)
[stacktrace]
# ...
Of course, in a real-life scenario, you'll have a much more complex error-handling mechanism, but for now, I hope that you understand the idea. You can also override the default queue or connection by chaining calls to onQueue() or onConnection() methods.
use App\Jobs\EncodeVideoClip;
use App\Jobs\GenerateSubtitles;
use App\Jobs\PublishVideoClip;

Route::get('/', function () {

    \Illuminate\Support\Facades\Bus::chain([
        new EncodeVideoClip,
        new GenerateSubtitles,
        new PublishVideoClip,
    ])->onConnection('database')
    ->onQueue('video-processing')
    ->catch(function (Throwable $th) {
        Log::error('The job failed with code: ' . $th->getCode());
    })
    ->dispatch();

    return view('welcome');
});
Batches
Apart from job chains, there are also batches. Batches are similar to chains, but they are collection of jobs independent from each other, and the worker processes a batch of jobs simultaneously. To see this in action, open the routes/web.php file and update the code for the / route handler:
use App\Jobs\EncodeVideoClip;

Route::get('/', function () {

    \Illuminate\Support\Facades\Bus::batch([
        new EncodeVideoClip,
        new EncodeVideoClip,
        new EncodeVideoClip,
    ])->dispatch();

    return view('welcome');
});
Like the chain() method, the batch() method returns an instance of the Illuminate\Bus\PendingBatch class, which encapsulates a bunch of helpful methods for dealing with batches. Before you can see this in action, you'll have to create the job_batches table inside your database. To do so, execute the following commands:
php artisan queue:batches-table
php artisan migrate
As the name suggests, this table stores information about the job batches. Apart from creating this table, you'll also have to add the Illuminate\Bus\Batchable trait to each job inside the batch. So, open the app/Jobs/EncodeVideoClip.php file and update its code as follows:
<?php

namespace App\Jobs;

use Illuminate\Bus\Batchable;
use Illuminate\Bus\Queueable;
use Illuminate\Contracts\Queue\ShouldQueue;
use Illuminate\Foundation\Bus\Dispatchable;
use Illuminate\Queue\InteractsWithQueue;
use Illuminate\Queue\SerializesModels;

class EncodeVideoClip implements ShouldQueue
{
    use Batchable, Dispatchable, InteractsWithQueue, Queueable, SerializesModels;

    // ...
}
Now, restart the queue worker. Make sure the window running the worker is visible and revisit the / route. You'll see all three jobs appear on the terminal simultaneously. If you look at the job_batches table using the database tool, you'll see information about the job batch appear in the table.

As you can see, it holds information like the total number of jobs, number of pending jobs, number of failed jobs, and more. I've already said that jobs in a batch are not dependent on each other. However, if any of the jobs in a batch fail, the worker will declare the entire batch as canceled. You can override this default behavior by calling the allowFailures() method before dispatching the job.
use \App\Jobs\EncodeVideoClip;

Route::get('/', function () {

    \Illuminate\Support\Facades\Bus::batch([
        new EncodeVideoClip,
        new EncodeVideoClip,
        new EncodeVideoClip,
    ])->allowFailures()
    ->dispatch();

    return view('welcome');
});
Apart from this method, the Illuminate\Bus\PendingBatch class also encapsulates regular methods, such as the then(), catch(), and finally() methods.
use App\Jobs\EncodeVideoClip;

Route::get('/', function () {

    \Illuminate\Support\Facades\Bus::batch([
        new EncodeVideoClip,
        new EncodeVideoClip,
        new EncodeVideoClip,
    ])->allowFailures()
    ->onConnection('database')
    ->onQueue('video-encoding')
    ->then(function(\Illuminate\Bus\Batch $batch) {
        logger('Batch ' . $batch->id . ' finished successfully!');
    })
    ->then(function(\Illuminate\Bus\Batch $batch) {
        logger('Batch ' . $batch->id . ' did not finish successfully!');
    })
    ->finally(function(\Illuminate\Bus\Batch $batch) {
        logger('Cleaning leftovers from batch ' . $batch->id);
    })
    ->dispatch();

    return view('welcome');
});
The then() method only runs if the batch has been processed successfully. The catch() method runs if a failure occurs, and the finally() method runs regardless of a failure. You can use a combination of these three methods to whip up some pretty complex workflows. I've also sneaked in the onConnection() and onQueue() methods to let you know that they also exist in the case of batches.
There is another interesting thing that you can do with chains and batches: dispatch batches of chains. I know it sounds complicated, but bear with me. Open the routes/web.php file and update the code for the / route handler:
use App\Jobs\EncodeVideoClip;
use App\Jobs\GenerateSubtitles;
use App\Jobs\PublishVideoClip;

Route::get('/', function () {

    \Illuminate\Support\Facades\Bus::batch([
        [
            new EncodeVideoClip,
            new GenerateSubtitles,
            new PublishVideoClip,
        ],
        [
            new EncodeVideoClip,
            new GenerateSubtitles,
            new PublishVideoClip,
        ],
    ])->dispatch();

    return view('welcome');
});
In this case, you'll have to put the chains within the batch array and pass them to the batch() method as a parameter. Remove the exception from the app/Jobs/GenerateSubtitles.php file, make sure to add the Illuminate\Bus\Batchable trait to all three jobs, restart the queue worker, and revisit the / route.
[2021-09-28 16:46:19][11] Processing: App\Jobs\EncodeVideoClip
[2021-09-28 16:46:19][11] Processed:  App\Jobs\EncodeVideoClip
[2021-09-28 16:46:19][12] Processing: App\Jobs\EncodeVideoClip
[2021-09-28 16:46:19][12] Processed:  App\Jobs\EncodeVideoClip
[2021-09-28 16:46:19][13] Processing: App\Jobs\GenerateSubtitles
[2021-09-28 16:46:19][13] Processed:  App\Jobs\GenerateSubtitles
[2021-09-28 16:46:19][14] Processing: App\Jobs\GenerateSubtitles
[2021-09-28 16:46:19][14] Processed:  App\Jobs\GenerateSubtitles
[2021-09-28 16:46:19][15] Processing: App\Jobs\PublishVideoClip
[2021-09-28 16:46:19][15] Processed:  App\Jobs\PublishVideoClip
[2021-09-28 16:46:19][16] Processing: App\Jobs\PublishVideoClip
[2021-09-28 16:46:19][16] Processed:  App\Jobs\PublishVideoClip
As you can see, the worker has processed the jobs as chains within a batch. You can also do the opposite (i.e., dispatch batches within a chain), but the processes is not that straightforward. Open the routes/web.php file and update the code for the / route handler:
use App\Jobs\EncodeVideoClip;
use App\Jobs\GenerateSubtitles;
use App\Jobs\PublishVideoClip;

Route::get('/', function () {

    \Illuminate\Support\Facades\Bus::chain([
        new EncodeVideoClip,
        function() {
            \Illuminate\Support\Facades\Bus::batch([
                new GenerateSubtitles,
                new GenerateSubtitles,
                new GenerateSubtitles,
            ])->dispatch();
        },
        new PublishVideoClip,
    ])->dispatch();

    return view('welcome');
});
Inside the chain array, you can define a closure dispatch and a batch within the closure. If you run this code, the worker will process the encode job, process the subtitle generation jobs all at once, and then process the publish job.
Laravel Horizon
So far in this tutorial, you've worked with queues and jobs using the terminal window, but Laravel has a gorgeous graphical user interface. Laravel Horizon is an official Laravel packages, and it's a elegant admin panel for managing queues. To use this in your application, you'll have to install the package and switch to the redis queue driver.
I am assuming that you have Redis installed on your system or are using a managed service, such as the official offering. Open the .env file of your project and change the value of QUEUE_CONNECTION to redis from database.
QUEUE_CONNECTION=redis
Now, install the Laravel Horizon package by executing the following commands:
composer require laravel/horizon
php artisan horizon:install
The second command will publish the app/Providers/HorizonServiceProvider.php file, the config/horizon.php file, and a bunch of new assets. I'll dive into the configuration options later, but let’s have a look at Horizon first. To start Laravel Horizon, execute the following command:
php artisan horizon
Then, visit the /horizon route on your browser, and you should see the Horizon Dashboard:

There isn't a lot to discuss about the UI. It's elegant and pretty self explanatory. You may try firing a number of jobs and see how they're presented within the UI. What I'm more interested in talking about is the configuration options. Open the config/horizon.php file inside your project, and you'll see an array containing all the different configuration options.
Most of these are very well documented both in the file and in the official docs. One thing that you may have noticed already is when you use Laravel Horizon, you don't have to start the worker queues manually. Laravel Horizon remains in charge of starting the queue worker. The queue worker configuration can be found at the bottom of the configuration file.
    'defaults' => [
        'supervisor-1' => [
            'connection' => 'redis',
            'queue' => ['default'],
            'balance' => 'auto',
            'maxProcesses' => 1,
            'memory' => 128,
            'tries' => 1,
            'nice' => 0,
        ],
    ],

    'environments' => [
        'production' => [
            'supervisor-1' => [
                'maxProcesses' => 10,
                'balanceMaxShift' => 1,
                'balanceCooldown' => 3,
            ],
        ],

        'local' => [
            'supervisor-1' => [
                'maxProcesses' => 3,
            ],
        ],
    ],
The defaults array contains the default configuration for all environments. Inside the environments array, you can customize the options for production or local environments. Laravel Horizon will match these environment names against the value of APP_ENV inside the .env file. You can add more environments in this array.
Running Workers in Production
So far in this article, you’ve started the queue workers manually. In a production server, that's not an option. Instead, you'll have to use a program called supervisor. It's a popular process control system for UNIX-like operating systems. If you're deploying an application on a Ubuntu server, supervisor will come pre-installed. However, if you're on a platform that doesn't come with the program pre-installed, follow the official installation instructions.
Supervisor, as the name suggests, supervises programs. If you instruct supervisor to start a queue worker, supervisor will make sure to keep it running. To do so, create a file /etc/supervisor/conf.d/laravel-worker.conf file and put following content in it:
[program:laravel-worker]
process_name=%(program_name)s_%(process_num)02d
command=php /srv/awesome-laravel-application/artisan queue:work
autostart=true
autorestart=true
stopasgroup=true
killasgroup=true
user=root
numprocs=8
redirect_stderr=true
stdout_logfile=/srv/awesome-laravel-application/storage/logs/worker.log
stopwaitsecs=3600
It's a typical program section in a supervisor configuration file. The most important configuration directives to understand here are process_name, command, and numprocs.
A typical program section in a supervisor configuration file usually represents a homogeneous process group containing multiple copies of a process. Thus, if you set the process_name of a program section to something like laravel-worker, then it'll have a single process named laravel-worker in it. However, if you set the name to the %(program_name)s_%(process_num)02d expression and numprocs (number of processes) to 8, then there will be 8 processes in this group, named laravel-worker_00, laravel-worker_01, laravel-worker_02, laravel-worker_03, laravel-worker_04, laravel-worker_05, laravel-worker_06, and laravel-worker_07.
The command directive represents the actual command supervisor will run. Assuming that you've deployed the application inside the /srv/awesome-laravel-application directory on your server, the php /srv/awesome-laravel-application/artisan queue:work command will start 8 queue workers. Another important directives to understand is the user directive. Depending on how you've configured your server, this could change. The stdout_logfile points to the log file where supervisor will record important events about this program. I usually keep the logs alongside the application log files, but you're free to keep them anywhere you like.
Once the configuration is in place, execute the following commands to start the processes:
sudo supervisorctl reread

sudo supervisorctl update

sudo supervisorctl start laravel-worker:*
The first command will reread the configuration file. The update command will update the processes that have changed. Finally, the start command will start the program. I hope you remember that queues need to be restarted on every code update. On a production server, you'll have to restart all the processes. To do so, you may execute the sudo supervisorctl restart laravel-worker:* command. However, if you've added a new configuration to the server, you'll have to first run the reread and update commands. Otherwise, supervisor will not know about the new configuration. The restart command should be a part of your CI/CD pipeline.
Running Laravel Horizon in Production
Running Laravel Horizon is similar to running queue workers, but the configuration is slightly different.
[program:horizon]
process_name=%(program_name)s
command=php /srv/awesome-laravel-application/artisan horizon
autostart=true
autorestart=true
user=root
redirect_stderr=true
stdout_logfile=/srv/awesome-laravel-application/storage/logs/horizon.log
stopwaitsecs=3600
The numprocs directive is irrelevant, as the number of workers is handled by Horizon itself. The remainder of the configuration is unchanged. The number of workers you should run really depends on the type of server and your requirements. There are no rules-of-thumb here. You'll understand once you've worked with them for some time.
Conclusion
That's a wrap on this article. I've covered almost all the important concepts regarding Laravel Queues, but this not a definitive guide. There are tons of other aspects of running queues that you should understand, such as job uniqueness, dealing with race conditions, and throttling. I could've included all of them in a single article, but that would've made it overwhelming. It's best if you start using queues in your applications and learn by doing. Also, make sure to read the official docs on queues thoroughly.
Thank you for being patient throughout the entire article. I hope that you've gained a solid understanding of the Laravel queue system. If you have any confusion regarding anything shown in this article, feel free to connect with me on Twitter, LinkedIn, or GitHub. Till the next one, stay safe and keep on learning.

Top comments (1)
Great article, thanks
*Batches: *
catch() instead of then() ?