This article was originally written by Aestimo Kirina on the Honeybadger Developer Blog.
As an indie developer, one of the most exciting achievements is when users happily sign up and start using your app. What's not exciting, however, is having to deal with the errors and exceptions your users will eventually encounter. To ensure that your app offers a good user experience, you want to be notified when exceptions are encountered that so you can deal with them as soon as possible. You can get help with this task from a professional error-monitoring solution, such as Honeybadger.
Using a professional error-monitoring service is recommended for production apps of all sizes, but not many users know how to get the most value from them. One of the best ways to learn how to effectively use these services is to learn how to monitor Ruby errors without using them.
TL;DR
In this article, that's exactly what we'll do. We'll learn about the different types of errors common to Ruby apps, how to log them, how to format them better and display them on the frontend, and finally, how to send error notification emails whenever errors pop up. These features make up a basic error-monitoring layer that can be added to a simple Ruby on Rails app; the source is here.
Let's begin with exceptions in Ruby.
Exceptions In Ruby
Ruby comes with built-in exceptions, which are all sub-classes of the
 class. Each sub-class of

 ```Exception```

 will have the following information:

- The type of exception
- An optional descriptive message
- Some backtrace information

### Built-in Exceptions

There are a number of these built-in exceptions, and depending on how your app is built, you'll encounter some more frequently than others. Here are the most common types of exceptions and their causes:

-

 ```NoMemoryError```

 - Usually raised when memory allocation fails.
-

 ```ScriptError```

 - Raised whenever a Ruby script cannot be run, usually due to one of its sub-class exception types, which are most often

 ```NotImplementedError```

,

 ```LoadError```

, and

 ```SyntaxError```

 in many Rails apps.
-

 ```StandardError```

 - Most of the exceptions encountered in your Rails app are sub-classes of this error. Whenever you implement a

 ```rescue```

 block that does not explicitly define the error to rescue from, it will default to rescuing sub-classes of

 ```StandardError```

. One of these is the very common

 ```ArgumentError```

, which is raised, for example, when you give the wrong number of arguments to a method that expects a certain number. Another less common one is

 ```SystemCallError```

, which occurs when something goes wrong in your app's interaction with the system layer, such as trying to open a non-existent directory.

For the sake of keeping to the article's objective, we won't go any further into Ruby's built-in errors. If you want to, check out the documentation [here](https://ruby-doc.org/3.1.3/Exception.html). For now, we'll break down what error monitoring is and explain how to add these features to our app.

## Error Monitoring

Most paid error-monitoring solutions do a good job of hiding much of what goes on under the hood, and there's a lot. They also come with intuitive user interfaces and real-time notifications that make error monitoring a breeze.

Trying to add all the features of these paid services to our simple Rails app is beyond the scope this tutorial. Instead, we'll implement the two main ones that will give us the basic functionality we need:

- Better error logging – Rails’ logs include information on everything happening with our app but are very messy. Digging through the default Rails logs can be tedious, especially when you are dealing with an app with multiple users and lots of requests and background jobs. We'll learn how to clean up the logs of an example Rails app so that it will be easier to find what we need.

- Error notifications - Logging errors and cleaning up the logs is helpful, but it would be better to have this information sent to us instantly when it happens instead of having to login into the server to dig through the logs. Thus, we'll add a simple notification layer that will ping us on email whenever something goes wrong with the app.

## Better Error Logging

Logs provide a developer with insights into the internal workings of a Rails app. Everything from server requests to SQL queries and even errors will be available in the logs.

Below is the log output of a running instance of our simple Rails app:


```text
[output]

Started GET "/games" for 127.0.0.1 at 2023-01-13 11:58:43 +0300
  ActiveRecord::SchemaMigration Pluck (0.1ms)  SELECT "schema_migrations"."version" FROM "schema_migrations" ORDER BY "schema_migrations"."version" ASC
Processing by GamesController#index as HTML
  Rendering layout layouts/application.html.erb
  Rendering games/index.html.erb within layouts/application
  Game Load (0.5ms)  SELECT "games".* FROM "games"
  ↳ app/views/games/index.html.erb:15
  Rendered games/index.html.erb within layouts/application (Duration: 29.0ms | Allocations: 8775)
  Rendered layout layouts/application.html.erb (Duration: 109.8ms | Allocations: 41346)
Completed 200 OK in 121ms (Views: 111.6ms | ActiveRecord: 1.5ms | Allocations: 44853)
As you can see, the default logs are packed with a lot of useful information; however, they are not organized in a way that makes it easy to find what we need. Therefore, our first task is to try and tame this mess by formatting the logs using these three methods:
- Customizing the log level
- Using log tags
- Trimming the logs
Customizing The Log Level
The log level defines the depth of information that will be made available in the log output. There are six built-in log levels:
-
-

 ```info```


-

 ```warn```


-

 ```error```


-

 ```fatal```

, and
-

 ```unknown```


The

 ```debug```

 level, which is the most detailed, is enabled by default. To give you an idea of the differences in the log outputs at the different levels, we'll use a call to the index action of the games controller in our simple Rails app:


```ruby
# app/controllers/games_controller.rb

def index
  @games = Game.all
end
# config/environments/development.rb
 config.log_level = :debug
 log level output:


```text
[output]

Started GET "/" for 127.0.0.1 at 2023-01-19 13:16:04 +0300
  ActiveRecord::SchemaMigration Pluck (0.1ms)  SELECT "schema_migrations"."version" FROM "schema_migrations" ORDER BY "schema_migrations"."version" ASC
Processing by GamesController#index as HTML
  Rendering layout layouts/application.html.erb
  Rendering games/index.html.erb within layouts/application
  Game Load (0.2ms)  SELECT "games".* FROM "games"
  ↳ app/views/games/index.html.erb:15
  Rendered games/index.html.erb within layouts/application (Duration: 15.0ms | Allocations: 8835)
  Rendered layout layouts/application.html.erb (Duration: 63.7ms | Allocations: 41537)
Completed 200 OK in 71ms (Views: 65.4ms | ActiveRecord: 0.6ms | Allocations: 45044)
And the
 level log output for the same request:


```ruby
# config/environments/development.rb
 config.log_level = :info
[output]

Started GET "/" for 127.0.0.1 at 2023-01-19 13:15:15 +0300
Processing by GamesController#index as HTML
  Rendered games/index.html.erb within layouts/application (Duration: 14.3ms | Allocations: 8178)
  Rendered layout layouts/application.html.erb (Duration: 74.3ms | Allocations: 41515)
Completed 200 OK in 85ms (Views: 76.6ms | ActiveRecord: 0.6ms | Allocations: 44991)
When you define the log level output you want, you are basically saying, "Give me log output for this level and up...". For example, if you set it to log at the
 level, you won’t get any log output for the

 ```debug```

 or

 ```info```

 levels. With the very detailed output from levels like

 ```debug```

 and

 ```info```

, you might want to consider using another log level in production for these two reasons:

- Security -

 ```debug```

 and

 ```info```

 level logs output everything. In production, you want to handle sensitive information that could easily end up in the logs much more discreetly.
- File size - Considering the information-rich nature of the

 ```debug```

 and

 ```info```

 level logs, if you are logging to file, your log files might balloon to unwieldy file sizes that will be difficult to manage.

So far, we've dealt with default logs. Now let's see how to customize the log output to make them even easier to read.

### Log Tagging

The default logs can be boring to read, but by using log tags, we can inject the log output with relevant pieces of information to help us debug. To do so, we'll use the

 ```ActiveSupport::TaggedLogging```

 module to customize log output from calling the index action of the

 ```GamesController```

 as follows:


```ruby
# app/controllers/games_controller.rb

def index
    logger = ActiveSupport::TaggedLogging.new(Logger.new(STDOUT))
    logger.tagged("Games") do
      logger.debug "Finding all games..."
      @games = Game.all
      logger.debug "Found #{@games.length} games!"
    end
end
Which gives us the following output:
[output]

Started GET "/games" for 127.0.0.1 at 2023-01-13 12:03:43 +0300
  ActiveRecord::SchemaMigration Pluck (0.1ms)  SELECT "schema_migrations"."version" FROM "schema_migrations" ORDER BY "schema_migrations"."version" ASC
Processing by GamesController#index as HTML
[highlight]
[Games] Finding all games...
  Game Load (0.5ms)  SELECT "games".* FROM "games"
  ↳ app/controllers/games_controller.rb:11:in `block in index'
[Games] Found 50 games!
[/highlight]
  Rendering layout layouts/application.html.erb
  Rendering games/index.html.erb within layouts/application
  Rendered games/index.html.erb within layouts/application (Duration: 7.3ms | Allocations: 3137)
  Rendered layout layouts/application.html.erb (Duration: 58.2ms | Allocations: 36105)
Completed 200 OK in 77ms (Views: 60.1ms | ActiveRecord: 1.2ms | Allocations: 45290)
We can now see the customized inputs we specified included in the log output. However, even with tagging and log level customizations in place, the default logs are still difficult to sift through. Let's now turn our attention to managing them by "trimming" them to make them more readable.
"Trimming" Default Logs
To do trim the default logs, we'll use the nifty Lograge gem. Run
bundle add lograge
to add the gem.
Next, add Lograge to your app's environment configuration:
# config/environments/production.rb

Rails.application.configure do
  config.lograge.enabled = true
end
Using Lograge in its default state, you can see how much better the logs the look:

Versus the default logs:

So far, we've formatted our logs using a few methods, such as trimming the logs, customizing the log level, and using log tags, but we still face the challenge of not being able to access the logs easily. Until now, if we wanted to view the logs, we'd have to do so via a shell. However, what if there was an easier way to view them?
Viewing Logs On The Front End
By default, Rails’ logs are available as real-time streams via the shell or as text files in the log folder. This is fine, but it would be even better if the information was available on the frontend.
This is possible using the Logster gem. First, add it to the Gemfile and run
.


```ruby
# Gemfile

gem 'redis' # In case Redis isn't installed already
gem 'logster'
Then mount Logster in the app's routes file like so:
# routes.rb

Rails.application.routes.draw do
  # Logster
  mount Logster::Web => "/logs"

  # Games
  resources :games

  root "games#index"
end
With the current configuration, it's possible for anyone to access the frontend and view the logs, which is not recommended. If you take this route, make sure to only allow authenticated users with proper permissions to access the Logster frontend. You can do so with the configuration shown below:
# routes.rb

constraints lambda { |req| req.session["admin"] } do
  mount Logster::Web => "/logs"
end
With Logster properly installed and the routes in place, visiting the route
should present you with a simple UI log viewer:
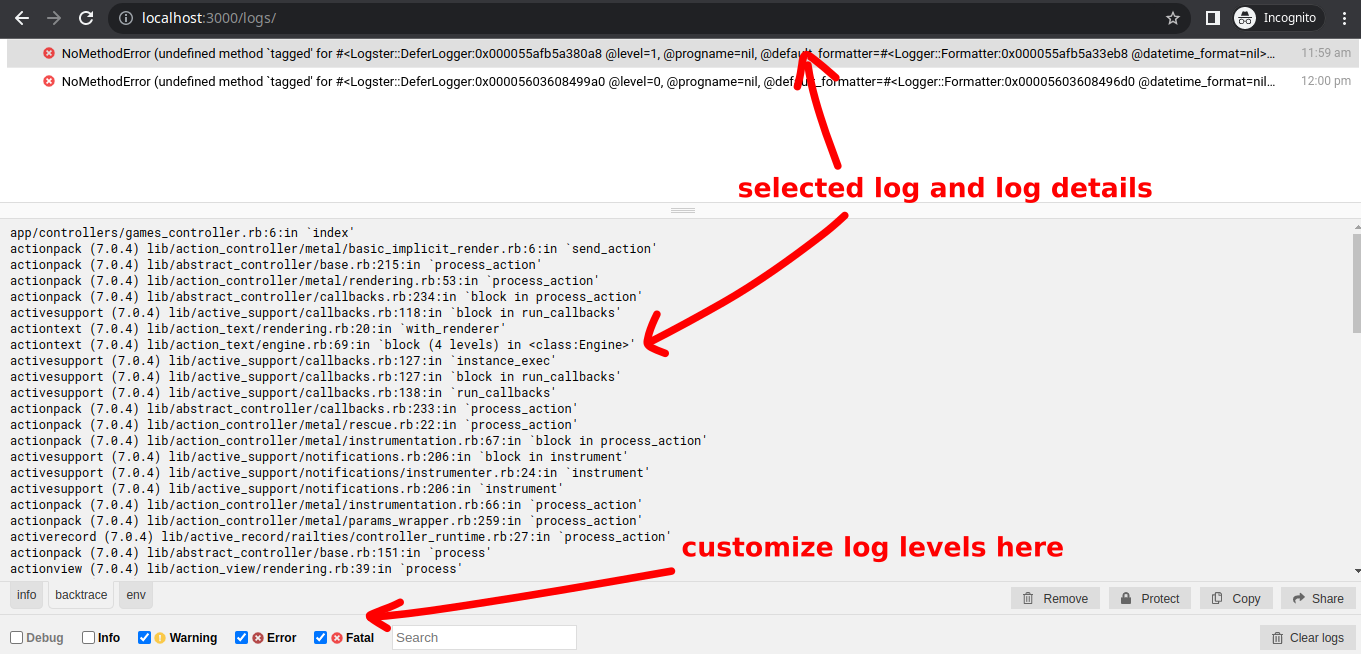
Thus far, we've learned how to format logs and view them through the frontend; however, if users experience errors, and we're not around to help them out, it will contribute to a bad user experience. What should we do? Error notifications is what we need next.
## Error Notifications
Real-time error notifications is a feature of pretty much all paid error-monitoring services. Most will give you a variety of channels ranging from email to text message and everything in between. For the purposes of this tutorial, we'll only implement error notifications via the email channel.
To get started, run
```bundle add exception_notification```
to install the [ExceptionNotification](https://github.com/smartinez87/exception_notification) gem. The gem gives you the option to customize your own notifier but also ships with built-in notifiers, including the following:
- Hipchat
- Slack
- Microsoft Teams
- Email and more.
### Configuring ExceptionNotification
ExceptionNotification is usually run as Rack middleware and, of course, best plugged into the production configuration. However, in our case, we'll configure it to run in development:
```ruby
# config/environments/development.rb
Rails.application.config.middleware.use ExceptionNotification::Rack,
email: {
email_prefix: '[PREFIX] ',
sender_address: %{"notifier" <notifier@example.com>},
exception_recipients: %w{exceptions@example.com}
}
Next, set up ActionMailer to deliver notification emails whenever an error occurs. Additionally, since we are working in the development environment, we'll use the awesome Letter Opener gem to preview any notification emails sent by our app.
Let's get it set up next.
Letter Opener Gem
Letter Opener allows us to preview emails sent from our app in the development environment. Go ahead and add
gem "letter_opener", group: :development
to your app's Gemfile and run
bundle install
. Then, add the relevant delivery settings to the development config file:
# config/environments/development.rb

config.action_mailer.delivery_method = :letter_opener
config.action_mailer.perform_deliveries = true
With that done, we should be set up to receive notification emails whenever an error is raised by our app in development.
It is important to point out that Letter Opener should only be used in development and not in production environments. For the production configuration, you can use any email delivery service of your choice.
Previewing Notification Emails With Letter Opener
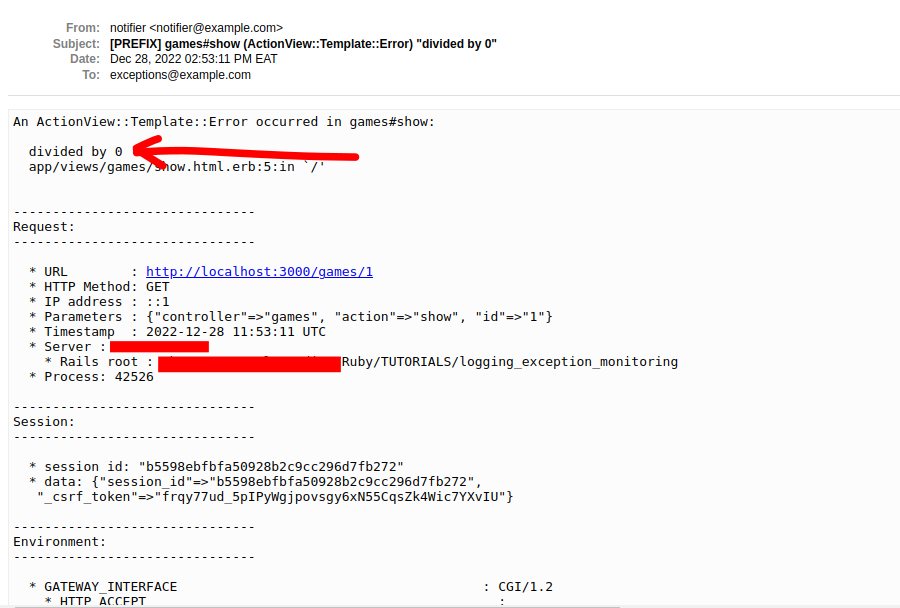
To give you an idea of what such an error email notification would look like, we've raised a
in the sample Rails app's show action in the games controller:
## Wrapping Up
In this article, we've learned about Ruby's inbuilt errors, as well as how to use log levels and tagging to customize the log output. We've also seen the possibilities of adding a log viewing frontend to a Rails app and how to send error notification emails. The goal of all this is to show you that it is possible to do error monitoring without using a service like Honeybadger. However, using a well-built professional error-monitoring service is still the recommended way to go for your production application.

Top comments (0)