1 INTRODUCTION
Cross platform mobile application development is a growing phenomenon due to its single code approach. Development of cross platform application with these new technologies is quick, but what matters more is how the apps that are developed on a single code base can be published to the respective application stores, what all kinds of testing is required for it and many more. This paper helps to cover these topics which will be useful to test single code base Applications before they are published to the App Stores.
2 DEVELOPMENT STAGE
2.1 Identifying Targets
Before beginning development, the target devices and platforms are to be identified. Because this will smoothen the process of technology selection. The questions asked during this stage revolve around few major areas consisting of Device Types, Operating Systems and Versions.
.
2.2 Finalizing technology
Based on the selection of targets in the prior stage, the technology needs to be selected. Main factor while the selection is how feasible is it to be used on the identified target platforms and what the native abilities offered.
2.3 Implementation
Once all the technology is finalized, the architectures are kept on the tables. Upon drafting the architecture of the application, coding for the application is started. Over the time and the choice of Software Engineering methodology, like Agile or waterfall, the application starts taking shape. Once few deployable modules are complete, testing of the modules start.
3 TESTING STAGE
Analysis and Testing is an important activity in any software development process and specially in case of Mobile Applications, it is important for providing dependable solutions for end users. Currently there are various types and stages of testing involved in testing mobile applications. Along with the testing team, developers are also responsible for performing some kind of testing.
3.1 Manual Testing
Testing teams manually has to execute test cases without using any kind of Automation Tool. This is the most primitive type of testing. Any new application has to be tested manually at initial stages before automating the test cases.
3.2 Unit Testing
This testing is to be performed by Developers. Unit is the smallest part of the software. Whenever a developer develops a module, he has to test that module. Main aim of this testing is to ensure that the basic functionality of the developed module are working.
3.2.1 Platform Dependency testing
When the technology which is to be used is a single code-oriented design, the features developed are to be scrupulously tested on the platforms which the app is supposed to run on. This ensures that the native features used in the code are working as expected on all the intended platforms.
3.3 Integration Testing
Once all the units are developed which can together, logically serve as an independent functionality, these units are merged.
The testing that takes plan on these merged units is Integration testing. This testing ensures that the units which were developed individually, when integrated with each other, work properly.
3.4 Beta Testing/Third Party Testing
Beta Testing is one of the Acceptance Testing types, which adds value to the product as the end-user validates the product for functionality, usability, reliability, and compatibility. Beta Test provides a complete overview of the true experience gained by the end users while experiencing the product. This testing is done by external members which are not the part of development or testing team.
3.4 GUI Testing
GUI testing is defined as the process of testing the system's Graphical User Interface of the Application Under Test. GUI testing involves checking the screens with the controls like menus, buttons, icons, and all types of bars - toolbar, menu bar, dialog boxes, and windows, etc. This stage ensures that the UI look and feel is the same across all the supported devices and platforms.
4 PREPARING AN APPLICATION FOR RELEASE
4.1 Preparing an Android app.
4.1.1 Preparing an application for release
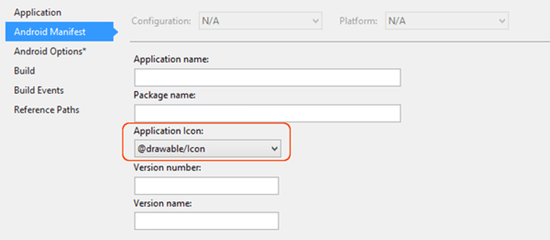
4.1.1.1 Specify the app icon
It is strongly recommended that each Xamarin.Android application specify an application icon. Some application marketplaces will not allow an Android application to be published without one. The Icon property of the Application attribute is used to specify the application icon for a Xamarin.Android project. In these examples, @drawable/icon refers to an icon file that is located at Resources/drawable/icon.png
4.1.1.2 Version the Application
Versioning is important for Android application maintenance and distribution. Without some sort of versioning in place, it is difficult to determine if or how an application should be updated. To assist with versioning, Android recognizes two different types of information:
Version Number – An integer value (used internally by Android and the application) that represents the version of the application. Most applications start out with this value set to 1, and then it is incremented with each build. This value has no relationship or affinity with the version name attribute (see below). Applications and publishing services should not display this value to users. This value is stored in the AndroidManifest.xml file as android:versionCode.
Version Name – A string that is used only for communicating information to the user about the version of the application The version name is intended to be displayed to users or in Google Play. This string is not used internally by Android. The version name can be any string value that would help a user identify the build that is installed on their device. This value is stored in the AndroidManifest.xml file as android:versionName. You cannot upload an APK to the Play Store with a versionName you have already used for a previous version.

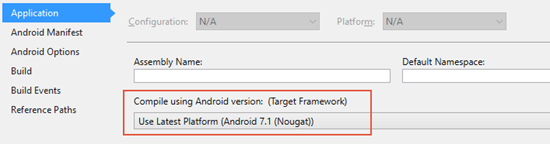
4.1.1.3 Understanding Android API levels
Target Framework – Specifies which framework to use in building your application. This API level is used at compile time by Xamarin.Android.
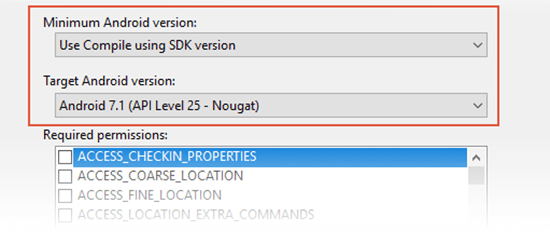
Minimum Android Version – Specifies the oldest Android version that you want your app to support. This API level is used at run time by Android.
Target Android Version – Specifies the version of Android that your app is intended to run on. This API level is used at run time by Android.
Before you can configure an API level for your project, you must install the SDK platform components for that API level.
On the Android Manifest page, set the Minimum Android version to Use Compile using SDK version and set the Target Android version to the same value as the Target Framework version (in the following screenshot, the Target Android Framework is set to Android 7.1 (Nougat)):
If you want to maintain backward compatibility with an earlier version of Android, set Minimum Android version to target to the oldest version of Android that you want your app to support

4.1.2 Compile
Select Build > Rebuild Solution to verify that it builds successfully in Release mode. Note that this step does not yet produce an APK.
4.1.2 Archive for Publishing
4.1.2.1 Archive
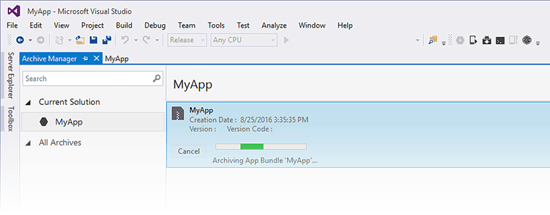
To begin the publishing process, right-click the Solution in the Solution Explorer and select Archive All..., which builds the solution and archives all Xamarin projects that can generate an archive:
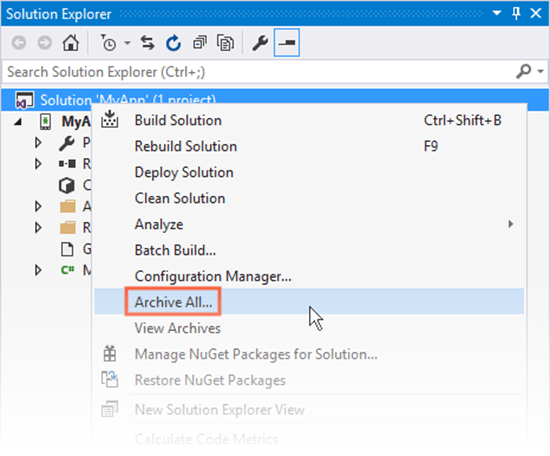
This will load the archive manager.
4.1.2.2 Distribution
When an archived version of the application is ready to publish, select the archive in the Archive Manager and click the Distribute... button:
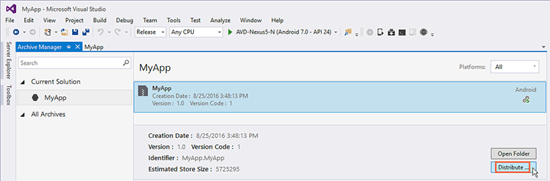
The Distribution Channel dialog shows information about the app, an indication of distribution workflow progress, and a choice of distribution channels. On the first run, two choices are presented:

It is possible to choose one of the following distribution channels:
- Ad hoc (We’ll be considering this option)
- Google Play
4.1.2.2.1 Publishing using Ad hoc option
After Ad-Hoc is selected, To publish the .APK, it must first be signed with a signing key (also referred to as a certificate).
An existing certificate can be used by clicking the Import button and then proceed to Sign the APK. Otherwise, click the click the + button to create a new certificate:

The Create Android KeyStore dialog is displayed; use this dialog to create a new signing certificate that can be used for signing Android applications. Enter the required information (outlined in red) as shown in this dialog:
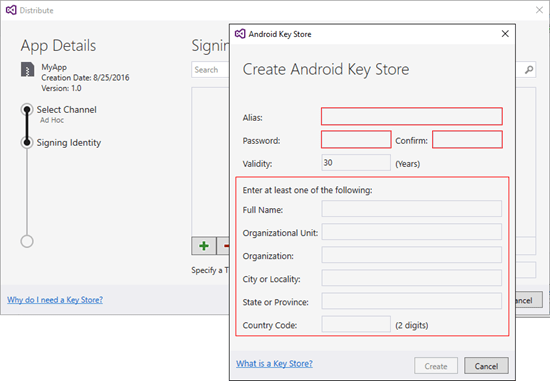
After the information is provided, click on create button.
The resulting keystore resides in the following location:
C:\Users\USERNAME\AppData\Local\Xamarin\Mono for Android\Keystore\ALIAS\ALIAS.keystore
Once the keystore is generated, make a backup of the same.
Sign the APK
When Create is clicked, a new key store (containing a new certificate) will be saved and listed under Signing Identity as shown in the next screenshot. To publish ad-hoc, select the signing identity to use for signing and click Save As to publish the app for independent distribution.
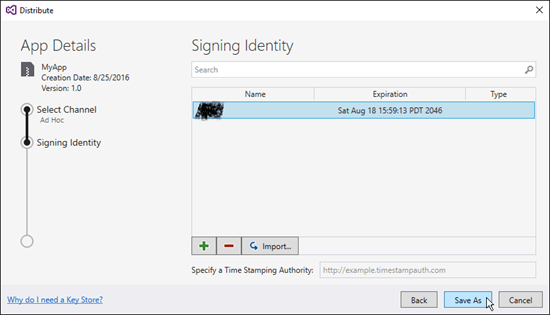
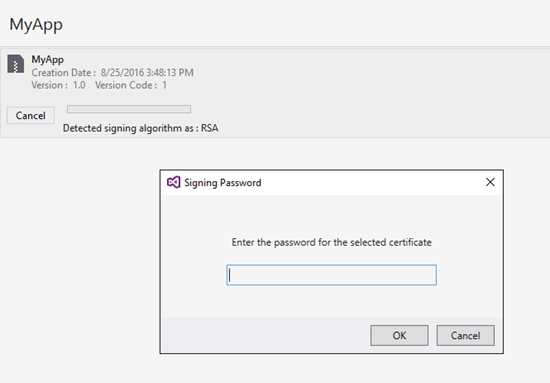
Next, the Archive Manager displays the publishing progress. When the publishing process completes, the Save As dialog opens to ask for a location where the generated .APK file is to be stored.
If the key password is unknown, the Signing Password dialog will appear to prompt for the password for the selected certificate
After the signing process completes, click Open Distribution

This causes Windows Explorer to open the folder containing the generated APK file. At this point, Visual Studio has compiled the Xamarin.Android application into an APK that is ready for distribution. The following screenshot displays an example of the ready-to-publish app, App.apk.
4.1 Publishing the app to Google Play Store
Before publishing the application to Google Play store, there are various security checks have to be validated and various operations are to be performed within security domain of the application.
4.1.1 Checks before publishing the app to Play Store
4.1.1.1 Obfuscate Source Code
When we build the app, the source code gets compiled into the library and files as per the selected build configuration. In case of Android, the code is bundled into an .apk file or app bundle files. But there are software packages which can convert the library files back to source code files which can result in security issues. Obfuscation is a process which will not allow to convert the library files back to source code files. To obfuscate code in Android Studio, navigate to the build.gradle file in the Android Studio Project and set the minifyEnabled property to true from false.
4.1.1.2 Disable Debugging
The debugging flag in the AndroidManifest.xml file should be set to false. The name of the flag is android:debuggable.
4.1.1.3 Other checks
The other checks which are the be performed are
- Ensuring that the application transmits data over HTTPS.
- Disable logging in the application
- Ensuring that the application has emulator checks.
- Ensuring the passwords are hashed and not encrypted.
- Ensuring Local Data storage is encrypted
- Avoid use of Custom Encryption Algorithm
4.1.2 Submitting the application to Play Store
4.1.2.1 Using the Google Play Console
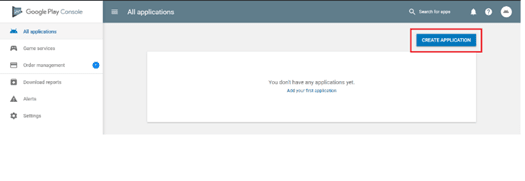
Login to the ‘Google Play Console’. Upon successful login, the home page will look like below image.

Once logged in, select the ‘All Applications’ tab from the side menu.

Click the create application button in the top right corner.
A prompt opens up asking for the default language of the application and the name of the application.

Once the app is created, select the ‘App Releases’ tab from the side menu. Google Play console offers three tracks for App Releases.
A. Production Track
This is the Main track which will be available for public
B. Open Track
This is the Beta track which will only be available for beta testers. Beta testers are people outside the development team.
C. Closed Track
This is the Alpha track which is only available for people inside the development team.

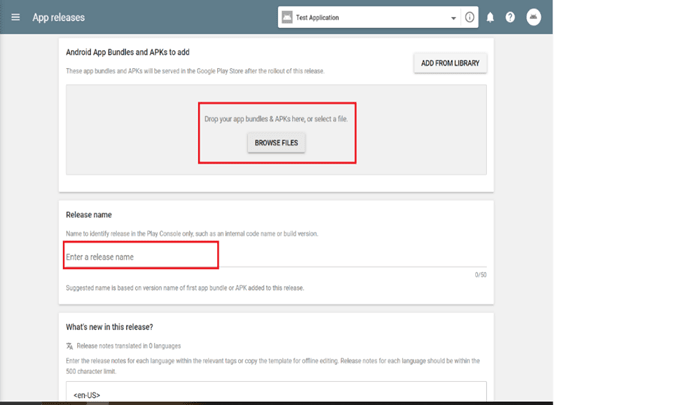
4.1.2.2 Upload the APK or app bundle files for your app
This stage give developer the ability to limit the reach of the application to specific people only. Here the application can be assigned to a Alpha Track, Beta Track or the Production Track. Choosing the correct track is important because Alpha and Beta track help in getting feedback from real end users. After selection of the track, the .apk and bundle files are to be selected and uploaded to the Play Store.
Select a track where the application is to be deployed. It will ask you for the APK file and a release name. It will also ask for release notes which consists of new features in the release.
4.1.2.3 Preparing the information about the application
After uploading the APK file, click on the ‘Store Listing’ tab from the side menu. Basic information about the application is required before submitting the application to Play Store. The information required is listed below:
- Short description about the application
- Brief description about the application
- Screenshots of various screens
- Hi-resolution Icon
- Video link
- Application Type
- Category
4.1.2.4 Set the rating of the Application
Once the application files are submitted successfully, in the next stage the submission team has to answer some questions. Based on the responses to these questions, the age rating is calculated for the application. This helps in identifying if the application is appropriate for which age group.
4.1.2.5 Set pricing and distribution plan
The developer can select if the application needs to be a paid one or a free one. The countries in which the application should be available can also be selected on this page.
4.1.2.6 Publish the App
Once all the details are filled, the developer can publish the app. Once published, it will be reviewed by the people at Google for validity of the information. If any of the security check is violated the application will be rejected. If no security violations are found, the application will be published successfully.

Top comments (0)