This guide provides detailed instructions for deploying Fider on AWS ECS, with tasks running inside a private subnet and an internet-facing Application Load Balancer (ALB) set up as a custom origin for CloudFront(Cloudfront + WAF).
This is a detailed article, so buckle up! Since this setup closely mimics a production deployment and let’s be real, deploying Fider on AWS isn’t an easy feat, you’ll want to follow along carefully.
AWS services used
- Elastic container registry(ECR)
- Elastic container service(ECS Fargate launch type)
- Application Load Balancer(ALB)
- Relational Database Service(RDS)
- Systems Manager Parameter Store
- Simple Storage Service(S3)
- Simple Email Service(SES)
- Cloudfront(CDN)
- Web Application Firewall(WAF)
- Key Management Service(KMS)
- Amazon Certificate Manager (ACM)
Table of Contents
- What is Fider ?
- Fider's Tech Stack
- Pre-flight Checks
- Install AWS CLI
- Push the Docker Images to ECR
- Create a VPC
- Create Subnet Group for RDS
- Create an RDS PostgreSQL DB
- Create Parameters in Systems Manager Parameter Store
- Create an IAM User
- Create an S3 Bucket
- Create an Identity in SES
- Why Use ECS Instead of EC2
- Create an ECS Cluster
- Create Task Definition
- Create an ECS Service
- Create CloudFront Distribution with WAF
What is Fider ?

Okay, okay, so, listen up! Fider is like this thing where people can go and, like, share their opinions on stuff, right? Imagine you’ve got a big ol' bag of potato chips don’t ask me why I’m talking about chips, it just seems right and you wanna know what everyone thinks about the flavor. Fider’s the place where people can give feedback on stuff like that, but, you know, for real stuff like websites and apps.
So, you go there, type up your thoughts, and boom other people can vote on whether they agree or disagree, like they're choosing between watching Family Guy or some other dumb show. But here’s the kicker, Fider lets people actually vote and prioritize the feedback they care about!
So, yeah, that’s Fider. Kinda like a big opinion poll but with a lot more techy stuff behind it. And you can totally use it for, you know, not chips...
You can checkout the Fider's official page for more details: https://fider.io/
This guide focuses on deploying Fider on AWS, but you can also self-host it on other platforms like Heroku, Azure, or your own servers. For more details, check out the official Fider self-hosting documentation.
Fider's Tech Stack
Backend: Go (Golang), with custom HTTP handling.
Frontend: React, using SCSS(Sassy CSS) for styling.
Database: PostgreSQL.
Authentication: OAuth 2.0.
Background Jobs: Go routines.
Cloud Storage and Email Integration: S3 for blob storage and SES for email notifications.
Pre-flight checks
Before starting, ensure that you have an AWS account with access to the free tier or a valid payment method on file.
Install AWS CLI
Step 1:
You need the awscli package installed for pushing the images built locally to Elastic Container Registry(ECR).
Step 2:
If you use ubuntu distro, Check the snap version by using the following command.
snap version
Run the following snap install command for the AWS CLI.
sudo snap install aws-cli --classic
After the installation is complete, verify the installation by using the command,
aws --version

With Snap package you always get the latest version of AWS CLI as snap packages automatically refresh.
For command line installer check out the documentation: https://docs.aws.amazon.com/cli/latest/userguide/getting-started-install.html
Step 4: Configure AWS CLI
Use this command to configure the AWS CLI.
aws configure
Once configured, verify your AWS CLI credentials using the following command.
aws configure list
Step 5: Pull official docker images from DockerHub
Pull the official docker image for Fider from the DockerHub registry at: https://hub.docker.com/r/getfider/fider/tags
Use the docker pull command to pull the image from the DockerHub.
docker pull getfider/fider:main

Check if the docker image is available in your instance.
docker images

Push the Docker images to ECR
Step 1: Visit the ECR console
Create a public or private repository based on your use case by clicking on the create repository prompt in the top right corner.

Name the repo getfider/fider
Check if the repository is created.

Step 2: View the push commands
View the push commands by clicking on the respective repository.

Use the AWS CLI to retrieve an authentication token and authenticate your Docker client to your registry.

tag your pulled image so you can push the image to this repository.
![]()
Run the following command to push this image to your newly created AWS repository.

The docker images should now be available in the repository you created.

Create a VPC
Step 1: Create a standalone VPC for deploying Fider application
Login to the management console then navigate to the VPC service console and click on Create VPC.

Create VPC only for now, you can create public and private subnets manually and can attach these subnets to particular route tables.

A route table will also get created with route to local traffic.

Step 2: Create an Internet gateway
Create an IGW and attach it to the VPC you created.


The IGW is now attached to the VPC.
Associate the IGW with the route table by clicking on edit routes.

By clicking on Add route attach the the IGW to the route table.

The route table now has a route to the IGW, which means the subnets associated with this route table can have Internet access.

Step 3: Create Public Subnets
Create at least two public subnets, so that the Application Load Balancer can reside in it.
Navigate to the VPC Console, under the subnets section create two public subnets.
Decide the subnet CIDR range and provision it accordingly.

Associate the public subnets to the public route table where the IGW is also attached.

Step 4: Create Private Subnets
Create at least two private subnets, so that your ECS tasks and RDS can reside in it.
Navigate to the VPC Console, under the subnets section create at least two private subnets.

Under the actions dropdown choose Edit subnet settings and uncheck the Enable auto-assign public IPv4 address.

Step 5: Create a Private route table
Create a private route table in the VPC console under the route tables section to route traffic locally.


Associate the private subnets to the private route table, like how you did with the public route table, and follow the same steps.
Step 6: Create an Elastic-ip
Allocate an elastic-ip address and attach it with the NAT gateway.

Click on Allocate Elastic IP address

From public ipv4 address pool, choose Amazon's pool of ipv4 address and click Allocate

You should now be able to check the static Elastic IP allocated to you. It can now be attached to the NAT gateway.
Step 7: Create NAT gateway
Create a NAT gateway to allow tasks in the private subnet to connect to the internet.
Navigate to NAT gateway section under the VPC console and create a NAT gateway.

Associate it with a public subnet and also associate an Elastic IP address to it.
Set the connectivity type to public.
Attach the NAT gateway to the private route table that has three private subnets associated with it.

The private route table now has a route to the NAT gateway.

Your VPC lineage should now look like this.

Create Subnet group for RDS
Navigate to the RDS sevice console and click on subnet groups,

Click on create DB subnet group

Fill out the subnet group details and add subnets and choose the availability zones(azs) accordingly(private subnets).

If you choose to launch multi-AZ DB clusters, you must select 3 subnets in three different availability zones.

Click on create,your subnet group will now be available in the subnet groups dashboard.

Create an RDS PostreSQL DB
Navigate to the RDS service console from the management console and click on DB instance, to create an RDS DB instance.

Click on create database

Choose standard create and choose PostgreSQL as engine type.

Choose the latest PostgreSQL engine version and for this guide i choose to go with single DB instance under the availability and durability section.

Under credential settings provide postgres as master user name and choose self managed to use your custom password for authenticating with RDS.

For this guide, I chose to go with Burstable classes, depending on your use case you can fine tune the DB instance class. Storage will be left as default, unless you choose to customise it.

Under connectivity section, choose the VPC that you created(fider-vpc) and the subnet group you created previously would appear under the DB subnet group section.
Choose NO under public access section.
Now, before proceeding to VPC security group section, navigate to VPC console and create a security group for both RDS and ECS.


The above sg rules are for ECS service.

The above sg rule is for RDS and it has no outbound rules set.
Now back to the RDS console where we left,

Choose the security group you created and choose the availability zone where you would want to host the DB instance.

Set database authentication as password based, I have disabled monitoring you can enable it if you want.
Create the initial database as fider in the DB instance.

I chose to go with the above settings, you can enable it if you want.

Click on create database to provision an RDS PostgrSQL DB.

The RDS PostgreSQL DB is now available!
Create Parameters in Systems manager Parameter Store
Since Fider currently does not appear to have built-in logic specifically to fetch credentials or secrets from AWS Secrets Manager, I have used parameter store to store Fider's environment variables so the tasks in ECS can fetch these credentials when they are being fired up.

Fider supports the above environment variables. I have used the standard tier and secureString type to encrypt sensitive data using KMS keys.
Create an IAM user
Fider supports the use of Amazon S3 for blob storage and Amazon SES for sending emails. However, simply passing the access keys through environment variables will not automatically make the images appear in the S3 bucket, nor will it enable SES for email sending.
The application will assume the role assigned to the user, which will then allow it to perform actions on the user's behalf.
Navigate to the IAM console and create a user and assign the roles necessary for accessing the S3 bucket and SES service,

I've granted full access to S3 and SES for this guide, but this isn't the recommended approach. Instead, you should create fine-grained access policies and assign them to the role.
Create an S3 bucket
Navigate to the S3 bucket console and create a general purpose S3 bucket for blob storage.

Once you've created the bucket, navigate to the Permissions tab and check the Bucket Policy section. It’s likely empty, right? Well, it shouldn’t be, if left empty the S3 bucket will remain empty forever.
  {
    "Version": "2012-10-17",
    "Statement": [
        {
            "Effect": "Allow",
            "Principal": {
                "AWS": "arn:aws:iam::<ACCOUNT_ID>:user/<USER_NAME>"
            },
            "Action": "s3:*",
            "Resource": "arn:aws:s3:::<BUCKET_NAME>"
        }
    ]
}
This policy is too permissive; you can create more fine-grained policies to restrict access.
Create an identity in SES
The application requires email verification as part of the signup process to prevent spam and ensure only valid users access the platform. I chose the SES API route instead of SMTP.
Navigate to the SES service console and start creating an identity.

I chose to go with domain verification. Once you've created the identity via the domain, make sure to validate the records with your DNS provider.
You can send a test mail from the verified identities to the check the workflow.
If you plan to run this setup in production, you can request production access from Amazon support. Otherwise, you can remain in the sandbox environment.

Why use ECS instead of EC2
There is one major reason to use ECS instead of EC2,
1. Reduced Operational Overhead:
EC2 is cheaper on paper, but that requires careful capacity management and container resource planning plus reserved instance commitments or spot fleet configurations. In the end it feels like 99% of the time, the admin overhead doesn't outweigh the savings.
Depends on how much control you want. If you want less control, go with Fargate. And yes, if you go with standard ECS, the EC2 instances are run and managed by you.
Create an ECS cluster
Step 1:
Navigate to the ECS console and create an ECS cluster with Fargate launch type.
Click on Create cluster.


I have turned on container insights for this guide, to see aggregated metrics at cluster and service level. In this way you can run the deep dive analysis.
This will create an ECS cluster via Cloudformation in the backend.

Create Task Definition
Step 1:
Navigate to the task definition section under the ECS console and create a task definition named fider-app-task-definition.

The task definition can be created via both the console and JSON.
Refer to the following JSON task definition for creating the task definition via JSON.
  {
    "taskDefinitionArn": "arn:aws:ecs:us-east-2:624184658995:task-definition/fider-app-task-definition:7",
    "containerDefinitions": [
        {
            "name": "fider-app",
            "image": "624184658995.dkr.ecr.us-east-2.amazonaws.com/getfider/fider:main",
            "cpu": 2048,
            "memory": 8192,
            "memoryReservation": 4096,
            "portMappings": [
                {
                    "name": "fider-app-3000-tcp",
                    "containerPort": 3000,
                    "hostPort": 3000,
                    "protocol": "tcp",
                    "appProtocol": "http"
                }
            ],
            "essential": true,
            "environment": [],
            "mountPoints": [],
            "volumesFrom": [],
            "secrets": [
                {
                    "name": "BASE_URL",
                    "valueFrom": "arn:aws:ssm:us-east-2:624184658995:parameter/BASE_URL"
                },
                {
                    "name": "DATABASE_URL",
                    "valueFrom": "arn:aws:ssm:us-east-2:624184658995:parameter/DATABASE_URL"
                },
                {
                    "name": "JWT_SECRET",
                    "valueFrom": "arn:aws:ssm:us-east-2:624184658995:parameter/JWT_SECRET"
                },
                {
                    "name": "GO_ENV",
                    "valueFrom": "arn:aws:ssm:us-east-2:624184658995:parameter/GO_ENV"
                },
                {
                    "name": "EMAIL_NOREPLY",
                    "valueFrom": "arn:aws:ssm:us-east-2:624184658995:parameter/EMAIL_NOREPLY"
                },
                {
                    "name": "EMAIL_AWSSES_ACCESS_KEY_ID",
                    "valueFrom": "arn:aws:ssm:us-east-2:624184658995:parameter/EMAIL_AWSSES_ACCESS_KEY_ID"
                },
                {
                    "name": "EMAIL_AWSSES_SECRET_ACCESS_KEY",
                    "valueFrom": "arn:aws:ssm:us-east-2:624184658995:parameter/EMAIL_AWSSES_SECRET_ACCESS_KEY"
                },
                {
                    "name": "EMAIL_AWSSES_REGION",
                    "valueFrom": "arn:aws:ssm:us-east-2:624184658995:parameter/EMAIL_AWSSES_REGION"
                },
                {
                    "name": "BLOB_STORAGE",
                    "valueFrom": "arn:aws:ssm:us-east-2:624184658995:parameter/BLOB_STORAGE"
                },
                {
                    "name": "BLOB_STORAGE_S3_ACCESS_KEY_ID",
                    "valueFrom": "arn:aws:ssm:us-east-2:624184658995:parameter/BLOB_STORAGE_S3_ACCESS_KEY_ID"
                },
                {
                    "name": "BLOB_STORAGE_S3_BUCKET",
                    "valueFrom": "arn:aws:ssm:us-east-2:624184658995:parameter/BLOB_STORAGE_S3_BUCKET"
                },
                {
                    "name": "BLOB_STORAGE_S3_ENDPOINT_URL",
                    "valueFrom": "arn:aws:ssm:us-east-2:624184658995:parameter/BLOB_STORAGE_S3_ENDPOINT_URL"
                },
                {
                    "name": "BLOB_STORAGE_S3_REGION",
                    "valueFrom": "arn:aws:ssm:us-east-2:624184658995:parameter/BLOB_STORAGE_S3_REGION"
                },
                {
                    "name": "BLOB_STORAGE_S3_SECRET_ACCESS_KEY",
                    "valueFrom": "arn:aws:ssm:us-east-2:624184658995:parameter/BLOB_STORAGE_S3_SECRET_ACCESS_KEY"
                }
            ],
            "logConfiguration": {
                "logDriver": "awslogs",
                "options": {
                    "awslogs-group": "/ecs/fider-app-task",
                    "mode": "non-blocking",
                    "awslogs-create-group": "true",
                    "max-buffer-size": "25m",
                    "awslogs-region": "us-east-2",
                    "awslogs-stream-prefix": "ecs"
                },
                "secretOptions": []
            },
            "systemControls": []
        }
    ],
    "family": "fider-app-task-definition",
    "taskRoleArn": "arn:aws:iam::624184658995:role/ecsTaskExecutionRole",
    "executionRoleArn": "arn:aws:iam::624184658995:role/ecsTaskExecutionRole",
    "networkMode": "awsvpc",
    "revision": 7,
    "volumes": [],
    "status": "ACTIVE",
    "requiresAttributes": [
        {
            "name": "ecs.capability.execution-role-awslogs"
        },
        {
            "name": "com.amazonaws.ecs.capability.ecr-auth"
        },
        {
            "name": "com.amazonaws.ecs.capability.docker-remote-api.1.28"
        },
        {
            "name": "com.amazonaws.ecs.capability.docker-remote-api.1.21"
        },
        {
            "name": "com.amazonaws.ecs.capability.task-iam-role"
        },
        {
            "name": "ecs.capability.execution-role-ecr-pull"
        },
        {
            "name": "ecs.capability.secrets.ssm.environment-variables"
        },
        {
            "name": "com.amazonaws.ecs.capability.docker-remote-api.1.18"
        },
        {
            "name": "ecs.capability.task-eni"
        },
        {
            "name": "com.amazonaws.ecs.capability.docker-remote-api.1.29"
        },
        {
            "name": "com.amazonaws.ecs.capability.logging-driver.awslogs"
        },
        {
            "name": "com.amazonaws.ecs.capability.docker-remote-api.1.19"
        }
    ],
    "placementConstraints": [],
    "compatibilities": [
        "EC2",
        "FARGATE"
    ],
    "requiresCompatibilities": [
        "FARGATE"
    ],
    "cpu": "2048",
    "memory": "8192",
    "runtimePlatform": {
        "cpuArchitecture": "X86_64",
        "operatingSystemFamily": "LINUX"
    },
    "registeredAt": "2025-02-18T06:06:55.123Z",
    "registeredBy": "arn:aws:sts::624184658995:assumed-role/AWSReservedSSO_AdministratorAccess_263ab8d7ae88c1c4/wasim",
    "tags": []
}
I have referenced the environment variables created in systems manager parameter store by their resource arn.
You also need the following policies to be attached to ecsTaskExecutionRole along with AmazonECSTaskExecutionRolePolicy,
- AmazonSSMFullAccess
- ROSAKMSProviderPolicy

The policies attached provides the ECS agent the required permissions to fetch the KMS encrypted environment variables from the systems manager parameter store, decrypt it and provide it to the application hosted inside the ECS tasks.
I have provided full access permission policies, but it's usually not the right way to do it. You can craft the fine grained access policies and attach the same to the ecsTaskExecutionRole.
Create an ECS service
Step 1:
Navigate to the ECS cluster you created and click on it, once inside the cluster click on service.

Step 2: Configuration parameters
In the compute configuration choose the capacity provider strategy and choose FARGATE as capacity provider with base 1 and weight as 100

Choose service as the application type in the deployment configuration and Replica as the service type with Desired tasks set to 1. You can also set it 2, I have used one for this guide.

In the networking configuration choose the VPC you created.

Turn off the public IP address as the tasks will use NAT gateway.
Configure the Application load balancer and place it inside the public subnet as front-facing for your application.

Create a target group on the fly in the ECS console itself and set up an HTTPS listener for your ALB. For this deployment, I’ve chosen to handle the HTTP to HTTPS redirect at the CDN level, so you don’t need an HTTP listener for your ALB, as redirects won’t happen at that level.
For the SSL certificate to appear in the dropdown, skip to step 3 from here and request a public certificate from the ACM console.
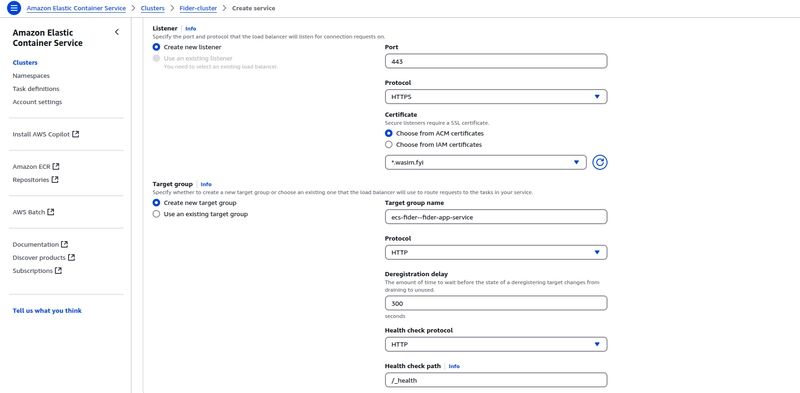
The health check path for Fider is _/health
I have not enabled service auto scaling for this guide, you can enable it if you want.
Click on create in the end and navigate to Cloudformation to view the status.


The password authentication with RDS PostgreSQL is successful and the records got migrated!

Since we have also enabled container insights, we can check the performance metrics of clusters, services and tasks.
Note: If you are not able to run the tasks or if you ran into errors like this,

It's because you placed the task in the public subnet with no public IP assigned to it, when you created the application load balancer in the ECS service console itself. Even i ran into this issue and then i had to troubleshoot the failed tasks.
I used the Systems Manager's AWSSupport-TroubleshootECSTaskFailedToStart automation document. It diagnosed the issue for me.

Note: Create the application load balancer and target group separately, note the availability zones(AZs) you assinged for ALB, and when you spin up the ECS tasks via service make sure you provide the private subnets from the same availability zones(AZs).
Feel free to check this documentation when you run into issues!

Step 3: Use ACM for SSL certificates
The service is up and running now.

Navigate to the ACM console and click on request a certificate.

Request a public certificate and click on Next.

Provide your domain name and choose the DNS validation method.

Click on request and ACM provides you with the DNS records, verify the records by mapping them to your DNS registrar settings.

Your SSL certificate is now ready to be used with the Application Load Balancer. You can map it under the Listener configuration for the ALB in the certificate section of the ECS service console.

Since I’m setting up CloudFront, I’ve also chosen to enable WAF at the CDN level for this deployment, as CloudFront acts as the first point of contact and can filter traffic before it reaches the ALB.
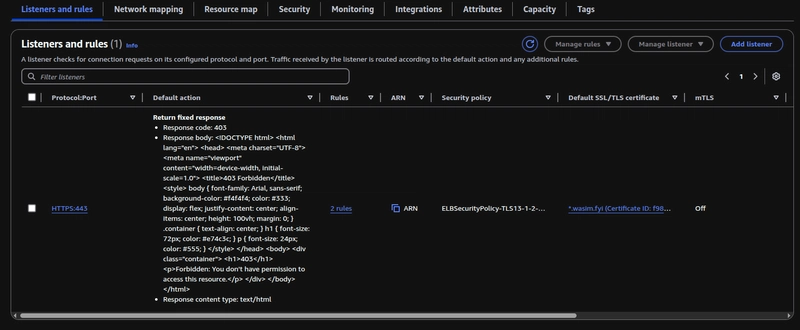
Since WAF is enabled at the CloudFront level and all traffic originates from there, you don’t need to enable WAF at the ALB level. Instead, I’ve added an X-Custom-Header to restrict access to the Application Load Balancer (ALB), ensuring that only requests from CloudFront are allowed.
Create Cloudfront distribution with WAF
Navigate to the integrations tab under the application load balancer

Click on manage cloudfront + WAF integration.

click on the check box to enable the cloudfront IPs as inbound to your application load balancer.

create an SSL/TLS certificate for your domain, from which you would like to host Fider on. Cloudfront only accepts SSL/TLS certificates from us-east-1(N.virginia) region.

Once you click create, WAF rules and Cloudfront distribution will get enabled for your ALB.
Now,navigate to the Cloudfront distribution and click on the behaviours tab to edit the settings of default cache behaviour,

I chose to handle the HTTP to HTTPS redirect at this level.
Since Fider is a dynamic application, Features like submitting feedback, voting, and commenting are processed in real-time, and the application relies on a database to store and manage user data dynamically. So set the Allowed HTTP methods to GET,HEAD,OPTIONS,PUT,POST,PATCH,DELETE . If not you won't be able to perform PUT operation if you choose from first two.
Save it and now hover over to the origins tab and choose to edit the ALB origin settings.


Set the protocol to HTTPS only, I choose to let Cloudfront talk to my ALB over HTTPS and scroll further down,

Add the Custom header which you added in the previous step with ALB, Cloudfront passes this header in every request it makes to the ALB. Hitting the ALB DNS without this header would result in 403 forbidden error.

This is how your ALB resource map should look. It will only forward traffic to the target group if the string you configured in CloudFront is present in the request header.

Next, map the distribution domain to the domain where you want to host Fider in your DNS records(CNAME record). Don't hit the distribution domain name it will only result in 502 error.
Hit the domain name you configured in the DNS entry, You should be able to see the landing page.

The images you upload to the webiste will get stored as an object in the S3 bucket, and when you access it from the browser via UI. you should be able to see this in the network tab under response headers (X-cache: Hit from Cloudfront)

You can navigate to the AWS WAF in the console and look for the request metrics.


You can also configure the managed rules in the WAF console under the Rules tab.
Viola! There you have it. Fider's up and running with the tasks securely inside their own private subnet, and the ALB routing requests to them. Additionally, with CloudFront and AWS WAF configured, traffic is efficiently delivered via the CDN while being protected at the edge, ensuring secure and optimized access.

Top comments (0)