Mommy it's too hot!
This is the cry that comes from our 2 year old's bedroom. Canada's extreme weather seasons can cause temperatures ranges from -40 degrees in the winter to 45 degrees Celsius or 110 Fahrenheit in the summer. This regularly shouldn't be a problem in itself as our home is programmed to always be the same temperature indoors. However our home's thermostat is located in our living room, reading temperatures and turning on and off the furnace based on conditions in that one room. If the curtains are open, if someone is cooking in the kitchen or even if lights and electronics are on, then the furnace will activate heating EVERY room in our home. This is especially a problem upstairs in our 2 years old's bedroom. He often wakes up crying, covered in sweat because his room is too warm.

As he is still too young to be able to use a blanket we have to resort to covering up his vent, opening his bedroom door, and sometimes even turning off the furnace. However this leads to frigid temperatures within a few hours.
Our family needs a heating and cooling system that adjusts to the temperature of the rooms that are most important in our home.
How Hot Is It?
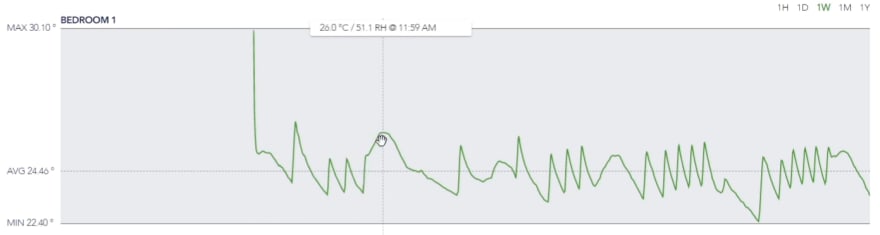
You cannot improve what you do not measure. After placing a bluetooth-enabled temperature sensor in my son's room, I quickly saw the problem. The room did not have a constant temperature. Between the random peaks and valleys, there was a range of over 3.5 degrees Celsius (6 Degrees Fahrenheit).
Combining the sensor with SensorPush's WIFI gateway the temperature measurements are automatically uploaded to their cloud where I can access them through APIs using MuleSoft.

In the above MuleSoft flow I programmed a Scheduler to run every 10 minutes. On triggering it will authorize against SensorPush's Cloud APIs and retrieve all bedroom temperature measurements for the previous 10 minutes. After receiving usually around 6-8 readings, I use DataWeave to traverse all the JSON response objects and calculate a reliable average temperature reading.
(Video Part 1) Process of determining the average temperature.
Videos are long please refer to timestamps
0:35 Problem Description
2:49 Building the Solution
15:31 Running the Application
Optimal Comfort Level
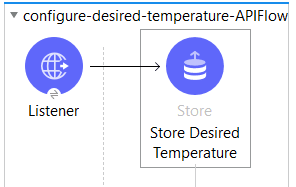
Now that we know the temperature of the bedroom, we need a desired temperature to strive for. This value needs to be in persistance storage so it can survive across multiple invocations and server restarts. That is why we are storing it inside AnyPoint's Object Store. To make the desired temperature value easily updatable, we wrap an API Endpoint Listener around it.
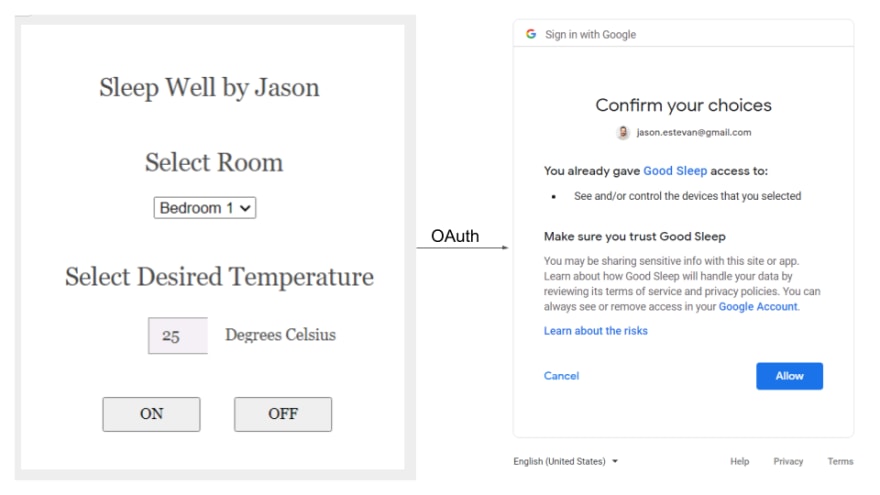
We can now connect this API to any user interface desired. Here is a mockup of one that will allow specifying which room to configure (future possibility of adding additional sensors in other rooms), the desired temperature of the selected room, and the option to turn the application on or off. This is also a great place to add OAuth authentication so the user can securely grant our application permission to access their home devices.
Continuing our MuleSoft solution, we add another flow that takes our calculated average temperature from the bedroom and compares it to our desired temperature stored in our Object Store. We determine one of three option paths; we need the room warmer, we need the room cooler, or if there is less than 1 degree difference we take no action.

Adjust on the Fly
It's great that now we know whether our son's room is too hot or too cold. We can take actions to adjust the temperature before it get's too extreme. However, as parents we value our sleep as well. A beneficial solution would ideally included an automated action. In order to adjust the temperature on the fly we would need to gain access to the furnace. This involved replacing our mercury-based thermostat with a 4th generation Google Nest thermostat.

Using the Google Cloud Platform authentication system with the public Nest Home Devices APIs I was able to query from within my MuleSoft application the thermostat's current temperature set point and the live temperature it's reading from my living room (where it's installed). Once I have this information, I send an outbound API request back to the thermostat to overwrite it's settings, convincing it to either turn the furnace on or off. If I need the furnace to turn on, I program the temperature set point higher than the current temperature it's reading, thus convincing the thermostat that it's too cold and turns itself on.
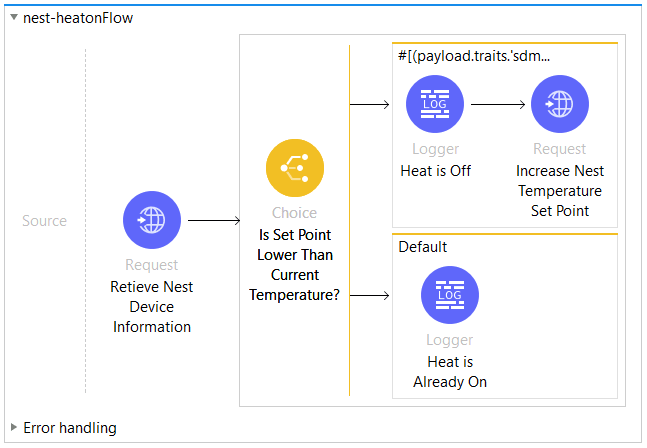
I take the opposite action if I want the Nest device to turn the furnace off. We send an API request to program the temperature set point to be lower than the current temperature it's reading resulting in the heat being shut off.

Now we have built a fully integrated solution with MuleSoft using a remote bedroom temperature sensor and a digital thermostat.
To summarize our MuleSoft application, using the Scheduler component we query the SensorPush APIs every 10 minutes to receive all bedroom measurements our bluetooth temperature sensor took recently. We use Dataweave to easily parse through all these readings to calculate the average temperature in our son's bedroom. Comparing this number to the desired bedroom temperature, which is stored inside AnyPoint's persistant Object Store, we determine whether the room is too warm or too cool for comfortable sleep. When an adjustment is needed, we interact with our Nest thermostat. Again using API calls we read our device's current settings and determine whether we need to adjust it's temperature set-point so that it will turn the furnace on or off, heating or cooling our upstairs bedroom. With the application running, our upstairs bedroom's temperature will stay within one degree of our desired temperature, allowing our 2 year old to sleep comfortably throughout the entire night.
(Video Part 2) Process of controlling the furnace.
Videos are long please refer to timestamps
0:00 Building the Solution
11:18 Running the Whole End to End Application
Source Code: (encryption key: 1234567890123456)

Top comments (1)
Great job Jason! Thanks for your submission.