
(Heroku and Salesforce - From Idea to App Part 2)
This is the 2nd article documenting what I’ve learned from a series of 10 Trailhead Live video sessions on Modern App Development on Salesforce and Heroku. In these articles I’m walking you through how to combine Salesforce with Heroku to build an “eCars” app—a sales and service application for a fictitious electric car company (“Pulsar”) that allows users to customize and buy cars, service techs to view live diagnostic info from the car, and more. In case you missed my first article, you can find the link to it here:
Modern App Development on Salesforce and Heroku
This article is going to cover setting up Heroku, installing LWC, and setting up the deployment for our app.
As a quick reminder, I’ve been following this series to stay current on the latest app development trends on these platforms, which are key for my career and business. I’ll be sharing step-by-step building the app, what I’ve learned, some of the highlights, and my personal take on some of the content.
In the last article…
In the last article, we walked through an overview of the Salesforce and Heroku Platforms and how they can work together. We also did some pre-work to get set up for building the eCars app. So, if you are jumping in at this point, here are the following prerequisites you will need:
- Getting a free Salesforce dev org: https://developer.salesforce.com/signup
- Installing the Salesforce CLI: https://developer.salesforce.com/tools/sfdxcli
- Installing Git (required for Heroku CLI): https://git-scm.com/book/en/v2/Getting-Started-Installing-Git (I also personally have Github Desktop.)
- Installing the Heroku CLI: https://devcenter.heroku.com/articles/heroku-cli
- Installing VSCode: https://code.visualstudio.com/ (I recommend also getting the Salesforce Extension Pack after installing VSCode.)
- Cloning the eCars GitHub repo: https://github.com/trailheadapps/ecars
For this article, there is another free account to sign up to start exploring Heroku: https://signup.heroku.com/
The only catch with the “Free Hobby” version of Heroku is that the dyno will automatically turn off when it’s not in use. There is also a limit of 500 hours of uptime per month on the free tier. It seems pretty fair to me—if they’re going to offer me some free compute resources, it’s only reasonable that they turn off the lights when I’m not actively using the resources.
Diving into Heroku
Let’s start with an introduction to Heroku, all the bells and whistles it comes with, and how to get quickly up to speed with deploying an app on the platform. If you’re not familiar with Heroku, it’s a PaaS solution for quickly creating and deploying apps. With Heroku the idea is for developers to focus on building their app, and the platform takes care of the infrastructure stuff (DevOps, scaling, environments, and so on).
One of the handy things about Heroku is the Buildpacks you can select and launch right off the bat. I’ve played around with setting up an Amazon EC2 application server from scratch. I’m not afraid to admit that I spent a good two hours sorting through documentation and help articles just to install the right pre-requisites on the instance.
With Heroku, however, you can just pick your programming language and Heroku will quickly create a turnkey process with these Buildpacks to get going with a particular language.
Heroku has 8 main officially-supported languages: Node.js, Ruby, Python, Java, PHP, Go, Scala, and Clojure.
However, there are many community Buildpacks available for other languages and frameworks as well.
For the eCars app we’re building, we’re using the Node.js Buildpack. While, at the time of this writing, I certainly understand and can work my way through javascript code, I wouldn’t say I have as much depth specifically with Node.js as I have with Salesforce APEX and Visualforce code. However, I’m looking forward to diving a little deeper into Node.js as I consider it cross-training for Salesforce aura and Lightning Web Components.
Going through the Buildpack for Node.js is super simple. The step-by-step instructions and links to required installed components are very easy to follow and I found myself up and running with Node.js in under 30 minutes.
https://devcenter.heroku.com/articles/getting-started-with-nodejs#set-up
You should also install the current Long-Term Support (LTS) version of Node.js from https://nodejs.org/en/. At the time of this writing, the LTS version was 14.15.1.
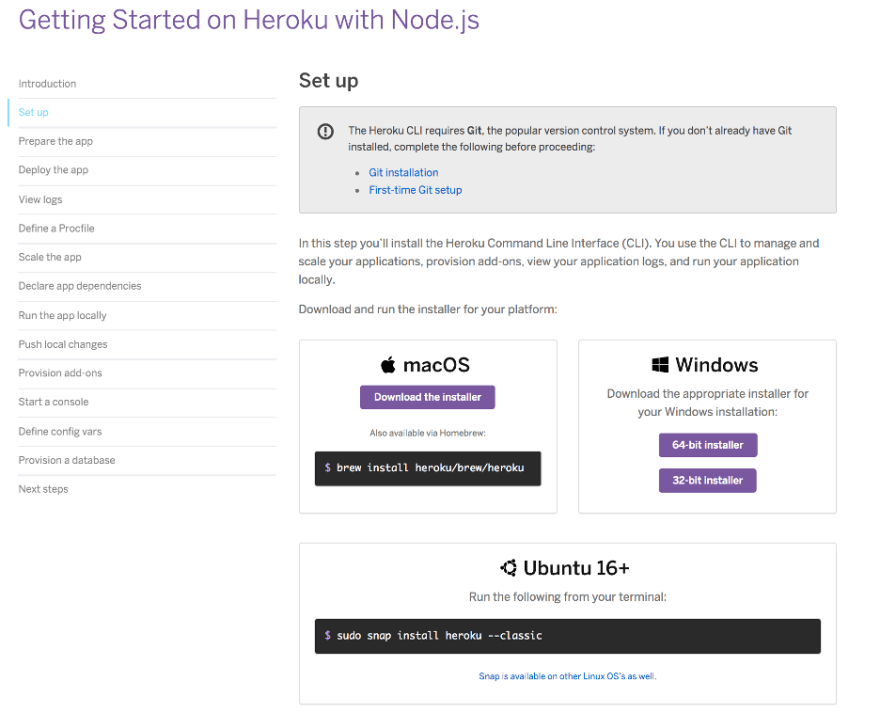
Turnkey process and instructions for getting started with Node.js on Heroku
VSCode CLI Exercises and Installing LWC
I mentioned earlier that Node.js would be good cross-training for Lightning Web Components (LWC). In fact, the next step is to actually install LWC using npm, which comes with Node.js installed earlier.
https://lwc.dev/
After following the instructions at the link above on the VSCode command line, and answering three questions about the type of app I wanted to create, npm was quickly on its way installing all the dependencies for the LWC app. Although I don’t understand what all the installed dependencies mean, I can appreciate all the hard work that went into making the app easy to use.
After a few minutes of installation, the sample LWC app was up and running on my localhost machine on port 3001. At this point, one could continue building and testing the app locally until ready to deploy to Heroku.
Deploying the Local Sample LWC App to Heroku
Now let’s deploy to Heroku. Deploying the app to Heroku is a simple exercise. You only need to know several git commands with some Heroku flavor attached. Heroku is git-based so whatever you’re deploying needs to be under git source control. The commands to then deploy are simple and should be familiar to anyone who has used git commands on a command-line interface:
First, create your Heroku app with desired name
heroku create [app name]
Second, commit Something to Git for Deployment
git commit
Finally, push the Source to the Main Branch on Remote Heroku Git Server to Deploy
git push heroku main
There are some deeper level items on this topic, such as the Procfile and package.json. These files deal with the application’s dependencies and instruct Heroku on how to build and compile the application. For now, this is perfectly sufficient as I have moved a local application to the remote Heroku host URL to make it accessible on the web.
Dynos, Scaling, and Concluding Thoughts
The session on Heroku involved a deep dive into Heroku’s “dynos” or a unitized computing package required to run a particular app. Without knowing how this all works under the hood, what you need to understand is that Heroku has some easy-to-use scaling features that add scale and power to the application vertically and horizontally to guarantee a certain level of uptime even in the face of spikes in usage.
To scale horizontally, you add MORE dynos to your Heroku application. Doing so can let Heroku route incoming requests across more running instances of your web servers, which improves performance with high traffic situations. Adding more dynos also allows your app to process more tasks in parallel, and handle a higher volume of jobs. There are, however, some cases where scaling horizontally doesn’t help, such as bottlenecks on services and long-running requests. Usually in these cases, the individual dynos are overloaded so parallel processing doesn’t help.
On the other hand, vertical scaling refers to making each dyno more powerful individually. Upgrading dynos to larger dyno types will provide your app with more memory and CPU resources so that the performance of the individual dynos are improved.
So if you imagine a factory with machines making trinkets, you can improve throughput by adding more machines (horizontal scaling) or by making each machine run faster (vertical scaling).
When I hear stories about a website or server crashing due to a sudden influx of visitors, I often wonder what kind of infrastructure those sites are running on and whether they would have crashed if they were using Heroku.
After working on the Lightning Web components (LWC) part of the app, I admit that as someone who has lived in APEX and Visualforce for many years, I am anxious about the shift towards Javascript-based aura and Lightning Web Components as it involves learning and adapting to a new framework that isn’t always my first go-to for building custom UI/UX components in Salesforce. However, this is certainly a trend I will have to embrace since the larger developer population is composed of more people who understand and work with Javascript than those who understand APEX.
It’s smart for Salesforce to attract and teach an existing population of Javascript developers to further enrich the entire Salesforce ecosystem. However, the silver lining to keep in mind is the number of resources there are in the ecosystem to help first-time Salesforce, APEX, and Lightning Web components users get information and training on the platform in a very short time.
Next
Ok - now we’re all setup with Heroku, LWC installed, and our deployment ready. In the next article we’re going to learn about data modeling in Salesforce, set up the data model, then explore the integration between the two platforms by connecting Heroku to the Salesforce data using Heroku Connect.
If you haven’t already, consider joining the official Chatter group for this series. It is a great opportunity to post questions and start discussions with the group. The slides from the presentations are also posted there after each session.
About me: I’m an 11x certified Salesforce professional who’s been running my own Salesforce consultancy for several years. If you’re curious about my backstory on accidentally turning into a developer and even competing on stage on a quiz show at one of the Salesforce conventions, you can read this article I wrote for the Salesforce blog a few years ago.
Link to the on-demand session recording:

Top comments (0)