Now, it’s time to parse the external website and add AI.
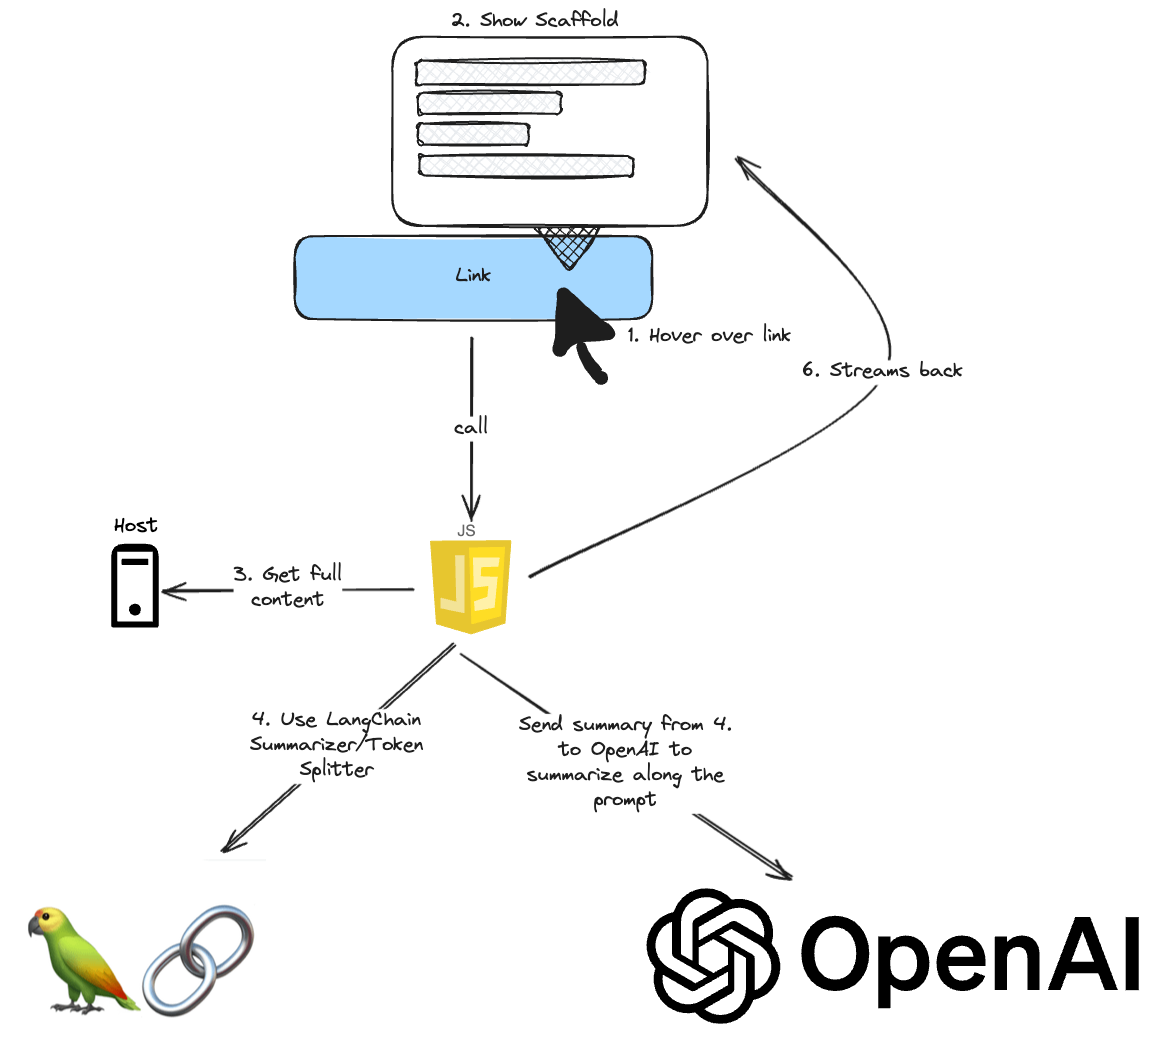
Idea
This is the idea of the project
Parsing Websites
Or you can even call it scraping 🫢
We can get the HTML by using the fetch function and then parse it via cheerio as it can parse HTML and manipulate it:
export function parseHtml(html: string): string {
  const $ = cheerio.load(html);
  const content: string = $('article').text() || $('main').text() || $('body').text();
  return content.trim();
}
As you can see, we parse only the content of article with fallback to main or body .
The fetch function is here:
export async function getPage(link: string) {
  console.log('Start scraping and fetching', link);
  try {
    const response = await fetch(link, {
      headers: {
        'Access-Control-Allow-Origin': '*',
      },
      mode: 'no-cors',
    });
    if (response.ok) {
      const html = await response.text();
      return html;
    }
  } catch (error) {
    console.error(error);
    throw new Error(`Error fetching ${link}: ${error}`);
  }
}

export async function getPageContent(link: string) {
  const html = await getPage(link);
  const content = html ? parseHtml(html) : '';
  return content;
}
Adding AI to it
Okay, we got the text and want to leverage a Large Language Model (LLM) to summarize it. The most popular one is OpenAIs GPT, but I also considered Ollama for local development. For now, let’s go with OpenAI.
But if you use OpenAI solely, then streaming is quite a pain. What also is complicated is managing the tokens. For these, we have two options.
- Using Vercel’s AI
- Use Langchain
Calculating the tokens is especially hard, so you should use one of the libraries above.
Vercel’s AI SDK
The Vercel AI SDK is an open-source library designed to help developers build AI-powered user interfaces, particularly for creating conversational, streaming, and chat user interfaces in JavaScript and TypeScript.
We will use their OpenAIStream , and StreamingTextResponse because it offers streaming, which is much better than the OpenAI module. And why reinvent the wheel, right?
LangChain
LangChain simplifies the development of Large Language Model (LLM) applications by offering a modular framework that allows developers to quickly build complex LLM-based applications through composition and modularity, providing standardized interfaces, prompt management, and memory capabilities, and enabling seamless integration with various data sources, thus streamlining the process of crafting LLM-based applications.
We will use it mainly for splitting long text into chunks. It might be that we could use LangChain also for streaming the response.
Create Options popup
If you have followed my previous blog posts, you should be familiar with the manifest.json . We add a default_popup in there.
{
  "manifest_version": 3,
  "name": "Link previewer",
  "version": "0.0.1",
  "description": "It sneak preview the link by mouse hovering and show key facts using OpenAI GPT model.",
  "icons": {
    "16": "images/icon-16.png",
    "32": "images/icon-32.png",
    "48": "images/icon-48.png",
    "128": "images/icon-128.png"
  },
  "content_scripts": [{
    "js": ["dist/index.js"]
  }],
  "action": {
    "default_popup": "popup.html"
  }
}
The purpose of this Popup is to enter the OpenAI- token. Here is the popup.html
<!doctype html>
<html lang="en">
  <head>
    <meta charset="UTF-8" />
    <meta name="viewport" content="width=device-width, initial-scale=1.0" />
    <title>Link previewer Options Page</title>
  </head>

  <body>
    <style>
      #popup {
          display: flex;
          justify-content: center;
          align-items: center;
          min-width: 220px;
          height: 300px;
          background-color: #f5f5f5;
      }
    </style>
    <div id="popup"></div>
    <!-- We bundle that inside the dist folder -->
    <script type="module" src="dist/popup.js"></script>
  </body>
</html>
Here is the Popup.tsx with preact.
import * as React from 'preact';

export default function Popup() {

    const saveOpenAi = () => {
        const openaiApiKey = document.querySelector<HTMLInputElement>('input[name="openai-api"]')?.value;
        chrome.storage.sync.set({ openaiApiKey }, () => {
            console.log('Value is set to ', openaiApiKey);
        });
    }
    return (
        <div class="openai-api-key-form">
            <h3>OpenAI API Key</h3>
            <input onClick={saveOpenAi} type="text" placeholder="Enter your OpenAI API key" name="openai-api" />
        </div>
    );
}
But I recommend using VanJS because the bundle size will be much smaller. I also used their VanUI for a Toast message.
import van from 'vanjs-core';
import { MessageBoard } from 'vanjs-ui';

const { h3, div, input, button } = van.tags;

const board = new MessageBoard({ top: '20px' });

const Form = () => {
  const divDom = div({ class: 'openai-api-key-form' }, h3('OpenAI API Key'));
  const inputDom = input({
    type: 'text',
    id: 'openai-api',
    placeholder: 'Enter your OpenAI API Key',
  });
  van.add(
    divDom,
    inputDom,
    button(
      {
        onclick: () => {
          // Set the OpenAI key to the Chrome Storage key
          chrome.storage.sync.set({
            openai: inputDom.value,
          });
          board.show({ message: 'Added your OpenAI Key', durationSec: 2 });
        },
      },
      'Add',
    ),
  );
  return divDom;
};

document.addEventListener('DOMContentLoaded', () => {
  const popup = document.getElementById('popup');
  popup ? van.add(popup, Form()) : null;
});
Let’s add Vercel’s AI
First, run bun add ai openai . Then, we create a new file openai.ts , and we need to get the OpenAI-Key. Luckily, we can use the chrome.storage- Object.
// openai.ts
let openai: OpenAI;

chrome.storage.sync.get(['openai'], (result) => {
  const openAIApiKey = result.openai;
  openai = new OpenAI({
    apiKey: openAIApiKey,
    dangerouslyAllowBrowser: true, // This allows it to use in the Chrome Extension
  });
});
That snippet gets the openai key from the storage. But it only gets the OpenAI key whenever the extension is loaded for the first time. What if the user changes the key? Luckily, we can listen to the event whenever the storage changes.
// in openai.ts
chrome.storage.onChanged.addListener((changes, area) => {
  if (area === "sync" && changes.openai) {
    const openAIApiKey = changes.openai.newValue;
    openai = new OpenAI({
      apiKey: openAIApiKey,
      dangerouslyAllowBrowser: true, // because we will use OpenAI directly inside the browser
    });
  }
});
Let’s write a function where we take a text as input and create a prompt. That function uses OpenAI along with Vercel’s AI and returns back a ReadableStream.
export async function getSummary(text: string) {
try {
// We do some clean up
const cleanText = text
.replaceAll('`', '')
.replaceAll('$', '\\$')
.replaceAll('\n', ' ');
const promptTemplate = `
I want you to act as a text summarizer to help me create a concise summary of the text I provide.
The summary can be up to 2 sentences, expressing the key points and concepts written in the original text without adding your interpretations.
Please, write about maximum 200 characters.
My first request is to summarize this text – ${cleanText}.
`;
// This is OpenAI's way to create messages
const completion = await openai.chat.completions.create({
model: 'gpt-3.5-turbo',
messages: [{ role: 'assistant', content: promptTemplate }],
stream: true, // Turn on the stream
});
// Convert the response into a friendly text-stream
const stream = OpenAIStream(completion);
// Respond with the stream
const response = new StreamingTextResponse(stream);
if (response.ok && response.body) {
return response.body;
}
} catch (error) {
console.error(error);
return '<b>Probably, too big to fetch </b>';
}
}
```
Now, let’s call that function. I hope you still have the `index.ts` from the previous part of this series.
```typescript
// index.ts
import { getSummary } from "./openai.ts";
import { getPageContent } from "./scraper.ts";
// Find the code in the prev part
for (const link of links) {
link.addEventListener("mouseenter", async (event: MouseEvent) => {
const timer = setTimeout(async () => {
// Find the code in the prev part
const externalSite = await getPageContent(link.href);
const summary = await getSummary(externalSite); // <-- New function
if (
summary === undefined &&
summary === "<b>Probably, too big to fetch </b>"
)
return;
}, 3000);
// Find the code in the prev part
});
}
```
Okay, our summary is now of type `ReadableStream` if we don’t get the message `<b>Probably, too big to fetch</b>`.
Now, we create another function inside the `openai.ts` to read the stream
```typescript
// declare function getSummary()
export async function readFromStream(
stream: ReadableStream,
url: string,
): Promise<string> {
let result = '';
const reader = stream.getReader();
const decoder = new TextDecoder();
const container = document.querySelector<HTMLElement>(`[data-url="${url}"]`);
try {
while (true) {
const { done, value } = await reader.read();
if (done) {
break;
}
const chunk = decoder.decode(value);
for (let i = 0; i < chunk.length; i++) {
await new Promise((resolve) => setTimeout(resolve, 10)); // Adjust the delay as needed
result += chunk[i];
if (container) {
container.style.height = 'auto';
container.textContent += chunk[i];
}
}
}
return result;
} catch (error) {
console.error(error);
return '<b>Probably, too big to fetch </b>';
}
}
```
On line 11, we retrieve the tooltip element to display the result. Line 10 fetches the stream reader and reads all the streams (line 15). Since the data is encoded, we must decode it (line 19) and then iterate over each chunk, essentially each character. To create a typing animation effect, we introduce an artificial delay of 10ms (which can be adjusted per your requirement) and then append it to the tooltip element.

Unfortunately, there is a limit. With OpenAI, you only have a limit of tokens of 4096 you can send.

Luckily, we can use [LangChain](https://langchain.com/) here.
## How to deal with long texts
We have to change the strategy a bit. There are two ways, and all involve using [LangChain](https://python.langchain.com/docs/get_started/introduction):
1. We split the text into chunks and summarize each chunk to shrink so that the result fits the number of tokens
2. We use LangChains [Chain Summarizer](https://js.langchain.com/docs/modules/chains/additional/analyze_document) to summarize it first and then send the summary to OpenAI along with our prompt.
I prefer the latter, so let’s continue.

### Split the Text into Chunks
Since we extract the whole content from the website, we take the `cleanText` and use the `RecursiveCharacterTextSplitter`. In general, I followed [their instruction on their official documentation](https://js.langchain.com/docs/modules/chains/popular/summarize).
```typescript
const textSplitter = new RecursiveCharacterTextSitter({
chunkSize: 1000,
});
const docs = await textSplitter.createDocuments([cleanText]);
```
### Use LangChains summarization function
LangChain has a built-in function to summarize the text, `loadSummarizationChain`, which requires an LLM. Since we have a function `readFromStream`, we can stream the result from the `loadSummarizationChain`. And the rest stays as it is
```typescript
const llm = new OpenAI({
openAIApiKey,
streaming: true,
});
const summarizeChain = loadSummarizationChain(llm, {
type: "map_reduce",
});
const stream = (await summarizeChain.stream({
input_documents: docs,
})) as ReadableStream;
// Respond with the stream
const response = new StreamingTextResponse(stream);
if (response.ok && response.body) {
return response.body;
}
```
### Modifikation on `readFromStream`
```javascript
export async function readFromStream(/* Parameters */) {
// - const decoder = new TextDecoder();
// +
// - const chunk = decoder.decode(value);
// +
const chunk = value.text;
}
```
Apparently, the `OpenAI` of LangChain differs from that `OpenAI` of Vercel’s AI SDK.
## Let’s build
Okay, let’s build everything
```sh
bun build src/index.ts --outfile dist/index.js --outdir dist &\
bun build src/popup.ts --outfile dist/popup.js --outdir dist
```
But the `index.js` throws an error 🤔

`Uncaught ReferenceError: Cannot access ‘BasePromptTemplate’ before initialization` It seems like Chrome does not hoist classes or functions of JavaScript Extensions 🤪
I couldn’t find a way how to change that in Bun. That’s why I had to script it myself.
## Conclusion
In conclusion, this project involves parsing an external website and using AI to summarize its content. We explored different options for leveraging OpenAI’s Large Language Model (LLM) and used Vercel's AI SDK for its streaming capabilities. We also discussed strategies for dealing with long texts, such as splitting the text into chunks or using LangChain's summarization function. This part of the series also shows how to create a popup for entering the OpenAI token and how to handle limitations on the number of tokens that can be sent. Finally, we encountered an error when building the project and will explore ways to fix it in the next part
Find the repository [here](https://github.com/jolo-dev/worth-the-click).
In the next part, I will try to fix that error.


Top comments (0)