この動画を参考に GAS に入門した
Google Document, Google Account, Gmail,
のスクリプトからの基本操作。
Logger と myFunction
Logger の使い方と console との違い
GAS でのみ使える console.log のようなもの。
console.log も使えるが

Logger は補完から出す時に L 2回なので打ちやすいので好き。
また、Logger はデバック用なので自動実行させているときは動作しない。
myFunction とは
function myFunction() {
  Logger.log("Hello GAS")
}
Execution log
10:31:20 PM Notice  Execution started
10:31:20 PM Info    Hello GAS
10:31:20 PM Notice  Execution completed
GAS ではこうやって myFunction 内部で実行する。
myFunction は一見不要に見えるが、なくしてみると
Logger.log("Hello GAS")
10:32:24 PM Error Attempted to execute myFunction, but it was deleted.
myFuntion が期待されているのに消されてるよ〜!ってエラーが出てしまう
なので myFunction は必要。
React の index.js のようなものだと解釈した。
Google ドキュメント
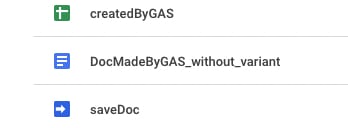
指定の名前の Google Doc を Drive の root に作成
まずは GAS のエディタを開いて saveDoc と言う名前をつけて
function myFunction() {
  const doc = DocumentApp.create("DocMadeByGAS")
}
初期関数に GAS によって作られたとの名前の Google Document を作らせるスクリプトを doc 変数に入れる
これを実行すると、

その名前で Drive の root に作られているのを確認できる
function myFunction() {
  DocumentApp.create("DocMadeByGAS_without_variant")
}

変数に入れても入れなくても作成はされる。
中身に文字列が入った Document を作成する
function myFunction() {
  const doc = DocumentApp.create("writtenByGAS")
  const body = doc.getBody()
  body.appendParagraph("Written by GAS")
}
作成した Document の body を取得して
appendParagraph で中身に文字列を追加する

これで新たなファイルが作成されて、中身を見ると

2 行目に GAS によって書かれたと書かれているのを確認できた
作成した Document の 名前から URL や ID を確認する
function myFunction() {
  const fileName = "writtenByGAS"
  const files = DriveApp.getFilesByName(fileName)
  while(files.hasNext()){
    let file = files.next()
    let fileId = file.getId()
    console.log(fileId)
  };
}
1JMXR29yZpbr3rEGx86uqQ2HwUe3m0t32mOTsfaUQRGE
DriveApp から取ってくる羽目になる。
結果は配列になってしまうし、map は対応していないっぽいので
hasNext と next を使って回して getId すれば
ようやくファイルIDが ファイル名から取れる
これは Google Drive が同じフォルダに同じファイル名のファイルも作れるため
ファイル名とファイルID を別にしている仕様からと推測する。

なのでこうやって同名ファイルが複数ある時には
10:39:38 PM Info    1SQxrJ0MoC69ExqhiQZtWh7AbFEJ1vZDyYN-QZVdugTw
10:39:38 PM Info    1wrcgmaC_GMLibbk72VrCIdA82DPXKsPAXWl6dYnW-Uw
それぞれ別の ID が返ってくる。
ファイルID から Document を開いてさらに文字列を追加する
https://developers.google.com/apps-script/reference/document/document-app
function myFunction() {
  const doc = DocumentApp.openById('1JMXR29yZpbr3rEGx86uqQ2HwUe3m0t32mOTsfaUQRGE');
  const body = doc.getBody()
  body.appendParagraph("adding by document id")
}
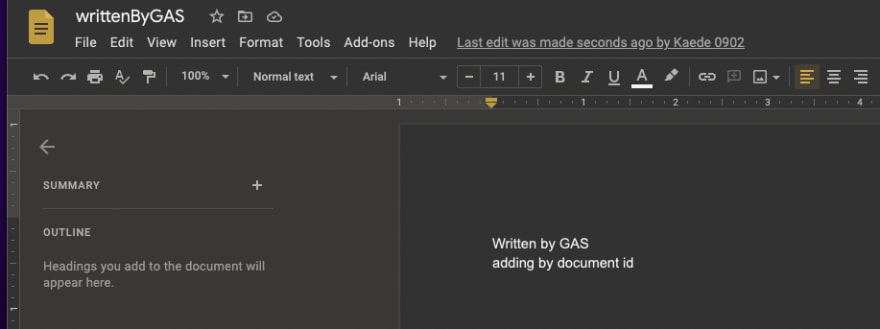
openById でファイルID からドキュメントの実体にアクセスできた
これに文字列を新規ファイルの時と同じように追加することができた
ちなみに DocumentApp.create には
https://developers.google.com/apps-script/reference/document/document-app
// Create and open a document.
と書いてあるのように、create だけでなく open の動作も入っているので
create した直後だったら create 操作を入れた変数
doc = DocumentApp.create('Document Name');
の body からアクセスができる。
Google Sheet
Google の Excel こと スプレッドシートこと Google Sheet も
GAS から操作できる
Google Sheet を作成する
https://tonari-it.com/gas-spreadsheet-create-getid/
function myFunction() {
  SpreadsheetApp.create("createdByGAS")
}
SpreadsheetApp と言うクラスから
DocumentApp で Document を作成するときと全く同じように
SpreadSheetApp で Sheet も作成できた。
Google Sheet を開いてテキストを追加する
https://dev.to/kaede_io/gas-google-sheet-de-akuteibunasitowoqu-de-nishi-bai-suru-5417
多くの記事では getActiveSheet で取れと書いてあるが
あれは私はどうやっても動かなかった。
https://developers.google.com/apps-script/reference/spreadsheet/spreadsheet-app#setactivesheetsheet
なので Document と同じようにこうやって openByID で取得する
ID のシート名から取得の仕方は前述の Document と同じ。
  const sheetId = "1SQxrJ0MoC69ExqhiQZtWh7AbFEJ1vZDyYN-QZVdugTw"
  const sheet = SpreadsheetApp.openById(sheetId);
セルを取得して書き込み
https://developers.google.com/apps-script/reference/spreadsheet/range?hl=en#setvaluevalue
const cell = sheet.getRange("A1");
cell.setValue("Put your cursor here before submit.");
const cellValue = cell.getValue()
Logger.log(cellValue)

2:11:32 AM  Notice  Execution started
2:11:32 AM  Info    Put your cursor here before submit.
getRange でセル名からセルを取得できる
setValue でテキストを引数に入れると書き込め
getValue と Logger で確認できる
レンジを取得して書き込み
https://developers.google.com/apps-script/reference/spreadsheet/range?hl=en#setValue(Object)
  const range = sheet.getRange("A1:D4");
  range.setValue("O");
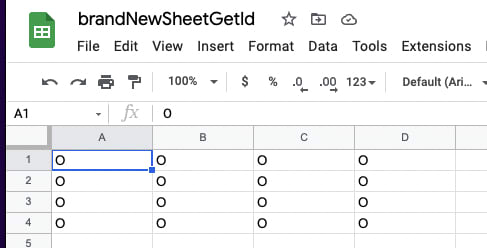
これで A1-A4 B1-B4 C1-C4 D1-D4
この全てのセルに書き込める
その他のセット操作
https://developers.google.com/apps-script/reference/spreadsheet/range?hl=en#setValue(Object)
他にもお馴染みの中央揃えなど、多くの操作が指定したセルの範囲にできるようだ
シンプルだしやりやすい。
Google アカウントの情報を取得する
現在のこの Google アカウントのアクティブユーザーを取得する
  const activeUser = Session.getActiveUser()
  console.log(activeUser)
Session.getActiveUser() で現在アクティブなユーザーを取得する
{ toString: [Function],
  getEmail: [Function],
  getUsername: [Function],
  getUserLoginId: [Function] }
しかしこれだけでは中身を見れない
  const activeUsername = activeUser.getUsername()
  console.log(activeUsername)
  const activeUserEmail = activeUser.getEmail()
  console.log(activeUserEmail)
  const activeUserLoginId = activeUser.getUserLoginId()
  console.log(activeUserLoginId)
なのでそれぞれの関数を実行する
8:37:46 AM  Info    kaede0902js
8:37:46 AM  Info    kaede0902js@gmail.com
8:37:46 AM  Info    kaede0902js@gmail.com
すると現在この Google アカウントでアクティブなユーザーの
username, email, loginId,
がわかった。
email と loginId は同じだった。
これを使って自分に通知メールが送ったりできるだろう。
Gmail を自分のアカウントから送る
メールを自分に送る
function myFunction() {
  const myEmailAdress = Session.getActiveUser().getEmail()
  GmailApp.sendEmail(myEmailAdress, "fromGAS", "This is from GAS")
}
先ほどと同様にアクティブなユーザー(自分の)メアドを取得して
GmailApp.sendEmail を使って自分にメールを送る

するとそのメールが直ちに自分に来ているのを確認できた。
同じ内容を定期的に送るのに総務とかだとかなり便利そう。

Latest comments (0)