In this article I will go through how to connect remotely in VSCode using SSH remote extension.
In both local and server: check that you have open SSH installed by searching Manage Optional Features in the Windows start menu.
In both local and server: open
services.mscand make sure that the services of ssh are running.In Server cmd:
run netstat -a | findstr 22You must see something like this (Listening):

its default port is 22.
From Local cmd: To go to the server run
ssh <SERVER_USERNAME>@<SERVER_IP>
You’ll be asked to enter the server password.In Local cmd: Now I am in a cmd seeing the Server
In Remote in
C:\Users\<USERNAME>.ssh: runssh-keygenand name the file of the ssh e.g.testSSH.In Local: Create a config file (with no extension) in
C:\Users\<USERNAME>.ssh.
Host <AnyName>
  HostName <IP>
  User <USERNAME>
  IdentityFile ~/.ssh/<name of the ssh file on the server made in previous step (e.g. ~/.ssh/testSSH)>
In VSCode in Local:
In Local: Make Sure to install Remote extension by Microsoft.
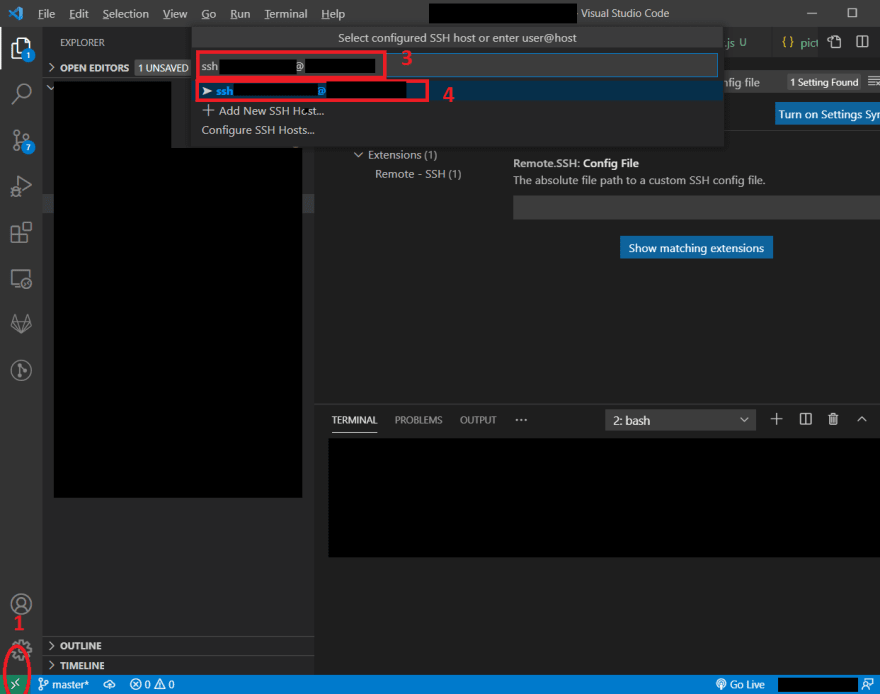
Click on its icon (1)
(2) select
Remote-SSH: Connect to HostEither do one of the following
or
(3) Enter e.g.:
ssh <SERVER-USERNAME>@<SERVER-IP>A new instance of VSCode will be open.
You’ll be asked for the Operating System, the Server Password.
You can open terminal in VSCode but firstly make sure that the server has Git downloaded.
You are now in the Server terminal:
Now you can download plugins and extensions as
Live Serveron the server from your opened VSCode window.In Local VSCode: File → Open Folder → type your project path on the server.
You can run Live Server extension and it will show that it is running on a port e.g. 5501 so now you can browse to http://:5501/ to see live dev.
Thanks for your time, and I am happy to get feedbacks.
Khaled Taymour


Top comments (0)