Hi, I am Júnior Nascimento. I've coding for a little bit than 1 decade now. I started learning Pascal language then migrate to Java, and finally to C and then C++.
Been using C++ for most of my journey I mostly do simple projects and competitive programming, nothing crazy, just for fun.
Then after a couple semesters into college, I learned Javascript because I wanted a job to become financial stable. My life was pretty much programming Javascript, using some frameworks to learn and do some interviews and Python for my academic needs.
Feedforward, a couple of years I landed a job using TypeScript and .NET core.
Sometimes I was doing some side projects using SolidJS and Tailwind. But a few weeks ago I wanted to do something more "low level" I was tired of using Typescript and doing something for the web. I was tired of making APIs with .NET, I wanted some sort of challenge.
I wanted to learn rust for some time now, but never really sit down to do some coding in rust.
Having implemented Neural Networks and Fluid Dynamics in C++ before, I thought to rewrite these projects in rust to become familiar with the language. But then I remember these book I saved almost a year ago about making a Raytracer in a weekend, so I just jumped into it.
The book shows a step-by-step guide on how to implement a raytracer in C++ and how the physics works and how we are going to translate to code.
But maybe you are asking yourself: What is a raytracer?
A raytracer is a computer program or algorithm that creates realistic 2D images of a 3D virtual environment by simulating the behavior of light. It does this by tracing the path of light rays as they interact with objects in the scene and determining how they are reflected, refracted, and absorbed.
To make an image, a raytracer casts a virtual camera into the 3D environment and traces rays of light from the camera through each pixel of the image plane. It then calculates the color and intensity of the light that should be visible at that point based on the properties of the objects and lighting in the scene.
Raytracing can create very realistic images with accurate lighting, shadows, reflections, and refraction, but it can be demanding on computer resources, especially for complex scenes with many objects and light sources. This technique is used in fields such as computer graphics, animation and visual effects for film were highly realistic images are needed.
With this of the way, let's go to the fun part.
I really jumped into this with no background in rust whatsoever, but I have a lot of experience with C++ so understanding the examples in the book was easy.
For the most part the functions are one to one conversion, not surprises here because we are calculating rays and making some linear algebra, is math, so every language should be able to do this with little to no difference.
C++ classes and Rust structs are very similar, so I had absolute no problem in translating and learning the syntax of Rust.
But for this implementation the author of the book choose to make a Hittable abstract class to represent every possible object that light can hit, and in Rust we don't have the concept of classes, so I was search on how to do something similar and learned about Traits.
Traits define shared behavior or functionality across multiple types without requiring a common inheritance hierarchy. They are similar to interfaces and specify a set of methods that types implementing the trait must provide.
For example, this is a Hittable trait:
pub trait Hittable : Sync {
  fn hit(&self, ray: &Ray, t_min: f32, t_max: f32) -> Option<HitRecord>;
}
This trait means that a struct should implement the function hit to being able to be of type Hittable.
The hit function receive a light ray and some limit (to facilitate computation)
Other thing rust implement is lifecycles, we have, but C++ just assumes you know what you are doing and don't check anything.
See this struct for instance:
pub struct HitRecord<'a> {
  pub point : Vector3<f32>,
  pub t: f32,
  pub normal: Vector3<f32>,
  pub material: &'a dyn Material,
}
I confess that when I was implementing this part, I was furious because I cloud not use a Trait as a type without marking as a dynamic and thus needing a lifecycle.
This struct represents where a ray of light hit something. And we need the material where the ray hit to calculate reflection, refraction and the color of the ray in the camera.
As we have more than one material the material field has to be a trait, in order to use a trait as a filed we have to mark the field as dynamic and thus have a lifecycle indicator. The <'a> basically means that the material is live as long what the Hitrecordobject.
I also learn about the Box "type" in rust, it's a smart pointer that allocate memory on the heap and to own and manage the lifetime of the data.
I used to make a list of hittable objects:
pub struct HittableList {
  pub objects: Vec<Box<dyn Hittable>>,
}
This is an array of points for hittable objects, in this project I only implemented spheres but any object that implement the Hittable trait cloud be in this list.
The last thing that I absolutely love about rust was Option and how using tuples are so easy.
In C++ the author (and I also in most of the cases I can remember) uses pointers to change variables in functions, to not copy and return a boolean value to check if the result was a sucess, in Rust I was able to eliminate this using the Option type.
The Option type means that a function can return any type you want, or None
For example:
fn refract(v: &Vector3<f32>, n: &Vector3<f32>, etai_over_etat: f32) -> Option<Vector3<f32>> {
  let uv = v.normalize();
  let dt = uv.dot(&n); // Angle between the ray and the normal
  let discriminant = 1.0 - etai_over_etat.powi(2) * (1.0 - dt.powi(2)); // Using law of cosines and the Snell's law
  if discriminant > 0.0 {
      // Can refract
      let refracted = etai_over_etat * (uv - n * dt) - n * discriminant.sqrt();
      Some(refracted)
  } else {
      // Must reflect
      None
  }
Ignore the math and focus in the part that if the light reflect we don't refract, so we return None, then when we use this function we only have to check if we have something to refract:
 if let Some(refracted) = refract(&ray.direction(), &outward_normal, etai_over_etat) {
      let reflect_prob = schlick(cosine, self.ir);
      if rand::thread_rng().gen::<f32>() >= reflect_prob {
        let scattered  = Ray::new(record.p, refracted);
        return Some((scattered, attenuation));
      }
    }
This check if we refract then based on a schlick function scatter the ray.
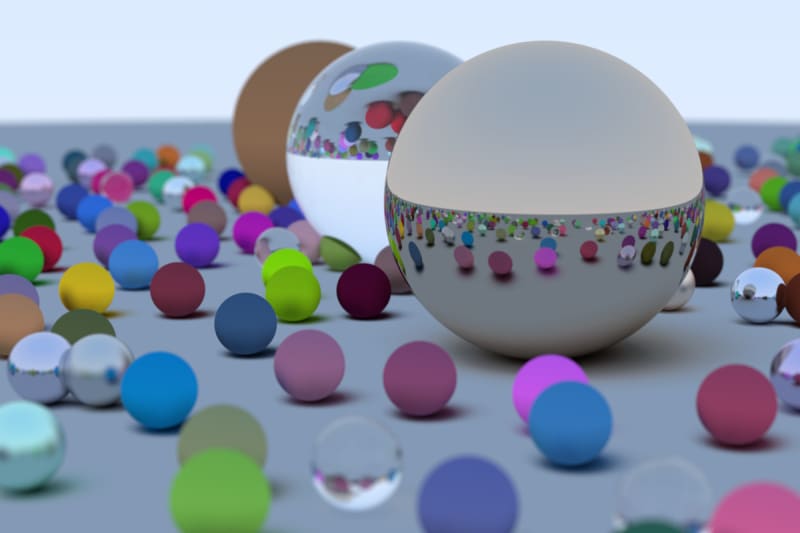
At the final, I was able to render this image:
I really enjoyed the experience and fell in love with rust, i planing doing some other projects with!
If anyone wants to see the whole project, you can check the project repository in GitHub!

Top comments (0)