
Hello! Our iOS Developer Lena wrote an article about adding Oath to iOS in half
In most cases, a mobile application should be able to authorize users for data access, and quite often this is done with third-party services. In these cases, OAuth2.0 is used. It is a protocol that allows to log into another service without the entering your login and password to the application and giving a restricted set of accesses to the service resources.
Mobile applications use Authorization Code Flow with Proof Key for Code Exchange (PKCE).
Today, we’ll consider implementation of the OAuth authorization with AppAuth-iOS. It is one of the most popular and easy-to-use libraries. The code from the article is available at Github.
In this article you will learn about:
- Basic configuration
- Authorization in the third-party service and saving the access token for further use
- Access token update
- Logout
- Conclusions
Basic configuration
We’ve chosen OAuth Github as a third-party service. The basic configuration is similar to that of the android application from the previous article: first, let’s register the OAuth application in Github.
When registering, set CALLBACK_URL for your application in the service. This is the URL to redirect to after authorization, and to be intercepted by your application.
We’ll use ru.kts.oauth://github.com/callback as CALLBACK_URL. Don’t forget to use the ru.kts.oauth custom scheme, so that only your application could intercept the redirect.
After registering the OAuth application in Github, you should have client_id and client_secret you have to generate. Save them.
Now you need to understand, what URL to go to in order to get authorized in the Github web-page, and what URL is to be used to exchange the code for the token. You can find the answer in the Github OAuth documentation.
- URL for authorization: https://github.com/login/oauth/authorize
- URL for token exchange: https://github.com/login/oauth/access_token
To get authorized, you have to determine the scopes Github provides access to. Let’s say, in the application we need access to the user information and repositories: user, repo.
After configuring the OAuth Github application, we should have the following data we will add to the project as configuration properties:
struct AuthConfiguration {
    static let baseUrl = "https://github.com/"
    static let authUri = "login/oauth/authorize"
    static let tokenUri = "login/oauth/access_token"
    static let endSessionUri = "logout"
    static let scopes = ["user", "repo"]
    static let clientId = "..."
    static let clientSecret = "..."
    static let callbackUrl = "ru.kts.oauth://github.com/callback"
    static let logoutCallbackUrl = "ru.kts.oauth://github.com/logout_callback"
}
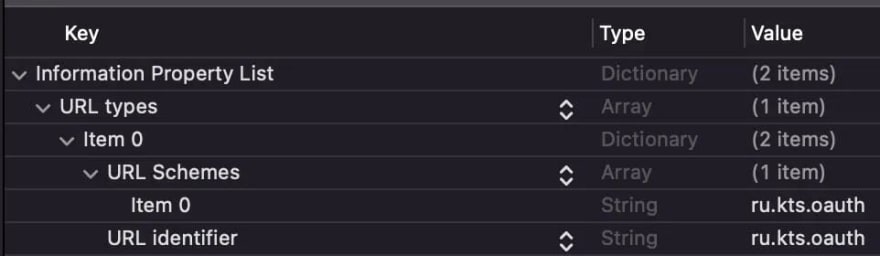
Please note that callbackUrl and logoutCallbackUrl have the ru.kts.oauth custom scheme. For the application to be able to intercept the redirect, it’s necessary to write this scheme in Info.plist (URL Schemes, URLIdentifier):
Connect AppAuth library via the cocoapods. When working with Github OAuth, there is one nuance — Github returns response in the xml format, while OAuth specification requires response in the json format. You can’t add the custom request header to specify the response format in the AppAuth library, so let’s fork it and add the headers to the source code.
Connecting AppAuth library
Now, let’s execute authorization.
📱 Authorization
Our task is:
- to create the method, in which we will generate the authorization request and call the AppAuth library method
- to implement the redirect intercepting to complete the process
1. Create the authorization session. For a start, in AppDelegate announce the variable of the OIDExternalUserAgentSession type that will hold the current authorization session and will be used when intercepting the redirect to continue the authorization process (implementation is below):
class AppDelegate: UIResponder, UIApplicationDelegate {

    var currentAuthorizationFlow: OIDExternalUserAgentSession?

}
All classes / protocols of the AppAuth library have OID prefix.
2. Create the authorization configuration. The AppAuth library contains the OIDAuthorizationService entity that allows to execute OAuth requests.
Requests are presented by OIDAuthorizationRequest (authorization request), OIDTokenRequest (token update request), OIDEndSessionRequest (logout request) entities. Every request requires the OIDServiceConfiguration configuration — a set of endpoint uris in the initializer. We’ll create the common constant for all requests and put it in a new class of OAuthRepository:
class OAuthRepository {
    private let configuration = OIDServiceConfiguration.init(
        authorizationEndpoint: URL(string: AuthConfiguration.baseUrl + AuthConfiguration.authUri)!,
        tokenEndpoint: URL(string: AuthConfiguration.baseUrl + AuthConfiguration.tokenUri)!,
        issuer: nil,
        registrationEndpoint: nil,
        endSessionEndpoint: URL(string: AuthConfiguration.baseUrl + AuthConfiguration.endSessionUri)!)
}
In our case, issuer (The OpenID Connect issuer) and registrationEndpoint (registration uri) fields are not used.
3. Create the authorization request. The entire OAuth data logic will be located in OAuthRepository class; let’s place the login method there.
State the request:
 let request = OIDAuthorizationRequest(
            configuration: configuration,
            clientId: AuthConfiguration.clientId,
            clientSecret: AuthConfiguration.clientSecret,
            scopes: AuthConfiguration.scopes,
            redirectURL: URL(string: AuthConfiguration.callbackUrl)!,
            responseType: OIDResponseTypeCode,
            additionalParameters: nil)
- The responseType field informs, in what form we want to get the response after authorization. Other possible values are OIDResponseTypeToken, OIDResponseTypeIDToken. Github always returns only the code, that’s why let’s use OIDResponseTypeCode
- additionalParameters is a dictionary, whose keys will be added to the request URL as additional query parameters. They can be required for some OAuth services, but we don’t use them in our example
4. Execute the authorization request. The next step is to call the AppAuth library method to execute the request.
If an authorized user doesn’t have to open pages in the application in SafariVC, you can get away with the standard method from the AppAuth library documentation. Under the hood, the method uses OIDExternalUserAgentIOS with a separate ASWebAuthenticationSession session, which then doesn’t share cookies with other SafariViewControllers. That’s not what we want.
To share the session with SavariVC we implement custom OIDExternalUserAgentIOSSafariViewController that implements the OIDExternalUserAgent interface from the library. This allows to open pages in SafariViewController without authorization.
Click here to see the sample implementation and add it to the project, and read more about UserAgent in this article.
5. Create OIDExternalUserAgentIOSSafariViewController:
let agent = OIDExternalUserAgentIOSSafariViewController(presentingViewController: viewController)
Now let’s use the authorization method with the custom externalUserAgent:
appDelegate.currentAuthorizationFlow = OIDAuthState.authState(byPresenting: request, externalUserAgent: agent) { [weak self] authState, error in
    // implementation below
}
Calling this method will open SafariVC with the authorization page, and after successful authorization, the service will redirect you to the url stated in the redirectURL field of the request. In our case, it’s ru.kts.oauth://github.com/callback.
The uri redirect parameters contain the code we need. It’s necessary to intercept this redirect, and then to exchange code for the token.
6. Now, let’s intercept the authorization redirect and get the token. To intercept the redirect, let’s implement scene(, openURLContexts:)_ method in sceneDelegate, for ios versions lower than 13 — application(_:, open url: URL, options:) in AppDelegate:
func scene(_ scene: UIScene, openURLContexts URLContexts: Set<UIOpenURLContext>) {
    let appDelegate = UIApplication.shared.delegate as! AppDelegate
    if let authorizationFlow = appDelegate.currentAuthorizationFlow,
       let url = URLContexts.first?.url,
       authorizationFlow.resumeExternalUserAgentFlow(with: url) {
            appDelegate.currentAuthorizationFlow = nil
     }
}
Here we check the current authorization flow in the application and call the resumeExternalUserAgentFlow method that verifies, if this uri coincides with the one stated in the request. If the method returns true, SafariVC hides and the process of exchange the code for the token starts. The code is exchanged for the token under AppAuth hood.
7. Save the tokens. After exchanging the code for the token, we get in the OIDAuthState.authState method handler we used during the previous step. It’s necessary to check that there are no errors and to save the obtained token. For simplicity, let’s save access and refresh tokens in UserDefaults:
appDelegate.currentAuthorizationFlow = OIDAuthState.authState(byPresenting: request, externalUserAgent: agent) { [weak self] authState, error in
    if error == nil {
        let tokenModel = TokenModel(access: authState?.lastTokenResponse?.accessToken,
                                            refresh: authState?.lastTokenResponse?.refreshToken)
        self?.userDefaultsHelper.setToken(value: tokenModel)
    }
}
In a real-life project, that would not be safe, so it’s better to use keychain.
7. Test the authorization
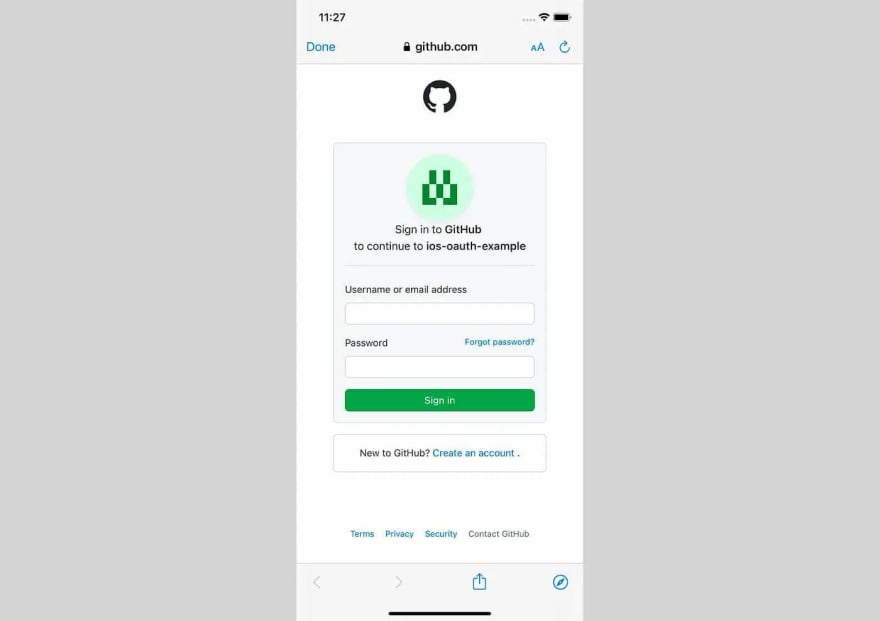
Run the code.
We have already implemented OAuth authorization and token receipt:
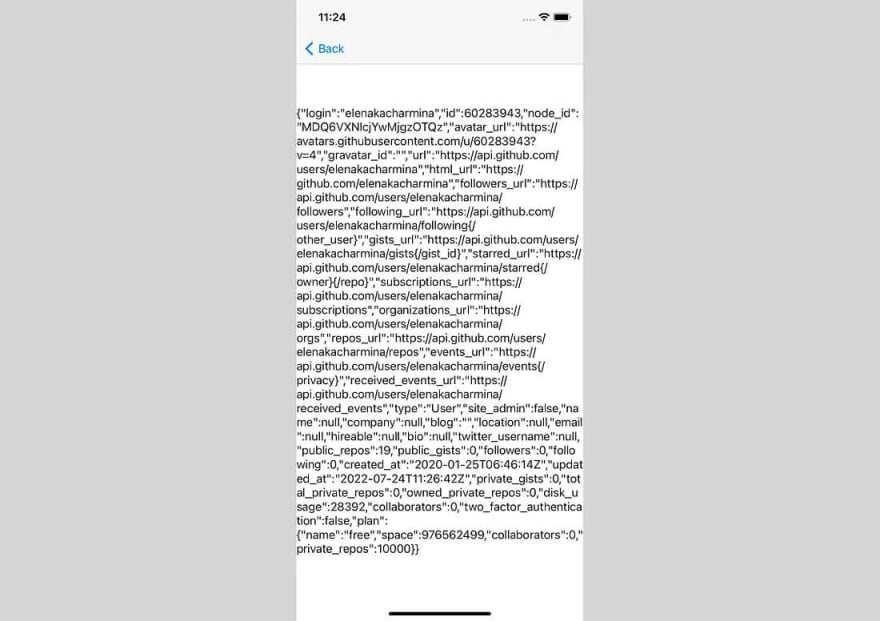
To validate the obtained token, we push a new screen, where we try to get data from https://api.github.com/user with the token.
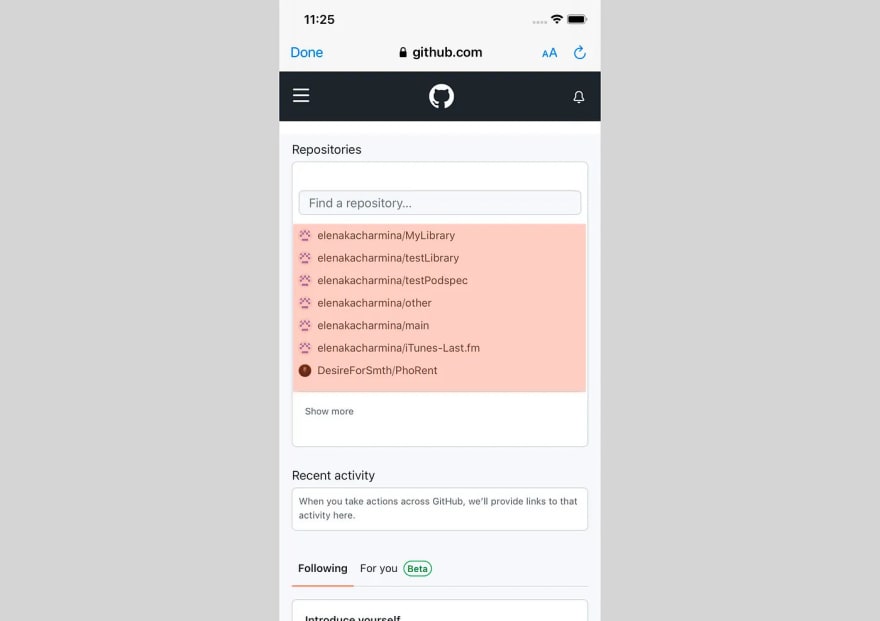
To make sure that the authorization session shares cookies with SafariVC, we open the Github user page in it by clicking:
📱Token Update
Refresh token is not used in Github OAuth, but in many other services the access expires. That’s why I provide the token update example.
1. Generate the token update request. For a start, it’s necessary to generate OIDTokenRequest:
func refreshToken() {
    guard let refreshToken = userDefaultsHelper.getToken()?.refresh else { return }
          let requestRefresh = OIDTokenRequest(
              configuration: configuration,
              grantType: OIDGrantTypeRefreshToken,
              authorizationCode: nil,
              redirectURL: nil,
              clientID: AuthConfiguration.clientId,
              clientSecret: AuthConfiguration.clientSecret,
              scope: nil,
              refreshToken: refreshToken,
              codeVerifier: nil,
              additionalParameters: nil)
In addition to the already known parameters we’ve seen during authorization, in the request it’s necessary to transfer the OIDGrantTypeRefreshToken value and the saved refresh token in the grantType parameter. We transfer nil in the parameters we don’t use.
2. Update the token. Call the OIDAuthorizationService.perform method, if updated successfully, we save new values of access and refresh tokens:
func refreshToken() {
    guard let refreshToken = userDefaultsHelper.getToken()?.refresh else { return }
    let requestRefresh = OIDTokenRequest(
        configuration: configuration,
        grantType: OIDGrantTypeRefreshToken,
        authorizationCode: nil,
        redirectURL: nil,
        clientID: AuthConfiguration.clientId,
        clientSecret: AuthConfiguration.clientSecret,
        scope: nil,
        refreshToken: refreshToken,
        codeVerifier: nil,
        additionalParameters: nil)

    OIDAuthorizationService.perform(requestRefresh) { [weak self] tokenResponse, error in
        if error == nil {
            let tokenModel = TokenModel(access: tokenResponse?.accessToken,
                                        refresh: tokenResponse?.refreshToken)
            self?.userDefaultsHelper.setToken(value: tokenModel)
        }
    }
}
You can check this implementation, if you create the Github Apps application instead of OAuth and replace clientId and clientSecret in AuthConfiguration.
📱Logout
When using OAuth authorization, it’s not enough to just clear the saved token from the storage. SafariVC cookies are not cleared, and when trying to get authorized again, a user will automatically log into the services under the previous account without the opportunity to enter another login / password.
That’s why, to implement logout, it’s also necessary to generate the request in OIDEndSessionRequest…
let request =  OIDEndSessionRequest(configuration: configuration,
                                    idTokenHint: accessToken,
                                    postLogoutRedirectURL: URL(string: AuthConfiguration.logoutCallbackUrl)!,
                                    additionalParameters: nil)
…and include it in the OIDAuthorizationService.present method:
let agent = OIDExternalUserAgentIOSSafariViewController(presentingViewController: viewController)

appDelegate.currentAuthorizationFlow = OIDAuthorizationService.present(request, externalUserAgent: agent) { [weak self] (response, error) in
  if let error = error {
       completion(.failure(CustomError.logoutError))
  } else {
       self?.userDefaultsHelper.clearToken()
    }
}
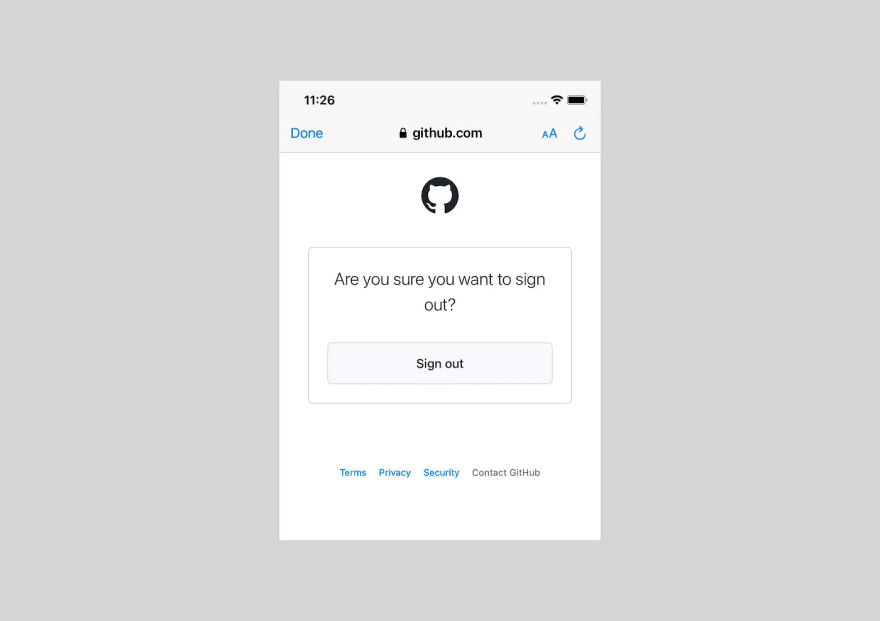
GitHub OAuth has no redirect after logout, that’s why users will have to close the window by themselves.
This causes an error in the callback, that’s why there is no error check in the final version, and the app just clears off the saves tokens:
let agent = OIDExternalUserAgentIOSSafariViewController(presentingViewController: viewController)

appDelegate.currentAuthorizationFlow = OIDAuthorizationService.present(request, externalUserAgent: agent) { [weak self] (response, error) in
    self?.userDefaultsHelper.clearToken()
}
📲** Conclusions**
The entier project code can be found in github.
We’ve implemented all methods required to support OAuth: authorization, token update and logout. Using the library helps easily integrate OAuth in the application. But some services — such as Github OAuth — have their own usage patterns that require custom solutions.
How do you implement OAuth in your applications? Have you had experience of working with AppAuth? What OAuth issues have you faced?

Top comments (0)