Many people know how to use CSS to style websites, but when it comes to CSS artwork, they get confused on how they are made.
So i thought it might be helpful if i share my humble experience with you, I am going to discuss some important CSS knowledge you will need to have, in order to make your own CSS art and enjoy it as i do, let’s start🚀
Useful CSS properties :
1. Gradient
We can declare gradient in both background or background-image properties, it can take as much colors as you want separated by a comma “ , ”.
We have two types of gradients:
-Linear Gradients: can be controlled by directions(left,top,right,bottom) or angles.
-Radial Gradients: can be controlled by giving each color a percentage, setting a shape(circle,ellipse).
• Great website to generate gradients: cssgradient
2. box-shadow
Give your element one or multiple shadows by separating them with a comma “ , ”.
I found that the “inset” property value is so much useful, it changes the shadow from an outer shadow to an inner shadow, this makes your element looks a little bit real.
• Great website to generate box-shadow: cssmatic
3. clip-path
Clip-path is a very useful property when it comes to CSS artwork, this property will make it easy to draw a path that probably will take you so much time to do in a different way.
This helps to draw circle, polygon and paths by specifying which region you want to show.
• Great website to generate clip-path: bennettfeely
Make your first CSS art
After we discussed these properties above, you are now ready to make your first CSS art.
This is the one we will make together 😍

This is the HTML :
    <div class="coffee-cont">
        <div class="coffee-cup"></div>
        <div class="coffee-hand"></div>
        <div class="coffee-tasse"></div>
    </div>
The first thing we will do is style our coffee container :
we will give it position:relative
and position:absolute to the other elements inside this div (except the coffee-cup div ) so that their positions will depend on their parent’s position.
    .coffee-cont {
        width: 500px;
        height: 500px;
        margin: 0 auto;
        position: relative;
    }
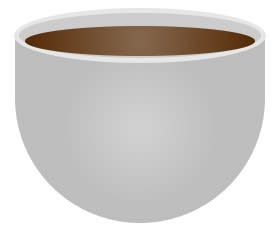
let’s style our second div, the coffee cup :
we will use the radial-gradient for the background to make the center a little bit brighter than the sides.
    .coffee-cup {
        position: relative;
        width: 250px;
        height: 190px;
        margin: 0 auto;
        background: radial-gradient(circle,rgba(208, 208, 208, 1) 5%,rgba(189, 189, 189, 1) 51%);
        border-radius: 0 0 150px 150px;
        top: 50%;
    }

Again a radial-gradient to the element before the coffee-cup to generate our coffee's color. notice that we give it z-index:9 so that it goes over the cup.
    .coffee-cup::before {
        content: '';
        display: block;
        height: 30px;
        width: 230px;
        position: absolute;
        border-radius: 50%;
        background: radial-gradient(circle,rgba(132, 102, 76, 1) 5%,rgba(86, 44, 8, 1) 96%);
        top: -7px;
        left: 10px;
        z-index: 9;
    }

this code will generate the top of the cup:
    .coffee-cup::after{
        content: '';
        display: block;
        height: 45px;
        width: 242px;
        position: absolute;
        border-radius: 50%;
        background: #cccccc;
        top: -25px;
        left: -1px;
        border: 5px solid #e6e6e6;
    }
Let’s add the coffee-hand div, we will give it z-index:-1, this way it goes behind the cup element
    .coffee-hand{
        width: 52px;
        height: 32px;
        position: absolute;
        background: #ffffff;
        border-radius: 32px;
        transform: rotate(-36deg);
        z-index: -1;
        border: 15px solid #dbdbdb;
        top: 56%;
        left: 66%;
    }

Now we take care of the element in the bottom, we will use a circular radial-gradient, the center will be brighter.
we need a shadow to add a nice effect to this element, for this we will use the box-shadow property with a darker color.
    .coffee-tasse{
        width: 400px;
        top: 68%;
        left: 10%;
        height: 139px;
        background: radial-gradient(circle,rgba(69, 69, 69, 1)
        13%,rgba(176, 176, 176, 1) 45%,rgba(143, 141, 141, 1)
        96%);
        border-radius: 50%;
        position: absolute;
        z-index: -1;
        border: 2px solid #f0f0f0;
        box-shadow: 1px 3px 0px 1px #323232;
    }
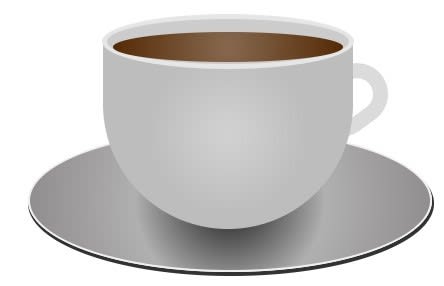
I added this ::after selector to generate another blurry shadow which will be displayed at the very bottom of this element.
    .coffee-tasse::after{
        content: '';
        display: block;
        width: 405px;
        top: 68%;
        border-radius: 50%;
        height: 145px;
        background: transparent;
        box-shadow: 2px 5px 8px 3px #bababa;
    }
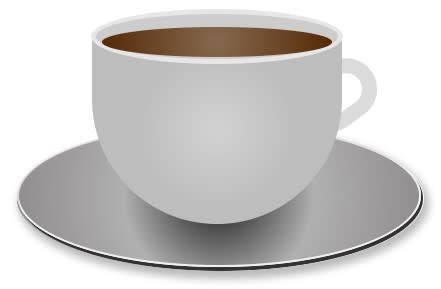
That's it ☕.
Congratulations on making your first CSS art 🎉, now it is your turn to use all the things you have learnt and make something fancier! 👏
Check all the code here : @codepen
If you want to see more of my CSS artwork, check out my twitter, i tweet a lot about CSS there. 😊

Top comments (49)
Amazing 🔥🔥🚀
Thank you :)
WOOOWWW this is beautiful
Thank you so much!
Wow, that is a neat article. Awesome 😎
I tried a css art too
CSS Art: Let's create a Cute Robot (Beginner)
Akhil Arjun ・ Jul 31 ・ 5 min read
Great one !
This is really good
Thank you Nadia❕
You're welcome :)
This is great thank you!
You're welcome
Happy you liked it :)
Thanks for the awesome guide!
You're very welcome!!
Mantaaap mbak nadiaaa
Thank you
Amazing post Nadia🙌🥳
Thank you so much :)
Awesome guide! Thanks so much <3
You're very welcome !
Awesome and so simple ! Well done
Thank you :)