
Written by Temitope Oyedele✏️
Flutter is a UI toolkit from Google that allows users to build natively compiled applications for the web, desktop, and mobile devices. It is also embedded from one single codebase, meaning that while Flutter embraces different platforms, it still originates from a single codebase.
And, because it’s a UI toolkit, it uses UI parts to give users the ability to create UIs without needing to create them in a particular way when structuring applications; Flutter builds UIs as code.
In this article, we’ll take a look at Flutter architecture and what it is comprised of. One of the benefits of learning the Flutter architecture is that it helps when structuring an application, like updating state, building widgets or screens, or making an app easy to maintain.
Knowing the Flutter architecture lets us get familiar with these core concepts that build up the architecture and aid in quick compilation and the code modification process.
Layers in Flutter’s architecture
Just like any other native application, Flutter is packaged with three layers:
- Embedder (lowest layer)
- Engine
- Framework (highest layer)
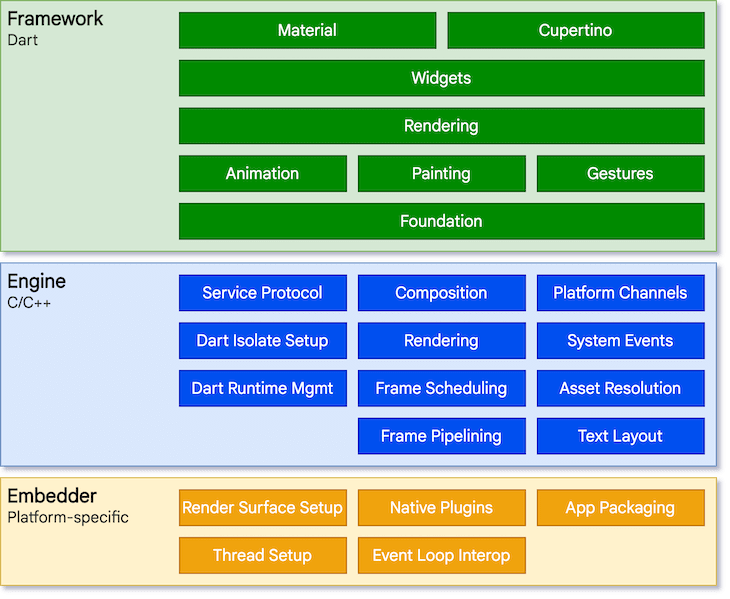
We’ll review each of these in-depth in the following sections.
Embedder layer
An entry point is provided by a platform-specific embedder, which coordinates with the underlying operating system to access services such as accessibility, rendering surfaces, and input.
The embedder is written in a platform-specific language, such as Java and C++ for Android, Objective-C/Objective-C++ for iOS and macOS, and C++ for Windows and Linux.
Flutter code can be embedded into an existing application as a module or as the complete application's content using the embedder.
Engine layer
The engine layer is written in C/C++, and it takes care of the input, output, network requests, and handles the difficult translation of rendering whenever a frame needs to be painted.
Flutter uses Skia as its rendering engine and it is revealed to the Flutter framework through the [dart : ui], which wraps the principal C++ code in Dart classes.
Framework layer
The framework layer is the part where most developers can interact with Flutter. The Flutter framework provides a reactive and modern framework that is written in Dart.
Within the framework layer, it comprises of the following:
- Rendering
- Widgets
- Material and cupertino
It also has foundational classes and building block services like animation, drawing, and gestures, which are required for writing a Flutter application.
We’ll look into all these aspects more in-depth in the following sections.
Flutter widgets
The first thing to note is that in Flutter, everything is a widget. A widget is simply an instruction that you place within your code and they are the basic building blocks of a Flutter application’s UI. Widgets indicate how their present configuration and status should appear in their display.
When a widget's state changes, it rebuilds its description, which the framework compares to the previous description to see what changes in the underlying render tree to transition from one state to the next.
A widget can be in the form of a button, an image, an icon, or a layout, and placing the widgets together creates a widget tree.
Widget tree
The widget tree is a never-ending chain of parent and child widgets that creates the visual layout on a screen.
Layouts are created by nesting widgets inside each other in a parent-child hierarchy. The parent-child widget tree may appear intimidating at first, but with practice, you will be able to master it.
For instance, imagine having an app with a login UI just like the image below:

The widget tree for this login screen can be illustrated with the diagram below:

The root widget is the main widget. We can also call it the parent of all other widgets in the tree. We then have the material widget, which is the theme of our app, followed by the scaffold, which is the body of our app.
Here, the child widget is in the form of a container widget with the column widget as a child. The column widget’s children include image, textfield, raisedbutton, container, and column.
Here’s how it can be structured in our code starting from the scaffold:
scaffold(
   body: Container(
    child: Column(
       children: [
              Image(),
              TextField(),
              TextField(),
              Container(
                  child: Column(
                   children: [
                     RaisedButton(),
                     RaisedButton(),
                  ]
                    ),
                  ),

               RaisedButton()
            ]
          ),
        ),
);
In Flutter, widgets can be grouped into categories like layout widgets, platform-specific widgets, platform-independent widgets, and state maintenance.
The process of putting widgets together is called composition. This means that we can combine a bunch of simple interface widgets that each handle one particular job, producing powerful effects.
Gestures
Interaction is possible with Flutter widgets thanks to a unique widget called [GestureDetector]. GestureDetector is an invisible widget that can record user events with its child widgets such as tapping and dragging.
Using the GestureDetector widget, Flutter provides excellent support for all types of gestures and we can include an interactive feature into an existing widget. Let us create a simple app to see how it works using the ontap() event.
         import 'package:flutter/material.dart';

void main() => runApp(MyApp());

class MyApp extends StatelessWidget {
  // This widget is the root of your application.
  @override
  Widget build(BuildContext context) {
    return MaterialApp(
      title: 'Flutter Demo Application', theme: ThemeData(
      primarySwatch: Colors.blue,),
      home: MyHomePage(),
    );
  }
}
class MyHomePage extends StatefulWidget {
  @override
  MyHomePageState createState() => new MyHomePageState();
}

class MyHomePageState extends State<MyHomePage> {
  @override
  Widget build(BuildContext context) {
    return new Scaffold(
      appBar: new AppBar(
        title: new Text('gesture'),
        centerTitle: true,
      ),
      body: new Center(child: GestureDetector(
          onTap: () {
            print('Box Clicked');
          },
          child: Container(
            height: 60.0,
            width: 120.0,
            padding: EdgeInsets.all(10.0),
            decoration: BoxDecoration(
              color: Colors.blueGrey,
              borderRadius: BorderRadius.circular(15.0),
            ),
            child: Center(child: Text('Click Me')),
          )
      )),
    );
  }
}
This then outputs the following screen; when you tap on the button, the output will display on the console:

Widget states
State is the behavior of an app at any given moment. Think of it as a widget’s information when it is first created and how it defines the properties of that widget. But this information might change during the lifetime of the widget.
To build the UI in Flutter we use two types of widgets:
- Stateless widgets
- Stateful widgets
Stateless widgets
Stateless widgets are static, implying that once they initialize, they do not change. Stateless widgets don't keep any real-time information, have no state to manage, and no direct interaction with the app. Icons, IconButton, and Text are examples of stateless widgets.
Also, note that a stateless widget overrides build() and returns a widget. We use the stateless widget when the UI depends on the information within the object itself:
import 'package:flutter/material.dart';

void main() => runApp(OurApp());

class OurApp extends StatelessWidget {
  @override
  Widget build(BuildContext context) {
    return Container();
  }
}
Here, this stateless widget's name is OurApp. A build function is overridden and takes BuildContext as a parameter, which returns a widget. That’s why we can see that the return type of the build method is a widget.
This is the place where you can design the UI of the screen, which is stateless.
Stateful widgets
Stateful widgets are dynamic, meaning they can change based on the situation. These are capable of storing real-time data, and we can use this information to update the user interface. TextField, Slider, and Form are all examples of stateful widgets.
The createState method is overridden by a stateful widget, which returns a state. When the UI can change dynamically, we use stateful widgets.
Here’s how a stateful widget is structured:
import 'package:flutter/material.dart';

void main() => runApp(OurApp());

class OurApp extends StatefulWidget {
  @override
  _OurAppState createState() => _OurAppState();
}

class _OurAppState extends State<OurApp> {
  @override
  Widget build(BuildContext context) {
    return Container();
  }
}
The name of the widget is again OurApp, but it now overrides the createState method rather than the build method, which returns an instance of the _OurAppState class. This class then extends from State<>, which takes OurApp as a template input.
The _OurAppState method now overrides the build function and returns a widget. This is where we can define the UI of the app, which is stateful. Because it is a stateful widget, you can call the build method any number of times, which redraws the widgets on the screen.
When the widget’s state changes, the state object calls setState(), telling the framework to redraw the widget.
State management
Managing the state of an application is one of the most important and necessary processes because it helps developers centralize all the states of various UI controls to manage data flow throughout an application.
We can also see how the state is managed and passed around in the system and how state management controls the state of one or more UI controls, such as text fields, radio buttons, checkboxes, dropdowns, toggles, and forms.
There are two kinds of state in Flutter:
- Ephemeral/local state
- App state
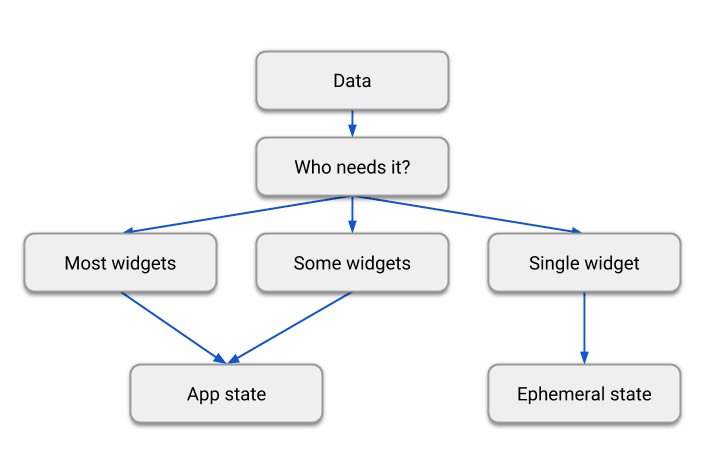
Ephemeral state
The ephemeral state represents a single widget's local state. It can be the current page in PageView, the current animation progress, or any other current local state of the UI.
There is no need to apply any state management strategy with this state because it is manageable and not overly complex. It is really simple and basic; however, because of this, it is not ideal for large programs and complicates state maintenance.
App state
The app state is a state that is shared by multiple sections of the application and is used during a user session. App state includes information such as a user's login information, notifications in a social networking or eCommerce app, and user preferences.
You must choose a state management approach for handling an app's state. While there are numerous approaches to achieving the app state, the choice is heavily influenced by the complexity and nature of the app.
One approach is using the inheritedWidget. When an app gets larger and the widget tree gets more complex, the inheritedWidget can help.
InheritedWidget is a foundation class that allows classes that extend it to efficiently propagate information down the tree. Essentially, it operates by notifying registered build contexts of any changes. Other alternative approaches include:
Flutter’s rendering process
Flutter’s rendering process is basically turning widgets into pixels. This is the job of Flutter’s multi rendering pipeline. Flutter handles the input, runs animations, builds the widget tree, lays out the render objects, paints the render objects, and compiles everything into a single image.
Whenever a part of the widget tree receives user input, animation, or any other changes, Flutter enters the build phase. In this phase, the framework reconstructs the widget tree by calling the necessary build methods.
The build() phase updates the element tree, which updates the render object tree. The render objects are responsible for layout and painting. During the layout phase, Flutter walks the tree of render objects passing down constraints.
Once the layout phase is complete, it enters the paint phase. This is where Flutter calls the paint method on all the render objects:
@overide
void paint(PaintingContext context, Offset offset) {
final paint =ui.paint()..color = const Color(0xff0000ff);
final rect = Rect.fromLTWH(0, 0, size.width, size.height);
context.canvas.drawReact(rect, paint);

}
Render objects paint under a canvas using methods like drawRect and drawLine. After the painting finishes, it moves to the compositing phase. This means combining images into a single picture.
The engine then receives the layout tree containing drawing instructions and converts them into pixels. This is a process called Rasterization.
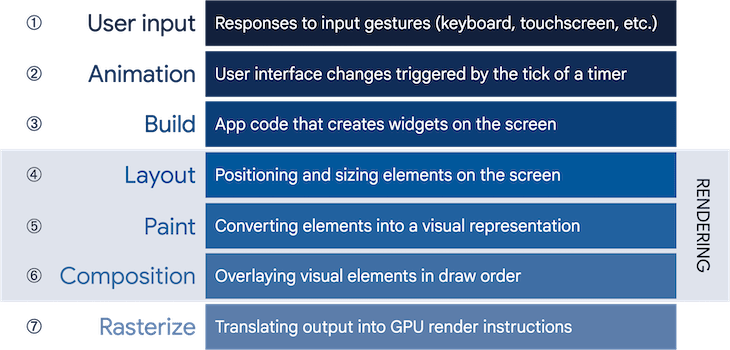 Rendering through layout, paint, and composition
How does Flutter integrate with other code?
Whether you embed native controls into a Flutter project or embed Flutter into an existing application, Flutter provides a wide range of interoperability techniques or protocols.
Through a platform channel, Flutter allows you to integrate custom code to mobile and desktop apps and provides a simple technique for communication between your host app's platform-specific code and your Dart code.
By establishing a common channel, you can send and receive messages between a platform component built in a language such as Swift, Kotlin, and Dart. Data is serialized from a Dart type into a standard format and then deserialized into an equivalent Kotlin or Swift representation.
Benefits of using Flutter
Faster coding
Typically, iOS and Android developers must create code and wait for it to compile and load onto a device before they can see changes. They can, however, test the impacts instantly or without delay thanks to Flutter's hot reload.
This means your development team can make quick adjustments and see the results. This is precisely why Flutter app development takes less time than others.
Flutter’s native rendering engine
The native rendering engine allows you to create UIs that are identical across all platforms. Typically, the rendering process generates further challenges in the platform widget's property display layer and the framework's widget data synchronization.
And, Flutter is doing everything to facilitate this process. Because it employs Skia, it does not require a specific UI component for rendering, merely a canvas for painting. What a great advantage of using Flutter!
One codebase for all platforms
Because of Flutter's code reusability, you can develop a single codebase and utilize it not only for mobile Android and iOS, but also for web, desktop, and other applications.
It is also worth noting that Flutter just released a big update on Windows support that drastically reduces development time, eliminates costs, and allows you to deploy your product faster.
Great performance
Flutter applications perform at a level comparable with native apps and are winning over other cross-platform technologies.
This is mostly due to the fact that Flutter is the only mobile SDK that does not rely on a bridge (JavaScript or web view) to communicate between the app and the platform. As a consequence, you get a more responsive app with attractive, fast animations and fewer performance issues.
Reduced time to market
Because of all the capabilities Flutter provides that make development easier, you can release your app faster and simultaneously send new features and improvements to iOS and Android.
Flutter community
As an open-source platform, Flutter is free to use and has a growing community contributing to its excellent documentation and aiding developers with issues that they may experience.
There are also numerous YouTube videos accessible for people interested in learning Flutter or improving their skills in Google's mobile UI framework.
Conclusion
The structure of our app and the way our data is organized can make the difference between a great and a common user experience. Understanding all of the core concepts helps greatly when building mobile applications in Flutter. Would you please share if this was helpful?
LogRocket: Full visibility into your web apps

LogRocket is a frontend application monitoring solution that lets you replay problems as if they happened in your own browser. Instead of guessing why errors happen, or asking users for screenshots and log dumps, LogRocket lets you replay the session to quickly understand what went wrong. It works perfectly with any app, regardless of framework, and has plugins to log additional context from Redux, Vuex, and @ngrx/store.
In addition to logging Redux actions and state, LogRocket records console logs, JavaScript errors, stacktraces, network requests/responses with headers + bodies, browser metadata, and custom logs. It also instruments the DOM to record the HTML and CSS on the page, recreating pixel-perfect videos of even the most complex single-page and mobile apps.

Top comments (0)