
Written by Yan Sun ✏️
Serverless architecture means we can build and deploy apps without having to manage servers, and offers developers high scalability, fast time-to-release, and lower cost.
Apache OpenWhisk is one of the most mature and feature-rich serverless frameworks. It allows us to build a complex app with simple stateless functions.
Since it’s an open source platform, developers can run the entire platform locally, which makes development, troubleshooting, and testing easier.
This article will explore how to set up OpenWhisk locally and develop a serverless Node.js app. We will use the example of sending a message each time a new user is added to a Slack channel to demonstrate the features of OpenWhisk.
What is Apache OpenWhisk?
OpenWhisk is developed by the Apache Software Foundation, thus it’s called Apache OpenWhisk. It supports a wide range of programming languages such as Node.js, Swift, Java, Go, and Scala_._
Compared with other mainstream serverless platforms like AWS Lambda or Azure Functions, OpenWhisk provides similar capabilities like a rich programming model, broad language support, scalability, and efficiency.
AWS’s and Azure’s serverless functions are part of their own ecosystems, which makes it easier to integrate the serverless functions to their other services, like cloud storage or monitoring services. The main advantage of OpenWhisk is that it is an open source platform, so we can deploy OpenWhisk on-prem or to a cloud provider, and avoid vendor lock-in.
As illustrated in the diagrams below, OpenWhisk supports an event-driven programming model.
 Source: Apache OpenWhisk
Below are the core concepts of OpenWhisk:
- Action: Also called functions, these are pieces of code that run on the platform in response to events
- Trigger: Defines named events streams
- Rule: Used to associate a trigger with one or more actions — each time a trigger event is fired, the action is invoked
 Source: Apache OpenWhisk
Setting up OpenWhisk locally
To set up the local OpenWhisk development environment, we’ll need a few things.
The simplest way to run OpenWhisk locally is to use Docker with Kubernetes enabled. After installing Docker, follow this step-by-step guide to enable Kubernetes within Docker.
We’ll also need to use Helm as the package manager for the local Kubernetes cluster. To install Helm, run this command:
brew install helm
Set up OpenWhisk on a local Kubernetes Cluster
Clone the Apache OpenWhisk Kubernetes Deployment repository, which contains the mycluster.yaml file for deployment configuration.
git clone https://github.com/apache/openwhisk-deploy-kube.git
Now, deploy Charts — a packaging format for Helm — from the Helm repository. Open your terminal and run the following command:
cd openwhisk-deploy-kube
helm repo add openwhisk https://openwhisk.apache.org/charts
helm repo update
helm install owdev openwhisk/openwhisk -n openwhisk --create-namespace -f /deploy/docker-macOS/mycluster.yaml
Please note that we use owdev as the release name and openwhisk as the namespace into which the chart's resources will be deployed.
The installation process will take some time. To check its status, use the following command:
kubectl get pods -n openwhisk -- watch
When you see the status of the owdev-install-packages-xxx is Completed, then your OpenWhisk deployment is ready! 
Now, install and configure the OpenWhisk CLI. To manage and develop OpenWhisk entities, we need to set up the OpenWhisk CLI (wsk) as below.
brew install wsk
// To verify the installation
Wsk -help
The last step is to configure your CLI to point to our local OpenWhisk platform API endpoint and provide the associated authentication credentials.
wsk property set --apihost localhost:31001
wsk property set --auth 23bc46b1-71f6-4ed5-8c54-816aa4f8c502:123zO3xZCLrMN6v2BKK1dXYFpXlPkccOFqm12CdAsMgRU4VrNZ9lyGVCGuMDGIwP
To verify the CLI configuration, use the command below:
wsk list -v
This command sends a READ HTTP request to the OpenWhisk API endpoint.
[GET] https://localhost:31001/api/v1/namespaces/_/actions?limit=0&skip=0
If you see the http request and response printed on the screen, congratulations, you are ready to go!
Serverless OpenWhisk project structure
The Serverless framework is an open source npm package that makes it easier to deploy serverless functions into various platforms. Its YAML configuration provides a standard abstraction to the serverless application structure, environment, and resources.
Firstly, let’s install the Serverless framework and the OpenWhisk provider plugin.
npm install --global serverless serverless-openwhisk
To create a Node.js app skeleton, we use the predefined template from Serverless.
serverless create --template openwhisk-nodejs --path nodeWhiskService
Cd nodeWhiskService
npm install
The project skeleton is generated. The important files inside the project are:
-
serverless.yml– The Serverless configuration file -
handler.js– Node.js’s main entrypoint
The serverless.yml file looks like the below:
service: nodewhiskservice

provider:
 name: openwhisk
 ignore_certs: true

functions:
 hello:
   handler: handler.hello
   events:
     - http: GET hello

plugins:
 - serverless-openwhisk
The configuration file includes following sections:
- Provider: Defines the serverless provider. The
ignore_certsproperty is set astruebecause we want to run the service against a locally-hosted OpenWhisk platform - Functions: Contains all the functions in the service:
- The generated sample
hellois the only function in the defaulthandler.jsfile - The
handlerproperty points to the handler function; in this case,handler.hellois mapped to thehello()function inhandler.js
- The generated sample
- Plugins: Contains the list of plugins for the project
Since we are going to create multiple handlers for different actions, let’s add a source folder to structure the project better.
    - src
          |-- handler
               |-- createHandler.js
             |-- updateHandler.js
             |-- listHandler.js
             |-- deleteHandler.js
    - package.json
    - ....
    -serverless.yml
Adding a new user with a web action
Firstly, let’s create a userCreate action to add a new user.
// JavaScript
// createHandler.js
'use strict';

function createUser(user){
 console.log('create user');
 const newUser = {name: user.name || 'Peter', age: user.age || 20};
 // Save user to database ....
 return newUser;
}

exports.user = createUser;
For sake of simplicity, the above function just returns a newUser JSON object instead of implementing the logic that saves it to the database.
Then, we update serverless.yml to add the configuration of the new function. We set the annotation web-export: true in the configuration file, which makes the function a web action.
functions:
 userCreate:
   handler: src/handler/createHandler.user
   events:
     - http: POST user
   annotations:
     web-export: true
Let’s deploy the service and test it.
// deploy all the functions and resources in the serverless.yml
serverless deploy -v
// only update the function
serverless deploy function -f createUser
The output will be similar to this:
endpoints (web actions):
https://localhost:31001/api/v1/web/23bc46b1-71f6-4ed5-8c54-816aa4f8c502/userCreate
We can test it using the Serverless invoke function as below. Alternatively, we can also use tools such as cURL or Postman to invoke the action.
serverless invoke --function userCreate --data '{"name": "test","age":30}'
The following result will be shown if everything works.
Serverless:
{
    "age": 30,
    "name": "test"
}
Using actions to call external APIs
The next task is to call an external API from an OpenWhisk action. In this example, we will send a Slack message to a Slack app channel.
The simplest way to post Slack messages is to use the Slack incoming webhook, which you can read more about in their documentation.
After setting up the incoming webhook, we can make use of it in the slackHandler.js file.
// JavaScript
function postMessage(channel, text, callback) {
 var options = {
   'method': 'POST',
   'url': 'https://hooks.slack.com/services/[SLACK_WEB_HOOK_URL]',
   'headers': {
     'Content-Type': 'application/json'
   },
   body: JSON.stringify({
     "text": text
   })
  };
 request(options, function (error, response) {
   if (error) {
     throw new Error(error);
   }
   console.log(response.body);
 });
}
Then we need to modify the serverless.yml to add the Slack action.
 slack:
   handler: src/handler/slackHander.sendMessage
   events:
      - trigger: newUserTrigger
You may notice the trigger setting under the events section. That’s because we want to trigger it by a rule instead of an HTTP request.
Configuring triggers and rules
OpenWhisk triggers are like events, and rules are used to associate triggers with actions.
When a trigger is invoked, all of the actions associated with it via rules will also be invoked.
After adding the above trigger configuration, a trigger and its rule are also automatically generated. The new rule associates the newUserTrigger with the slack action. If you list all the rules, you can see the newly generated rule below.
userservice_newUserTrigger_to_slack private active
What we want to achieve here is to post a Slack message after a new user is created. Let’s modify the createUser function as below:
// JavaScript
const openwhisk = require('openwhisk');

const triggerSlack = async params => {
 const name = 'newUserTrigger';
 const ow = openwhisk();
 await ow.triggers.invoke({name, params});
}

async function createUser(user){
 console.log('create user');
 const newUser = {name: user.name || 'Peter', age: user.age || 20};
 // Save user to database ....
 await triggerSlack(newUser);

 return newUser;
}

exports.user = createUser;
In the above code, we use the OpenWhisk JavaScript SDK to invoke newuserTrigger programmatically. Now, if I call the userCreate action, a Slack message will appear in the Slack channel. The Slack channel is defined in the Slack incoming webhook.
Triggers can connect multiple loosely-coupled actions together. It can also make your app easier to extend — for example, if I need to send a Twitter message after user creation, a Twitter handler can be easily connected with a new Twitter trigger, and we can associate it with the userCreate action so both actions are performed.
Creating action sequences to perform multiple tasks
In the previous steps, we created a single web action to perform a single task. But can we perform multiple tasks one by one and pass the output from one to the input of the next?
OpenWhisk provides the sequences feature to achieve that.
Let’s add a sequence based on this example. In the previous step, we built a userCreate web action. After we create a user, we want to call a listUser action. This action will add the new user to the list of existing users and return it. We expect the two actions will be executed sequentially.
// listHandler.js

function listUser(params) {
 return new Promise((resolve, reject) => {
   setTimeout(() => {
     console.log("get list of users from a repository...");
     const result = { users: [{ name: "John", age: 40 }] };
     if (params && params.name) {
       const newUser = { name: params.name, age: params.age };
       result.users.push(newUser);
     }
     resolve(result);
   }, 1000);
 });
}

exports.user = listUser;
In the listUser function, we take the output of userCreate as input and add it to the existing user list.
How can we link these two actions together to make a sequence? The Serverless Framework makes it really easy.
// Serverless.yml
userCreateAndList:
   sequence: # Use sequences rather than handlers to handle events. handler and sequence properties are mutually exclusive.
     - userCreate
     - userList
   events:
     - http: POST createList
In the above configuration, we define a sequence userCreateAndList. It is composed of two actions: userCreate and userList. The sequence can be invoked by the HTTP post endpoint createList.
The last step is to deploy the service again to make the newly-created action and sequence effective. Then we can test our first sequence using cURL or Postman. The sample cURL command looks like the below.
curl --request POST '[Your Local createUser url]' \
--header 'Content-Type: application/json' \
--data-raw '{
    "name": "Sam cook",
    "age": 23
}'
The output will be like this:
{
  "users": [{
    "age": 40,
    "name": "John"
  }, {
    "age": 23,
    "name": "Sam cook"
  }]
}
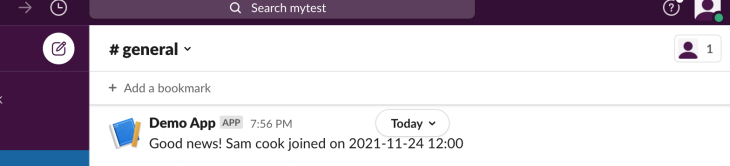
We also received a Slack message as part of the output.
Summary
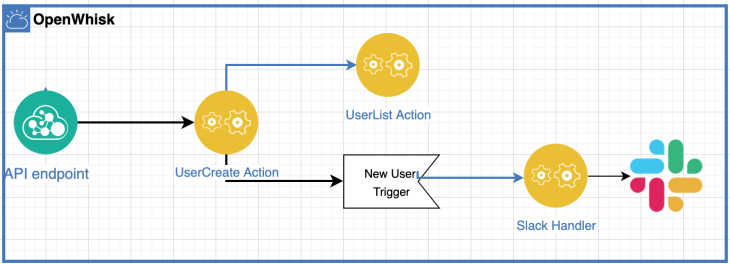
In this article, we covered how to set up a local OpenWhisk environment. Then, we used the Serverless framework to start a new service project. We also demonstrated how to create a web action, trigger, rule, and sequence. The below diagram illustrates the user service we built.
 OpenWhisk provides a solid open source option in the serverless world. You have the flexibility to deploy it on-premises or via a cloud provider, as well as avoid vendor lock-in.
The Serverless framework makes it possible to write a serverless app that can be deployed to any vendor. With the Serverless framework plugin for OpenWhisk, it’s fairly straightforward to deploy and manage web actions, triggers, rules, and sequences.
I hope you find this article useful. The example source code can be found here.
200’s only ✔️ Monitor failed and slow network requests in production
Deploying a Node-based web app or website is the easy part. Making sure your Node instance continues to serve resources to your app is where things get tougher. If you’re interested in ensuring requests to the backend or third party services are successful, try LogRocket.

LogRocket is like a DVR for web apps, recording literally everything that happens on your site. Instead of guessing why problems happen, you can aggregate and report on problematic network requests to quickly understand the root cause.
LogRocket instruments your app to record baseline performance timings such as page load time, time to first byte, slow network requests, and also logs Redux, NgRx, and Vuex actions/state. Start monitoring for free.

Top comments (0)