
Written by Taminoturoko Briggs✏️
Live streaming is a great way to engage with audiences ranging anywhere from one person to millions in real time. Unlike video conferences where anyone can share their screen or speak at any time, in live streaming, viewers have limited permissions. Implementing live streaming from scratch would be time-consuming, but there are services that we can use to add this feature with just a few steps, one of which is 100ms.
In this tutorial, we’ll learn about 100ms by building a live stream app with an interactive feature where broadcasters and viewers can communicate using chat.
To follow along with this tutorial, you should be familiar with React and React Hooks. You should also have Node.js installed in your system.
The full code for this tutorial is available on GitHub. Let’s get started!
- Introduction to 100ms
- Setting up 100ms
- Building a live streaming app with 100ms
- Setting up React
- Integrate 100ms into our app
- Joining a room
- Displaying video tiles
- Live stream via HLS and display stream to viewers
- Adding room control functionalities
- Add chat functionality and display all participants
Introduction to 100ms
100ms is a cloud platform that allows developers to add video and audio conferencing to web, Android, and iOS applications. It provides REST APIs, SDKs, and a dashboard that makes it simple to capture, distribute, record, and render live interactive audio and video.
Using 100ms to build a live app is straightforward, involving just two major steps. The first is creating and configuring a template in the dashboard with roles and settings for the app and its users.
The template configuration will be different depending on what type of app you're building — video conference, virtual event, or live streaming. For example, in a live streaming app, streamers or broadcasters can share video, audio, or their screen, while a viewer cannot do any of the above. We’ll set all this up in the template.
Instead of creating a custom template, we can choose from the available starter kits that already have the appropriate configurations for different types of live apps, then fine-tune them. After setting up the template, we'll use the SDK with its intuitive methods, hooks, and selectors on the client side to integrate and work with 100ms.
Before getting started, you should be familiar with the 100ms concepts below:
- Room: When we join an audio or video call, the participants are said to be in a room
- Peer: A participant in the audio or video call. You are the local peer, while others are remote peers
- Track: There are two types of tracks a peer can have, audio and video
Setting up 100ms
To set up the live streaming template, navigate to 100ms and set up a user account in the browser. When logged in, click Create Your First App on the dashboard and a modal will appear where we can create a custom template or choose one that has already been created: 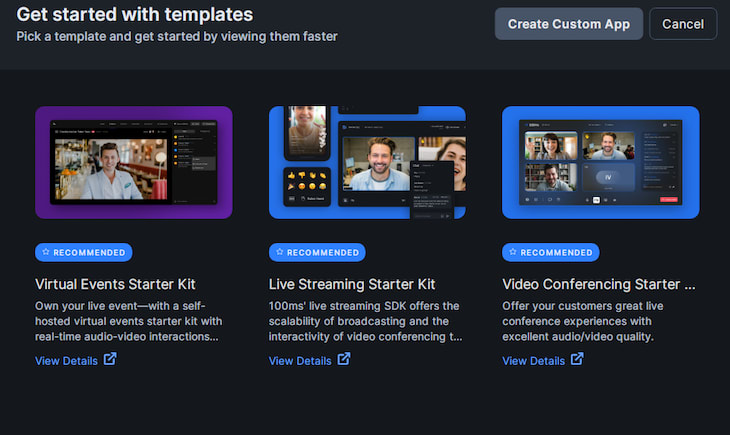
Instead of creating a new template, we'll use the live streaming app starter kit. Hover on the Live Streaming Starter Kit template and click on the Deploy now button that appears. You’ll see the following: 
In the Choose your Account Type area, select Personal, then click Next, and you’ll see the following: 
We need to enter a unique subdomain. For this, I’ll enter livestreamnow, but you can use any other name. After that, click Continue. With this, a live streaming starter kit has been created, and you’ll see it when we navigate to our dashboard: 
To view the configuration of the starter template, hover on it and click on the setting icon that appears. You'll see the following screen: 
Notice that two roles suitable for a live streaming app have already been created, broadcaster and hls-viewer.
The broadcaster role represents a streamer that publishes their audio or video. They have all permissions turned on, allowing them to perform all available operations, like sharing audio and video, muting and unmuting any participant in the room, stopping and starting the live stream, and more. We can edit the operations allowed for this role or any other role by just toggling the switch next to the operation we want to disable or enable.
The hls-viewer role represents the audience members that join the live stream and can interact using messaging. None of their permissions are turned on, which is usually the case for the audience in a live stream.
We can create other roles by clicking on Add a Role on the right side of the screen and then editing the permissions to suit our needs. However, since the required roles for our use case have already been created for us, we won’t do that.
Building a live streaming app with 100ms
100ms includes support for HLS for live streaming, which enables scaling to millions of viewers, mainly due to its support by OSes and CDNs. However, compared to other protocols, live streaming via HLS is slower and has a higher latency.
In this section, we’ll use the 100ms SDK to build the live streaming app. Before proceeding, you should be familiar with the following:
-
hmsStore: Contains the complete state of the room at any given time, including, for example, participant details, messages, and track states -
hmsActions: Used to perform any action like joining, muting, and sending a message
Setting up React
I’ve already created a starter template that we’ll use for this tutorial, so we can focus solely on using 100ms. Clone the GitHub repo with the following commands:
$ git clone -b starter https://github.com/Tammibriggs/LiveStreaming-100ms.git

$ cd LiveStreaming-100ms

$ npm install
Now, when we start the app using the npm start command, we’ll see the following page: 
On the page above, we can enter a name and select the role we want to use when joining the room.
At this point in the tutorial, when we click on the Join button, we won’t be taken to a different page; we’ll work on that later. Instead, after clicking on the Join button, the page will look like the following image: 
Integrate 100ms into our app
To integrate 100ms into our React app, first, we'll install the SDK, which we’ll need to build the app. We’ll install one additional dependency, HLS.js, to aid us in displaying the HLS stream for browsers that don’t support HLS natively:
$ npm i @100mslive/react-sdk@latest hls.js
Next, to initialize the SDK, we need to wrap our entire application with the <HMSRoomProvider /> component. In the starter app, head over to the index.js file in the src directory and modify it to look like the following code:
// src/index.js
import React from 'react';
import ReactDOM from 'react-dom/client';
import './index.css';
import App from './App';
import { HMSRoomProvider } from '@100mslive/react-sdk';

const root = ReactDOM.createRoot(document.getElementById('root'));
root.render(
  <React.StrictMode>
    <HMSRoomProvider>
      <App />
    </HMSRoomProvider>
  </React.StrictMode>
);
Now, let’s go ahead and retrieve the necessary credentials for building our app, room_id and token_endpoint. To get the room_id, navigate to your 100ms dashboard. In the sidebar, click on Rooms, and you’ll be taken to the following page: 
The two rooms above have already been created for us, which was done when deployed the live streaming starter kit. To verify that the rooms have the broadcaster and hls-viewer roles required for our app, click on any of the IDs under the Room Id table head to check: 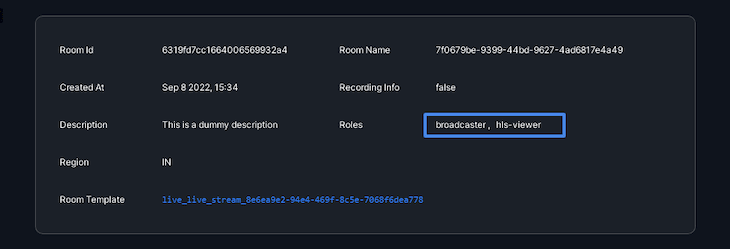
Now, copy one of the IDs and paste it in the appropriate variable in the .env file of the starter app.
To get the token_endpoint on the sidebar, first click on Developer. On the next page, copy the token_endpoint and paste it in the appropriate variable in the .env file: 
Joining a room
Now, we’ll work on the page below: 
Before we can begin streaming via HLS, we first need to join a room using the join method on hmsActions, which requires us to pass a config object. The config object must have the following fields:
-
userName: The name of the user that will be visible to everyone connected to the room -
authToken: A client-side token that we'll use to authenticate the user
If we were building a video conference, virtual meeting, or any other video call app, we could publish our video by joining the room, which could be seen by other peers or participants in the room. However, since we’ll be live streaming via HLS, the process is different.
Head over to src/JoinRoom.js and add the following import:
// src/JoinRoom.js
import { useHMSActions } from "@100mslive/react-sdk";
Next, add the following lines of code after the selectedRole state:
// src/JoinRoom.js
const hmsActions = useHMSActions()
Next, let’s create the function for generating the authToken and join the room. Add the following lines of code after the hmsActions variable:
// src/JoinRoom.js
const handleSubmit = async (e) => {
  e.preventDefault()
  const response = await fetch(`${ENDPOINT}api/token`, {
    method: "POST",
    body: JSON.stringify({
      user_id: `${Date.now()}`,
      role: selectedRole, //broadcaster, hls-viewer
      type: "app",
      room_id: ROOM_ID,
    }),
  })
  const { token } = await response.json()
  // Joining the room
  hmsActions.join({
    userName: username,
    authToken: token,
  })
}
In the code above, we are sending a request to generate the authentication token using the endpoint we supplied in our .env file. The request takes the selected role and room ID as parameters. After generating the token, we use it along with the username entered in the input field to join the room using the join method.
To call this function when the form is submitted, modify the opening form tag <form> to look like the following code:
// src/JoinRoom.js
<form className="join" onSubmit={handleSubmit}>
Right now, when we navigate to http://localhost:3000/ in our browser, enter a username, and click on the Join button, we’ll join the room. However, there won't be any changes in the UI yet. To fix this, we need a way to know the connection state of the room and to hide the form after we've connected. We can do so using the selectIsConnectedToRoom selector and the useHMSStore Hook.
Head over to src/App.js and add the following import:
// src/App.js
import { useHMSStore, selectIsConnectedToRoom } from '@100mslive/react-sdk';
Next, add the following lines of code in the App component:
// src/App.js
const isConnected = useHMSStore(selectIsConnectedToRoom)
Next, modify the return statement in the App component to look like the following:
// src/App.js
return (
  <div className="App wrapper">
    {isConnected
      ? <Room />
      : <JoinRoom />
    }
  </div>
);
With this, after joining the room, we’ll see the following page: 
Displaying video tiles
After joining the room, our video and audio will be published, meaning other peers in the room can view it. However, since we’re live streaming via HLS, other viewers shouldn’t be able to see this. For every broadcaster that joins the room, we want only a video tile of their published video to be displayed to other broadcasters.
For this, we’ll use the useVideo Hook, which takes in a video track ID and returns a videoRef to be passed to a video element. To get the video track ID, we first need to get the list of peers in the room. We can do so using the useHMSStore Hook and selectPeers selector.
Modify the Stream.js file in the src directory to look like the following code:
// src/Stream.js
import VideoTile from "./VideoTile";
import HlsView from "./HlsView";
import { selectLocalPeer, selectPeers, useHMSStore } from "@100mslive/react-sdk";

function Stream() {
  const peers = useHMSStore(selectPeers)
  const localPeer = useHMSStore(selectLocalPeer)

  return (
    <div className="stream">
      {localPeer.roleName === 'broadcaster' &&
        peers.filter((peer) => peer.roleName === 'broadcaster')
        .map((peer) => (
          <VideoTile key={peer.id} peer={peer} peers={peers} />
        ))
      }
    </div>
  )
}

export default Stream
In the code above, we are getting the list of peers in the room as well as the local peer, which is you. We are conditionally rendering the VideoTile component only when the roleName field of localPeer equals broadcaster.
Doing so will make the video tiles visible only to broadcasters because we haven’t started streaming yet. After that, using the filter method, we can create a new array containing only peers who are broadcasters, then mapping through it and passing each peer to the VideoTile component.
Now, head over to the src/VideoTile.js file. Let’s use useVideo to start displaying the published video of broadcasters in the room. Modify the VideoTile.js file to look like the following code:
// src/VideoTile.js
import { useVideo } from "@100mslive/react-sdk";

function VideoTile({ peer, peers }) {
  const { videoRef } = useVideo({
    trackId: peer.videoTrack
  })

  const numberOfBroadCasters = () => {
    const broadcasters = peers.filter((peer) => {
      return peer.roleName === 'broadcaster'
    })
    return broadcasters.length
  }

  return (
    <video
      ref={videoRef}
      className={numberOfBroadCasters() >= 2 ? 'video' : ''}
      autoPlay
      muted
      playsInline
    />
  )
}

export default VideoTile
With this, when we join the room as a broadcaster, we should see our published video and the videos of other broadcasters in the room.
Live stream via HLS and display stream to viewers
To start streaming via HLS, we just need to call the startHLSStreaming in hmsActions. To stop the stream, we can call the stopHLSStreaming method, and to get the HLS state, we can use the selectHLSState selector. It's that simple.
Head over to src/Controls.js and add the following imports:
// src/Controls.js
import { selectHLSState, useHMSActions, useHMSStore } from '@100mslive/react-sdk'
Next, add the following lines of code in the Controls component:
// src/Controls.js
const hmsActions = useHMSActions()
const hlsState = useHMSStore(selectHLSState)
Next, add the following functions after the hlsState variable for starting and stopping the live stream:
// src/Controls.js
const startHLSStreaming = async () => {
  try {
    await hmsActions.startHLSStreaming()
  } catch (err) {
      alert(`failed to start hls ${err}`)
  }
}

const stopHLSStreaming = async () => {
  try {
    await hmsActions.stopHLSStreaming()
  } catch (err) {
      alert(`failed to stop hls ${err}`)
  }
}
To call the functions above, replace the button component under the {/* HLS stream button */} comment in the return statement with the following code:
// src/Controls.js
{hlsState.running
  ? <Button
      variant="contained"
      disableElevation
      className='leave'
      onClick={stopHLSStreaming}
    >
      <StopCircleOutlined /> Stop Streaming
    </Button>
  : <Button
      variant="contained"
      disableElevation
      onClick={startHLSStreaming}
    >
      <PodcastsOutlined /> Go Live
    </Button>
}
Now, to display the HLS stream to viewers, we’ll use HLS.js, which we installed earlier. For more UI customizations, you can check out Video.js, which uses HLS.js internally.
When using HLS.js in displaying the stream, we need to pass the stream URL to its loadSource method and also pass a video element to it using the attachMedia method. We can get the stream URL from the hls state, which we can retrieve using the selectHLSState selector. Head over to src/Stream.js and add the following code before the closing tag </> of the div with stream as the className:
// src/Stream.js
{localPeer.roleName === 'hls-viewer' &&
  <HlsView/>
}
Next, head over to src/HlsView and modify the file to look like the following code:
// src/HlsView
import { selectHLSState, useHMSStore } from '@100mslive/react-sdk'
import Hls from 'hls.js'
import { useEffect, useRef } from 'react'

function HlsView() {
    const videoRef = useRef(null)
    const hlsState = useHMSStore(selectHLSState)
    const hlsUrl = hlsState.variants[0]?.url
    useEffect(() => {
        if (videoRef.current && hlsUrl) {
            const browserHasNativeHLSSupport = videoRef.current.canPlayType(
                'application/vnd.apple.mpegurl'
            );
            if (Hls.isSupported()) {
                let hls = new Hls()
                hls.loadSource(hlsUrl)
                hls.attachMedia(videoRef.current)
            }
            else if (browserHasNativeHLSSupport) {
                videoRef.current.src = hlsUrl
            }
        }
    }, [hlsUrl])
    return <video ref={videoRef} autoPlay controls></video>;
}

export default HlsView
With this, viewers will now be able to see the stream from broadcasters.
Adding room control functionalities
Let’s add functionality to mute and unmute audio and video and to leave the room. Head over to src/Controls.js and add the following imports:
// src/Controls.js
import { selectIsLocalAudioEnabled, selectIsLocalVideoEnabled, selectLocalPeer } from '@100mslive/react-sdk'
Next, add the following lines of code after the hlsState variable:
// src/Controls.js
const audioEnabled = useHMSStore(selectIsLocalAudioEnabled)
const videoEnabled = useHMSStore(selectIsLocalVideoEnabled)
const localPeer = useHMSStore(selectLocalPeer)
We use the selectIsLocalAudioEnabled and selectIsLocalVideoEnabled selectors to get the respective boolean states of the audio and video and determine whether they are currently muted or unmuted. We'll then toggle the current state and show the appropriate icon in the UI. We also get localPeer using the selectLocalPeer selector.
To mute and unmute audio and video, we can use setLocalVideoEnabled and setLocalAudioEnabled in hmsActions, which receives a boolean as parameter. In the Controls component, add the following functions after the stopHLSStreaming function:
// src/Controls.js
const toggleAudio = async () => {
  await hmsActions.setLocalAudioEnabled(!audioEnabled);
}

const toggleVideo = async () => {
  await hmsActions.setLocalVideoEnabled(!videoEnabled);
}
Now, to call the function above, find the following lines of code in the return statement:
<IconButton>
  <MicOffOutlined />
</IconButton>
<IconButton>
  <VideocamOffOutlined />
</IconButton>
Modify the code above to the following code:
// src/Controls.js
<IconButton onClick={toggleAudio}>
  {audioEnabled
    ? <MicNoneOutlined />
    : <MicOffOutlined />
  }
</IconButton>
<IconButton onClick={toggleVideo}>
  {videoEnabled
    ? <VideocamOutlined />
    : <VideocamOffOutlined />
  }
</IconButton>
To leave the room, we need to call the leave() method in hmsActions. After the toggleVideo function, we need to add the following lines of code:
// src/Controls.js
const leaveRoom = async () => {
  if(localPeer.roleName === 'broadcaster'){
    hmsActions.leave()
    await hmsActions.stopHLSStreaming()
  }else{
    hmsActions.leave()
  }
}
In the code above, if the roleName field of the localPeer equals broadcaster, along with leaving the room, we are also ending the HLS stream in case it’s ongoing.
To call the function above in the return statement, we’ll see the following lines of code:
<Button
  variant="contained"
  disableElevation
  className='leave'
>
  <LogoutOutlined /> Leave Room
</Button>
Modify it to the following:
// src/Controls.js
<Button
  variant="contained"
  disableElevation
  className='leave'
  onClick={leaveRoom}
>
  <LogoutOutlined /> Leave Room
</Button>
With this, the mute, unmute, and leave functionality should be working fine.
However, you'll notice that even when we join the room as a viewer, all the UI components meant to be seen or used only by the broadcaster will be visible, which shouldn’t be so. Viewers should only be able to see the leave button.
To fix this, modify the return statement of the Controls component to look like the following:
// src/Controls.js
return (
  <div className='controls'>
    {localPeer.roleName === 'broadcaster'
      ? <>
          <IconButton onClick={toggleAudio}>
            {audioEnabled
              ? <MicNoneOutlined />
              : <MicOffOutlined />
            }
          </IconButton>
          <IconButton onClick={toggleVideo}>
            {videoEnabled
              ? <VideocamOutlined />
              : <VideocamOffOutlined />
            }
          </IconButton>
          <Button
            variant="contained"
            disableElevation
            className='leave'
            onClick={leaveRoom}
          >
            <LogoutOutlined /> Leave Room
          </Button>
          {hlsState.running
            ? <Button
                variant="contained"
                disableElevation
                className='leave'
                onClick={stopHLSStreaming}
              >
                <StopCircleOutlined /> Stop Streaming
              </Button>
            : <Button
                variant="contained"
                disableElevation
                onClick={startHLSStreaming}
              >
                <PodcastsOutlined /> Go Live
              </Button>
          }
        </>
      : <Button
          variant="contained"
          disableElevation
          className='leave'
          onClick={leaveRoom}
        >
          <LogoutOutlined /> Leave Room
        </Button>
    }
  </div>
)
Add chat functionality and display all participants
There are three different methods available to send chat messages that have different use cases.
-
sendBroadcastMessage('message'): For messages that will be received by everyone in the room -
sendGroupMessage('message', ['role1']): For messages that will be received by every peer who is part of the passed-in roles -
sendDirectMessage('message', peer.id): For messages that will be received only by the peer whose ID was passed
In our app, we’ll only use sendBroadcastMessage(), but you can add features for the rest if you like.
Head over to src/ChatNdParticipants.js and add the following lines of code:
// src/ChatNdParticipants.js
import { selectHMSMessages, useHMSActions, useHMSStore } from "@100mslive/react-sdk"
Next, add the following lines of code after the message state:
// src/ChatNdParticipants.js
const messages = useHMSStore(selectHMSMessages)
const hmsActions = useHMSActions()

const handleSubmit = (e) => {
  e.preventDefault();
  hmsActions.sendBroadcastMessage(message)
  setMessage('')
}
We’ve created a handleSubmit, which will send the messages. We are also retrieving all the sent messages using the selectHMSMessages selector.
When the send-message form is submitted, we need to call handleSubmit and loop through the retrieved messages and display them. To call handleSubmit, modify the open tag <form> of the form with a name of send-message to the code below:
// src/ChatNdParticipants.js
<form name='send-messge' onSubmit={handleSubmit}>
Next, replace the Message component under the {/* Messages */} comment with the following:
// src/ChatNdParticipants.js
{messages.map((msg) => (
  <Message key={msg.id} message={msg} />
))}
Next, modify the Message.js file in the src directory to look like the following code:
// src/ChatNdParticipants.js
import { selectLocalPeer, useHMSStore } from '@100mslive/react-sdk'

function Message({message}) {
  const localPeer = useHMSStore(selectLocalPeer)

  return (
    <div
      className={`message ${message.senderUserId === localPeer.customerUserId && 'myMessage'}`}
    >
      <span>{message.senderName}</span>
      <p>{message.message}</p>
    </div>
  )
}

export default Message
Now, the chat functionality should be working. To display the participants, we’ll use the selectPeers selector to get all the peers in the room, loop over them, and display their name and role.
In the ChatNdParticipants.js, add the following import:
// src/ChatNdParticipants.js
import { selectPeers } from "@100mslive/react-sdk"
Next, add the following line of code after the hmsActions variable:
// src/ChatNdParticipants.js
const peers = useHMSStore(selectPeers)
Now, add the following lines of code after the {/* Participants */} comment:
// src/ChatNdParticipants.js
{peers.map((peer) => (
  <div className='rightBox__participant'>
    {peer.name}
    <p>{peer.roleName}</p>
  </div>
))}
With this, we’re done building our live streaming app.
Conclusion
In this tutorial, we learned how to build a live streaming app using 100ms. Aside from the features covered in this tutorial, there are a lot others we can add, like streaming on YouTube, Twitch, Facebook, etc using RTMP streaming, displaying notifications for activities happening in the room, and more.
I hope you enjoyed this tutorial, and be sure to leave a comment if you have any questions. Happy coding!
Cut through the noise of traditional React error reporting with LogRocket
LogRocket is a React analytics solution that shields you from the hundreds of false-positive errors alerts to just a few truly important items. LogRocket tells you the most impactful bugs and UX issues actually impacting users in your React applications.

LogRocket automatically aggregates client side errors, React error boundaries, Redux state, slow component load times, JS exceptions, frontend performance metrics, and user interactions. Then LogRocket uses machine learning to notify you of the most impactful problems affecting the most users and provides the context you need to fix it.
Focus on the React bugs that matter — try LogRocket today.

Top comments (1)
Some comments may only be visible to logged-in visitors. Sign in to view all comments.