
Written by Atharva Deosthale✏️
Nowadays, developers are learning more about Web3. It’s the successor of the two previous versions of the web, where the first one, Web1, focused on providing information to the users, just like Wikipedia. It was used during the early days of the internet.
We've been in Web2, where people share data on websites that are governed by huge companies, and the companies sell the data to advertisers. But now, Web3 is rising. The basic concept of Web3 is that the user owns their data. The data will be stored not in a server monitored by companies (like Google or Facebook), but on a chain of thousands of computers, which we call the blockchain.
Because of this, many Web3 technologies are coming up everyday, and Moralis is one of them. Moralis makes working with Web3 APIs easy. It is the “Firebase of Web3,” as it follows the motto of “one line of code”. I personally have been using Moralis recently, and it has saved me a lot of development time. Authentication, Database, Web3 transfers, and so on; you name it, Moralis can do most of these complicated things much more easily.
Today, we are going to look at how Moralis works and make a simple project with Next.js. We will use authentication with Metamask (made easier by Moralis) and we will create a button that will help us transfer funds from one logged-in Metamask wallet to another.
We will be using Next.js because we don’t need to set up repetitive things like routing all from scratch; Next.js provides us with an inbuilt router. Also, many developers are transitioning to Next.js, so it makes sense to show how it works with this framework. However, if you still prefer to use React, the tutorial will work with it as well, so don’t worry!
Requirements
Before you continue with the tutorial, let’s go through a list of requirements so that they don’t take up a lot of your time while in development:
- Working knowledge of React
- Working knowledge of how the blockchain works and stores data
- A Metamask wallet - I recommend setting up two wallets, as we will need both of them to transfer funds
- A code editor - I prefer Visual Studio Code
- Node.js installed on your machine
If you get stuck somewhere in the tutorial, feel free to have a look at the GitHub repository.
Setting up a Moralis server
Go to Moralis.io and create a new account or log in if you already have one. Once you are logged in, you will be presented with a dashboard like this:
Now, click on the button which says Create a new server, then click on Testnet (which is the testing version of a blockchain, as we will not be using real ETH for transactions in this tutorial). You will now be prompted with several options:

Here, I’ve entered my server’s name, preferred location, and preferred testnet chain. In this tutorial, we will be working on the Ropsten ETH Testnet because it’s easy to obtain some test ETH in this chain for development purposes. I also tried to use Rinkeby, but experienced downtimes.
After you fill in the required fields, click Add Instance and this should start creating your instance. In the meantime, let’s go ahead and set up our Next.js app.
Creating a Next.js app
Navigate to a safe directory and use the following command to create a new Next.js app:
npx create-next-app projectname --example with-tailwindcss
Replace projectname with a name of your choice. This command will set up Next.js and also set up Tailwind CSS for us to do some minimal styling, even though we won’t be focusing a lot on styling in this tutorial.
Once the app is created, navigate to the project directory and use the following commands to install the dependencies we will need for this project:
npm install moralis react-moralis @walletconnect/web3-provider
This will install the moralis core library as well as react-moralis, which will provide us with some handy hooks. @walletconnect/web3-provider is being installed because Moralis throws a warning if not; this package is used to use WalletConnect instead of Metamask. In this tutorial, we will be covering Metamask only, so we are installing this package just to get rid of the warning.
Setting up the environment variables
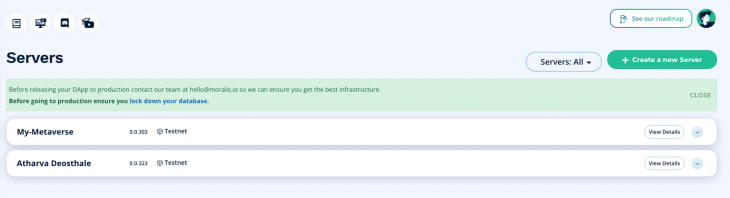
Go back to your Moralis dashboard and you should see your project created like this:
![]()
Now, click on View Details to get the information necessary to link our Next.js app to our Moralis server. Take note of the Server URL and Application ID.
Go back to your Next.js app and make a new file called .env. Fill in the details in the format as shown below:
NEXT_PUBLIC_SERVER_URL=(server url here)
NEXT_PUBLIC_APP_ID=(application id here)
We are using NEXT_PUBLIC_ as the prefix here so that Next.js knows this environment variable is safe to be exposed on the client side of the app.
Start the Next.js development server using the following command:
npm run dev
This command should launch our Next.js app on localhost:3000, so fire up your browser and have a look at the app!
Connecting a Next.js app with Moralis
To connect the app with the server, we need to wrap every component under a MoralisProvider.
The best way to do this is with the root file app.js in the pages folder. Open the file and change it to the following:
import { MoralisProvider } from "react-moralis";
import "../styles/globals.css";
function MyApp({ Component, pageProps }) {
  return (
    <MoralisProvider
      appId={process.env.NEXT_PUBLIC_APP_ID}
      serverUrl={process.env.NEXT_PUBLIC_SERVER_URL}
    >
      <Component {...pageProps} />
    </MoralisProvider>
  );
}
export default MyApp;
Here, we have wrapped our Component with MoralisProvider, so all of the child components will render properly with Moralis support. We also have passed in the appId and serverUrl through the environment variables we made before.
Creating the login page
Open index.js under the pages folder. This will be the starting point of our Next.js app. Remove everything except the <Head> component, and use the following layout to design the simple login page:
return (
  <div className="h-screen w-screen flex items-center justify-center">
    <Head>
      <title>Moralis IO tutorial</title>
      <meta name="description" content="A basic tutorial of Moralis IO" />
      <link rel="icon" href="/favicon.ico" />
    </Head>
    <button
      className="px-7 py-4 text-xl rounded-xl bg-yellow-300 animate-pulse"
    >
      Login using Metamask
    </button>
  </div>
);
When you save the file, you will see an animating yellow button that says Log in using Metamask.
Now let’s add the functionality to it. Unsurprisingly, it’s very easy using Moralis! Import the useMoralis hook from react-moralis and use it to get some useful functions:
const { isAuthenticated, authenticate } = useMoralis();
const router = useRouter();

useEffect(() => {
  if (isAuthenticated) router.replace("/dashboard");
}, [isAuthenticated]);
In the above code, we have imported a variable isAuthenticated, which keeps the track of the authentication state of the app. We also imported the authenticate function which actually helps the user to login using Metamask.
The useEffect redirects the user to the dashboard whenever the user is authenticated. Add the onClick property to the button, so your button should look like this:
<button
  className="px-7 py-4 text-xl rounded-xl bg-yellow-300 animate-pulse"
  onClick={() =>
    authenticate({ signingMessage: "Authorize linking of your wallet" })
  }
>
  Login using Metamask
</button>
We are also passing in the signingMessage so that we can display a message while authenticating using Metamask. Now if you click on Log in using Metamask, you should see Metamask popping up and asking for authorization like this:
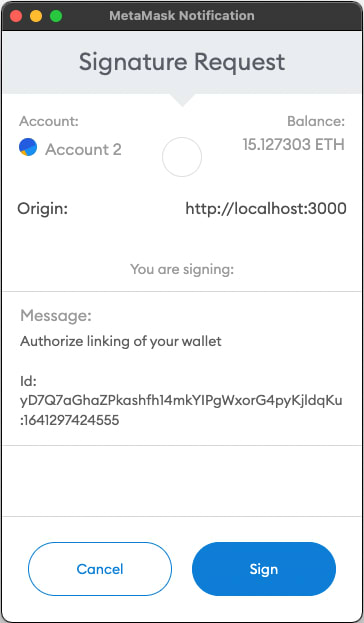
Once you click Sign, you get logged in using your wallet, and you will see a 404 error page, because we have yet to create a dashboard.
I want to talk about something important before moving on to the dashboard. I’m on the Ropsten test network on Metamask, so every transaction in this application will be performed on the Ropsten Testnet. Make sure you are not on the MainNet (production version of Ethereum) on Metamask while testing; always set to some kind of testnet before working.
Getting test Ether
Before we get to the dashboard, let’s fill our first wallet with some test Ether. Ropsten Testnet is the best test network because you can get test ETH easily as compared to other testnets (in my opinion). So, open Metamask, make sure you’re on the Ropsten test network, and click on the Buy button. Once you scroll down, you should see this option to get test ETH:

Depending on which Faucet Metamask redirected you to, you might need to paste in your wallet address. Shortly, you will get test ETH in your wallet running on Ropsten Testnet.
There are some limitations on how much ETH you can extract from the Faucet, so spend wisely even when testing. Now, we can proceed to the dashboard, where will be performing a simple ETH transfer.
Creating the dashboard
Create a new folder named dashboard under pages. Create a new file index.js with the following layout:
import Head from "next/head";
import { useRouter } from "next/router";
import { useEffect } from "react";
import Moralis from "moralis";
import { useMoralis } from "react-moralis";

function Index() {
  const { isAuthenticated, logout } = useMoralis();
  const router = useRouter();

  useEffect(() => {
    if (!isAuthenticated) router.replace("/");
  }, [isAuthenticated]);

  return (
    <div className="h-screen w-screen flex flex-col items-center justify-center">
      <Head>
        <title>Moralis Tutorial - Dashboard</title>
      </Head>
      <button
        className="px-7 py-4 mb-5 text-xl rounded-xl bg-yellow-300"
      >
        Send 0.1 ETH to owner
      </button>
      <button
        className="px-7 py-4 text-xl rounded-xl bg-yellow-300"
      >
        Logout
      </button>
    </div>
  );
}
export default Index;
Here, we imported the Moralis Hook, and extracted useful functions we will need for actions that require Moralis. useEffect ensures that the user is redirected back to the login page once the user is no longer authenticated. To log out, add the logout function to the logout button, which should look like this:
<button
  onClick={logout}
  className="px-7 py-4 text-xl rounded-xl bg-yellow-300"
>
  Logout
</button>
Now, let’s create a function that will help us transfer test ETH to another wallet:
const sendEth = async () => {
  try {
    await Moralis.Web3.enableWeb3();
    const result = await Moralis.Web3.transfer({
      type: "native",
      amount: Moralis.Units.ETH("0.1"),
      receiver: "account not connected with the app",
    });
    console.log(result);
    alert("Transfer of funds succeeded!");
  } catch (err) {
    console.error(err);
    alert("Something went wrong");
  }
};
In the code above, we are first enabling the Web3 instance so that we can access functions related to it. Then, we are initiating a transfer, so when the transaction is approved and processed, the result will be logged in console, or an error will be logged.
Enter the function in the onClick of the Send 0.1 ETH to owner button. Your button should look like this:
<button
  onClick={sendEth}
  className="px-7 mb-5 py-4 text-xl rounded-xl bg-yellow-300"
>
  Send 0.1 ETH to owner
</button>
Now, when you click on the button, you should see Metamask popping up asking for approval of the transaction:
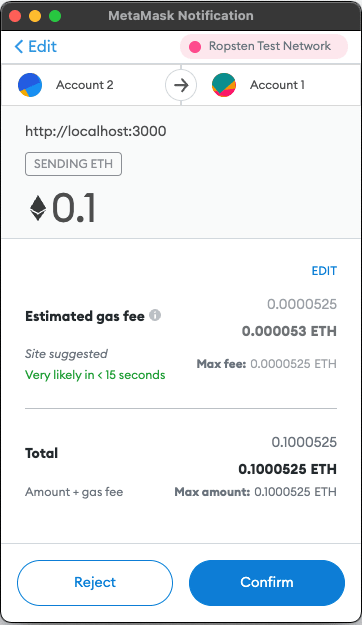
Make sure you are on the Ropsten Testnet and click on Confirm to process the transaction. It might take some time to process the transaction as it’s being written on the blockchain. Once the processing completes, you can see the test ETH arriving in your other account.
What’s next?
These are the very basic functionalities of Moralis. In addition to these, you can manage custom tokens, send NFTs, interact with deployed smart contracts, and much more! Go ahead and explore the universe of Web3 using Moralis!
LogRocket: Full visibility into production Next.js apps
Debugging Next applications can be difficult, especially when users experience issues that are hard to reproduce. If you’re interested in monitoring and tracking Redux state, automatically surfacing JavaScript errors, and tracking slow network requests and component load time, try LogRocket.

LogRocket is like a DVR for web and mobile apps, recording literally everything that happens on your Next app. Instead of guessing why problems happen, you can aggregate and report on what state your application was in when an issue occurred. LogRocket also monitors your app's performance, reporting with metrics like client CPU load, client memory usage, and more.
The LogRocket Redux middleware package adds an extra layer of visibility into your user sessions. LogRocket logs all actions and state from your Redux stores.
Modernize how you debug your Next.js apps — start monitoring for free.

Top comments (0)