
Did you pull a new assignment to sprinkle SAML2 magic on your .NET WebAPI using JWT with a free library? Well, your search ends here, fellow coder! By the end of this guide, you'll be equipped with a production-ready solution and glean insights into how to extend it and construct a truly enterprise-grade authentication system.
My inspiration for this guide draws heavily from this stackoverflow thread that offers a great example.
Gearing Up:
Prerequisites
Before we delve into the thick of things, it would be beneficial to have:
- A basic understanding of .NET Core and C# programming. (This article by Jason Watmore is a gem!)
- Some degree of familiarity with SAML2.
But fret not. Armed with the examples provided here, you'll manage to put together a working solution.
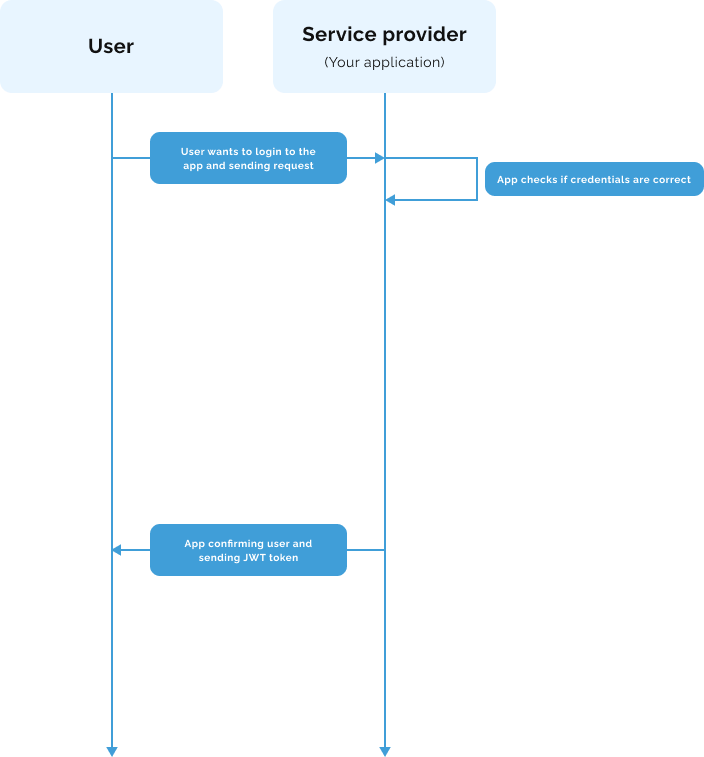
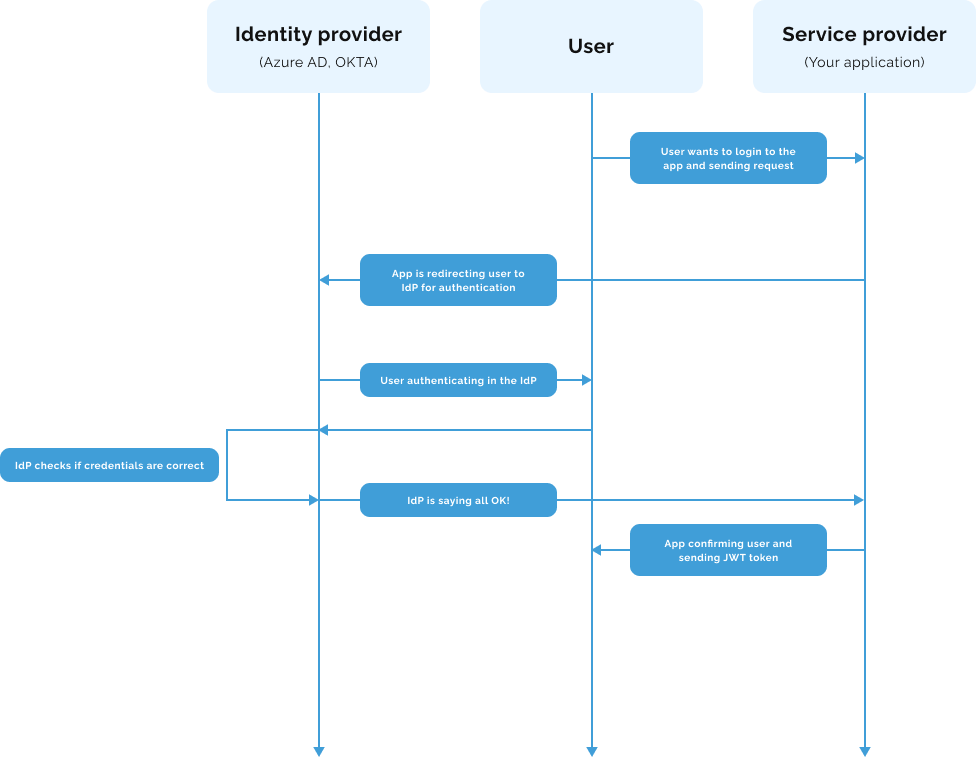
Visualizing the Flow
Before we embark, let's visualize how our app's authentication flow transforms with and without SAML.
Here is really simplified sequence diagram of how basic authentication looks like:
And now with SAML2:
Step 1: Loading Up the Necessary Packages
First off, we need to install the necessary NuGet packages for Sustainsys, JWT, and other supporting libraries. Head to the Package Manager Console and run these commands:
Install-Package Sustainsys.Saml2.AspNetCore2
Install-Package Microsoft.AspNetCore.Authentication.JwtBearer
Install-Package System.IdentityModel.Tokens.Jwt
Step 1.1: Certificates 101
SAML authentication protocol mandates certificate management, primarily used for signing and encrypting SAML assertions. Here's a brief rundown on how to handle these certificates.
For our demo, we'll use the certificate from https://stubidp.sustainsys.com/Certificate
Here's how you'd use a .pfx file:
public static X509Certificate2 GetCertificate()
{
    X509Certificate2 certificate = new X509Certificate2(@"path/to/your/certificate.pfx", certificatePassword);
}
Step 2: Configuring SAML2 & JWT Authentication
Fantastic! Now, we'll couple SAML2 authentication with Sustainsys and set up JWT authentication in our .NET WebAPI application. Open your Startup.cs file (or Program.cs, based on your configs) and add these configurations:
JwtSecurityTokenHandler.DefaultInboundClaimTypeMap.Clear();
services
    .AddAuthentication(options =>
    {
        options.DefaultScheme = "AppScheme";
        options.DefaultSignInScheme = "AppExternalScheme"; // If you didn't have add default scheme
        options.DefaultSignOutScheme = "AppExternalScheme"; // If you didn't have add default scheme
    })
    .AddCookie("AppExternalScheme") // If you didn't have add this
    .AddJwtBearer("AppScheme", options => ...);
services
    .AddAuthentication()
    // AddSaml2 must always be after AddAuthentication
    .AddSaml2(sharedOptions =>
    {
        string siteAddress = "https://your.application.example.com/" // take note!
        sharedOptions.SPOptions.EntityId = new EntityId(siteAddress);
        sharedOptions.SPOptions.ServiceCertificates.Add(serviceCertificate);
        sharedOptions.SPOptions.AuthenticateRequestSigningBehavior = SigningBehavior.Always;
        sharedOptions.SPOptions.WantAssertionsSigned = true;

        RegisterIdentityProvider(sharedOptions, siteAddress, selectedIdentityProvider);
    });

    // Register a single identity provider
    void RegisterIdentityProvider(Saml2Options sharedOptions, string siteAddress, IdentityProviderCustomClass identityProvider)
    {
        var ip = new IdentityProvider(
            new EntityId(identityProvider.MetadataId), sharedOptions.SPOptions)
        {
            MetadataLocation = identityProvider.MetadataLocation, // example: https://stubidp.sustainsys.com/metadata
            LoadMetadata = true,
            DisableOutboundLogoutRequests = false,
            AllowUnsolicitedAuthnResponse = identityProvider.AllowUnsolicitedAuthResponse,
        };


        X509Certificate2 customerSsoCertificate = GetCertificate();
        ip.SigningKeys.AddConfiguredKey(customerSsoCertificate);

        //Finally, add identity provider to the app
        sharedOptions.IdentityProviders.Add(ip);
    }
Step 3: Crafting New Controller Endpoints
/// <summary>
/// Redirects the user to the SAML authentication provider (SSO)
/// </summary>
/// <param name="returnUrl">URL to which the user should return post successful authentication.</param>
[HttpGet("saml/redirect")]
public async Task<ActionResult> SamlRedirectSaml(string returnUrl)
{
    return new ChallengeResult(
        Saml2Defaults.Scheme,
        new AuthenticationProperties
        {
            RedirectUri = Url.Action(nameof(SamlLoginCallback), new { returnUrlOrError.Value.Url }),
            IsPersistent = true
        });
}

/// <summary>
/// Logs the user in (SSO).
/// </summary>
/// <param name="url">URL to which the user should return post successful authentication.</param>
[HttpGet("saml/login")]
public async Task<ActionResult> SamlLoginCallback(string url)
{
    // Use .AuthenticateAsync to verify if user authentication was successful
    AuthenticateResult authenticateResult = await HttpContext.AuthenticateAsync("AppExternalScheme");
    if (!authenticateResult.Succeeded)
    {
        return await Problem(statusCode: StatusCodes.Status401Unauthorized);
    }

    // Use claims to identify authenticated user
    Collection<Claim> claimCollection = authenticateResult?.Principal?.Claims;
    if (claimCollection.Count == 0) // No claims specified
    {
        return await Problem(statusCode: StatusCodes.Status400BadRequest);
    }

    // You can use ClaimTypes instead of long string like
    // Always refer to the identity provider documentation of your choice to match the correct claims with your app
    string? userName = claimCollection.FirstOrDefault(c => c.Name.Equals(ClaimTypes.NameIdentifier, StringComparison.OrdinalIgnoreCase)).Value;
    Maybe<UserSecurityData> existingUser = await _userService.GetUser(userName);
    if (existingUser.HasNoValue) // User doesn't exist
    {
        // Optional: Auto-create a user account if none exists
        Result<User> autoCreatedUser = await _userService.AutoCreateAccount(userNameOrError.Value, claimCollection);
        if (autoCreatedUser.IsFailure)
        {
            return await Problem(statusCode: StatusCodes.Status401Unauthorized);
        }

        // Log in user as you normally would
        await LogInSsoUser(autoCreatedUser.Value.Id);
    }
    else
    {
        // Log in user as you normally would
        await LogInSsoUser(existingUser.Value.Id);
    }

    // Redirect user to the original address
    return Redirect(url);
}
Unveiling the Hidden Treasures
This section'll explore a few more tips to enhance your solution.
Tap into Azure Key Vault
Did you know there's a savvy way to manage your certificates? Azure Key Vault is your secret weapon among Microsoft Azure's cloud-based services. Think of it as a secure digital chest where you can safely stash your cryptographic keys, certificates, secrets, and connection strings used by your cloud apps and services. Rather than spreading them throughout your application code or configuration files, Azure Key Vault offers centralized, safe, and scalable storage.
To give you an idea, here's a snapshot of how you can utilize Azure Key Vault:
public static X509Certificate2 GetCertificate()
{
    DefaultAzureCredential azureCredentials = new DefaultAzureCredential();
    CertificateClient client = new CertificateClient(new Uri($"https://{VaultName}.vault.azure.net/"), azureCredentials);

    Azure.Response<X509Certificate2> certificate = client.DownloadCertificate("CertificateName");

    return certificate.Value;
}
Juggling Multiple Identity Providers
Imagine handling multiple identity providers, such as Azure AD and OKTA. No problem at all! A few modifications to our existing solution, and you're all set.
Firstly, let's revisit our existing code and integrate some additional lines. We'll begin with the registration:
services
    .AddAuthentication()
    // AddSaml2 must always follow AddAuthentication
    .AddSaml2(sharedOptions =>
    {
        string siteAddress = "https://your.application.example.com/" // be careful here
        sharedOptions.SPOptions.EntityId = new EntityId(siteAddress);
        sharedOptions.SPOptions.ServiceCertificates.Add(serviceCertificate);
        sharedOptions.SPOptions.AuthenticateRequestSigningBehavior = SigningBehavior.Always;
        sharedOptions.SPOptions.WantAssertionsSigned = true;

        // NEW - Here's where we register multiple identity providers
        foreach(IdentityProviderCustomClass selectedIdentityProvider in multipleIdentityProviders)
        {
            RegisterIdentityProvider(sharedOptions, siteAddress, selectedIdentityProvider);
        }

    });
Then, let's add some flavors to the saml/redirect endpoint by incorporating identity provider selection logic.
[HttpGet("saml/redirect")]
public async Task<ActionResult> SamlRedirect(string returnUrl, string entity)
{
    var properties = new AuthenticationProperties
    {
        RedirectUri = Url.Action(nameof(SamlLoginCallback), new { returnUrlOrError.Value.Url }),
        IsPersistent = true
    };

    properties.Items.Add("idp", new EntityId(entity).Id) // NEW - This line is crucial. It explicitly defines the identity provider to use.

    return new ChallengeResult(Saml2Defaults.Scheme, properties);
}
A User-Friendly Approach to Error Handling
When directing users to multiple websites, the traditional error messaging approach between the Front-End (FE) and the API can fall short. However, you can handle this user-friendly by designing a cshtml view on the API end to display error messages.
Let's look at an example. Start by creating Error.cshtml and ErrorModel.cs files:
@page
@model ErrorModel
@{
    Layout = null;
}

<!DOCTYPE html>
<html>
<head>
    <title>Oops, Something Went Wrong!</title>
</head>
<body>
    <h1>Error</h1>
    <p>@Model.ErrorMessage</p>
</body>
</html>
using Microsoft.AspNetCore.Mvc.RazorPages;

public class ErrorModel : PageModel
{
    public string ErrorMessage { get; set; }

    public void OnGet(string message)
    {
        ErrorMessage = message;
    }
}
Next, integrate this into your controller. Here's how it would look with some pre-existing code:
[HttpGet("saml/login")]
public async Task<ActionResult> SamlLoginCallback(string url)
{
    AuthenticateResult authenticateResult = await HttpContext.AuthenticateAsync("AppExternalScheme");
    if (!authenticateResult.Succeeded)
    {
        ViewResult view = View("Error", new ErrorModel{ ErrorMessage = "Authentication failure!"});
        view.StatusCode = StatusCodes.Status401Unauthorized;

        return view;
    }
...
Simplifying Claims Processing With a Helper Class
Claims are generally used to identify an authenticated user. You might want to consider creating a helper class to make your code easier to understand and maintain.
 public class ClaimCollection : Collection<Claim>
{
    // Constructors...
    // ...

    public Result<UserName> GetUserName() => this.FirstOrDefault(c => c.Type.Equals(ClaimTypes.NameIdentifier, StringComparison.OrdinalIgnoreCase)));

    public Result<Email> GetEmail() => this.FirstOrDefault(c => c.Type.Equals(ClaimTypes.Email, StringComparison.OrdinalIgnoreCase));

// Add other claims as needed...
The Importance of Logging
If you've ever been caught up in a SAML2 flow issue, you'd know how challenging it can be to identify the problem. Was it an error in the Identity Provider (IdP) configuration? Or was there a bug within your code? For this reason, it's crucial to incorporate a logging system into your application's communication with the identity provider.
The sustainsys library handles this aspect and allows for the injection of a logger. In the following example, we've used the pre-defined AspNetCoreLoggerAdapter, which employs the standard Microsoft.Extensions.Logging class.
services
    .AddAuthentication()
    .AddSaml2(sharedOptions =>
    {
        string siteAddress = "https://your.application.example.com/" // remember this!
        sharedOptions.SPOptions.EntityId = new EntityId(siteAddress);
        sharedOptions.SPOptions.ServiceCertificates.Add(serviceCertificate);
        sharedOptions.SPOptions.AuthenticateRequestSigningBehavior = SigningBehavior.Always;
        sharedOptions.SPOptions.WantAssertionsSigned = true;
        sharedOptions.SPOptions.Logger = new AspNetCoreLoggerAdapter(logger)  // Here's where you add the logger

...
The Charm of User-Password Authentication with SAML2
What's so special about SAML2 in .NET? With SAML2, you no longer need to implement user-password authentication separately. SAML2 seamlessly integrates into your authentication processes, allowing you to maintain your existing authentication endpoints. It handles the Single Sign-On (SSO) flow, so users can log in once and access multiple applications without having to repeatedly enter their credentials.
Final Thoughts
Voila! You've now become part of the elite club capable of integrating SAML2 into their .NET applications. Recognizing the potential for research headaches, I decided to put together this comprehensive guide. But don't rest on your laurels. This is just the starting point, and there's a whole universe to explore beyond. However, with this demo, you've already hit the ground running.
If you've discovered an even better solution, please share! We're all in this learning journey together. Also, a hearty shoutout to the talented team behind the Sustainsys library. Keep the coding spirit alive. Happy coding!

Top comments (0)