
Introduction
Are you looking for an efficient and user-friendly control panel for your web server? Look no further than CyberPanel! CyberPanel is a powerful web hosting control panel that allows you to easily manage your websites, email accounts, and DNS settings.
Original source of this article can be found on this page at Axxellanceblog
And the best part? It's completely free and open-source! In this tutorial, we'll guide you step-by-step through the process of installing CyberPanel on Ubuntu. So, whether you're a seasoned web developer or just starting, follow along to learn how to get CyberPanel up and running on your Ubuntu server.
What is CyberPanel
CyberPanel is a free and open-source web hosting control panel that enables website owners and developers to easily manage their websites, email accounts, and DNS settings. It was designed with speed and security in mind, making it an ideal solution for those who want to create and manage websites quickly and efficiently.
CyberPanel comes with a user-friendly interface that simplifies website management tasks. With just a few clicks, you can install popular web applications such as WordPress, Joomla, and Drupal, set up email accounts, manage DNS zones, and more.
One of the standout features of CyberPanel is its integration with the LiteSpeed web server. LiteSpeed is a high-performance web server that is known for its speed, security, and scalability. When combined with CyberPanel, it provides an unbeatable hosting experience for websites of all sizes.
In addition to LiteSpeed, CyberPanel also includes several other powerful features, such as automatic backups, Let's Encrypt SSL support, and advanced security measures to protect your website from hacking attempts.
Overall, CyberPanel is an excellent web hosting control panel for anyone who wants to create and manage websites easily and efficiently. Its user-friendly interface, powerful features, and integration with LiteSpeed make it a top choice for website owners and developers alike.
CyberPanel vs CyberPanel Enterprise
CyberPanel and CyberPanel Ent are two versions of the same web hosting control panel. While they share many similarities, there are a few key differences between them that you should be aware of before deciding which version to use.
CyberPanel is the free, open-source version of the control panel. It comes with a range of features that make it a popular choice for website owners and developers. For example, CyberPanel includes an intuitive interface that makes it easy to manage your websites, email accounts, and DNS settings. It also comes with LiteSpeed Web Server integration, which is known for its speed, security, and scalability.
CyberPanel Ent, on the other hand, is the enterprise version of the control panel. It includes all of the features of the free version, as well as some additional tools and capabilities that are designed to meet the needs of larger organizations. For example, CyberPanel Ent includes advanced backup and restoration options, enhanced security features, and support for multiple server environments.
Another key difference between the two versions is that CyberPanel Enterprise comes with dedicated support and maintenance services. This means that if you run into any issues while using the enterprise version, you can reach out to the CyberPanel team for assistance.
Ultimately, the version of CyberPanel that you choose will depend on your specific needs and requirements. If you are a small to medium-sized website owner or developer, the free version of CyberPanel is likely to provide you with everything you need to manage your websites effectively. However, if you are part of a larger organization that requires additional tools and support, CyberPanel Ent may be the better choice for you.
To learn more about the differences between OpenLiteSpeed and LiteSpeed Web Server Enterprise, please see this comprehensive comparison
Server-side requirements
Before you can install CyberPanel on your server, you need to ensure that your server meets the necessary requirements. Here are the server-side requirements for CyberPanel:
- Operating System: CyberPanel is compatible with a variety of operating systems, including CentOS 7 and 8, Ubuntu 18.04 and 20.04, and Debian 9 and 10.
- RAM: CyberPanel requires a minimum of 1 GB of RAM to operate effectively. However, we recommend at least 2 GB of RAM to ensure optimal performance.
- Disk Space: CyberPanel requires a minimum of 10 GB of free disk space. However, the actual amount of disk space required will depend on the number of websites you plan to host and the amount of traffic they receive.
- Processor: CyberPanel is compatible with both Intel and AMD processors.
- Web Server: CyberPanel requires the LiteSpeed web server to be installed on your server. If you don't have LiteSpeed installed, you can easily install it using the CyberPanel installation script.
- Firewall: CyberPanel requires that port 8090 is open and accessible for communication with the control panel.
It is essential to ensure that your server meets these requirements before attempting to install CyberPanel. Failure to meet these requirements may result in installation issues or poor performance. If you are unsure whether your server meets the necessary requirements, consult with your hosting provider or system administrator.
What we will talk about
Now let’s talk about what we are going to do in this article in order to successfully install Appwrite on our Ubuntu server.
- Updating our ubuntu server #
- Remove Unnecessary Installations #
- Install CyberPanel with OpenLiteSpeed #
- Configure Firewall Rules #
- Accessing the CyberPanel Web UI #
- Accessing the OpenLiteSpeed #
- How to change the password of OpenLiteSpeed and CyberPanel Web Admin #
- Troubleshooting #
1. Updating our ubuntu server:
Updating and upgrading an Ubuntu server is a straightforward process. To update the package list on your server, simply run the command sudo apt-get update in the terminal. This will download and refresh the package list from the Ubuntu repositories.
To upgrade the packages on your server to the latest available versions, run the command sudo apt-get upgrade. This will upgrade all installed packages to their latest available versions. It's recommended to perform these updates regularly to keep your Ubuntu server up to date with the latest security patches and bug fixes.
The below terminal command will update and upgrade your Ubuntu server simultaneously without having you copy and paste the command twice.
sudo apt-get update && sudo apt-get upgrade
2. Remove Unnecessary Installations
We need to uninstall the default web server, database server, mail transfer agent, and IMAP and POP3 servers if they are already installed and their services are operational because CyberPanel has its own structure and relies on the OpenLiteSpeed server. Before removing the services, you must first stop them.
sudo systemctl stop mysql.service
sudo systemctl stop apache2.service
sudo systemctl stop dovecot.service
sudo systemctl stop postfix.service
Once you've stopped them, use the following commands to uninstall the installations:
sudo apt-get remove -y mysql-server apache2 dovecot-core postfix
Reboot the computer after the unnecessary installations have been removed to make the adjustments effective.
shutdown -r now
3. Install CyberPanel with OpenLiteSpeed
Step1. Install wget & curl
We require wget and curl tools on our system in order to run the script provided by the Cyberpanel developers to install their hosting control panel.
sudo apt install wget curl -y
Step2. Run the installation script
Run the following command. It will start the automatic installation process, which will ask you a few questions about the LiteSpeed version and add-ons you want to install.
sh <(curl <https://cyberpanel.net/install.sh> || wget -O -<https://cyberpanel.net/install.sh>)
You can use this command if you are unable to log in as root for some reason.
sudo su - -c "sh <(curl <https://cyberpanel.net/install.sh> || wget -O - <https://cyberpanel.net/install.sh>)"
Step 3: Select the version of LiteSpeed that you would like to use
Choose which LiteSpeed version to install. Please make sure you have a license key before choosing LiteSpeed Enterprise. It is free for 1 domain, but you still need to obtain the key. Go to the pricing table to choose your preferred strategy.
CyberPanel Installer v2.1.2

RAMcheck : 184/981MB (18.76%)

Diskcheck : 7/30GB (27%) (Minimal 10GBfree space)

1. Install CyberPanelwith OpenLiteSpeed.

2. Install Cyberpanelwith LiteSpeed Enterprise.

3. Exit.

  Please enter the number[1-3]:
The prompt below will appear if LiteSpeed Enterprise was your choice. Type in your serial number.
If you do not have any license, you can also use trial license (if server has not used trial license before), type TRIAL
Please enter your LiteSpeed WebServer Enterprise serial number:
Step 4: Select options and add-ons
A sequence of prompts for the various options and add-ons will be displayed to you.
Full Service (default Y):
- * * PowerDNS 121 - an open-source DNS server * Postfix 57 - open-source mail transfer agent * Pure-FTPd 33 - open-source FTP server
Remote MySQL (default N):
- * * Allow for your Database to be installed on a remote server
CyberPanel Version (default Latest Version):
- * * Press Enter to install the most recent version of CyberPanel, or choose to install a prior version.
Password (default “1234567”):
- * * It is recommended that you use “s” to set your own strong password
Memcached 32 (default Y):
- * * distributed memory object caching system
Redis 14 (default Y):
- * * Data structure store that can be used as a database, cache, and message broker in memory
Watchdog 46 (default Yes):
A kernel watchdog is used to keep track of whether a system is active. It is intended to automatically restart computers that have become stuck owing to irreparable software faults.
Step 5: Installation
The installation will take place automatically. Around 5 to 10 minutes, depending on how efficient your server is.
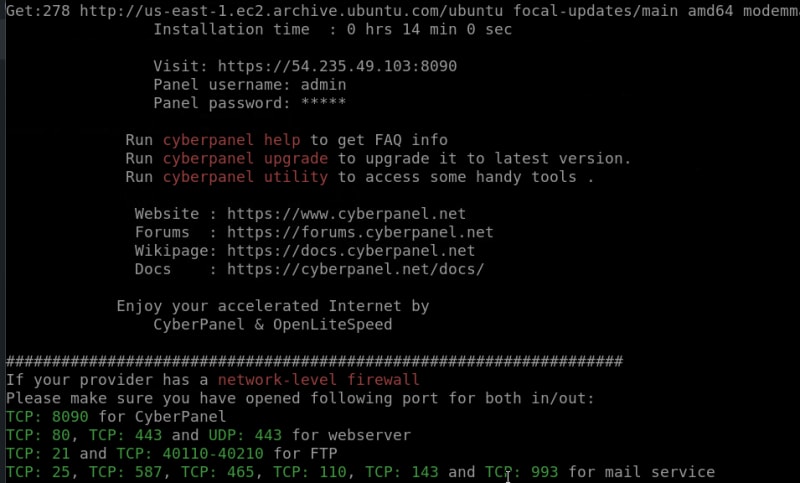
Step 6: Finalize Installation
You will see the following screen, which displays crucial details about your configuration after the installation is complete. For future use, select it out and copy it somewhere secure.
Step 7: Restart Server
Enter “y” to restart. Or enter “reboot” later after you have performed other desired operations.
Would you like to restart your server now? [y/N]:
Step 8: Access CyberPanel
The following information (which you should edit) will allow you to access CyberPanel following a successful installation:
URL: https://<Your Server's IP Address>:8090
Username: admin
Password: <the password you set during installation>
4. Configure Firewall Rules
For HTTP and HTTPS on Ubuntu 20.04, we must open ports 80 and 443. Open port 7080 for the WebAdmin and port 8090 for the CyberPanel Panel.
Install ufw if you haven’t installed it already, by typing:
sudo apt-get install ufw -y
Check whether UFW is turned on or off before setting up firewall rules by typing:
sudo ufw status
If UFW isn't already enabled, do so by typing:
sudo ufw enable
When UFW is activated, enter the following commands into your terminal window to configure firewall rules:
sudo ufw allow 8090,80,443,25,587,465,110,143,993,53,21/tcp
sudo ufw allow 443,53/udp
sudo ufw allow 40110:40210/tcp
Note: Instead of using ufw, open the above ports in your service provider's firewall if you are a user of a VPS or cloud server.
To ensure that you haven't made any syntax mistakes that would prohibit you from being able to visit the web server over HTTP/HTTPS after configuring this rule, run the command below:
sudo ufw status verbose
The following command can be used to check the status of your CyberPanel installation:
sudo systemctl status lscpd.service
Please note that there might be a few warnings at the end of your output, you can ignore those warnings.
If you notice failed in red next to the status, your installation is broken. It would be best to look for any errors or cautions in your error logs, which are listed in the terminal window you used to install CyberPanel.
5. Accessing the CyberPanel Web UI
Depending on whether you're using HTTP or HTTPS, you can access CyberPanel now that you've successfully installed it by using either of the following URLs:
http://your-server-IP-address:8090 or https://your-server-IP-address:8090
Note: Don't forget to substitute your server IP address for your-server-IP-address. Similarly, if the port number differs from 8090, make sure you use the correct one.
You will be greeted with the login screen:

Click the Sign In button after entering your admin login information. Please be patient as the CyberPanel UI may take a few seconds to log you in. The primary dashboard, which displays up-to-date server data, should be visible.
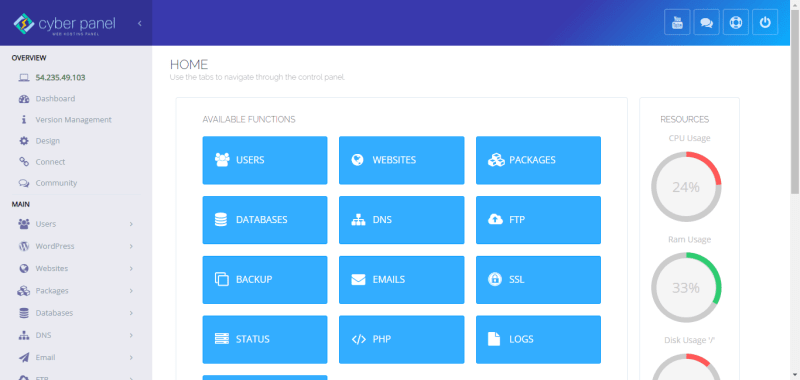
You can view the system load, memory usage by processes and services, disk utilization, the current users logged in via WebAdmin/User Login or Admin Panel, along with what they are doing at any given time, and other information on this dashboard.
6. Accessing the OpenLiteSpeed
The OpenLiteSpeed web interface can be accessed simply by typing the server IP address into a browser once the ports have been opened: http://your-server-IP-address:7080
Note: Don't forget to substitute your server IP address for your-server-IP-address. Similarly, if the port number differs from 8090, make sure you use the correct one.

7. How to change the password of OpenLiteSpeed and CyberPanel Web Admin
This is how to update the passwords for the OpenLiteSpeed and CyberPanel Admin web interfaces if you have forgotten them.
Go to the command prompt on your Ubuntu 20.04 system where Cyberpanel is installed.
For the CyberPanel backend service using port 8090:
cd /usr/bin/
sudo adminPass your-new-password
Note: replace the your-new-password with the password you want to set for CyberPanel Admin users:
For CyberPanel OpenLiteSpeed Web Admin Interface running at port number 7080:
cd /usr/local/lsws/admin/misc
sudo ./admpass.sh
8. Troubleshooting
Even with a straightforward installation process, you may encounter some issues when installing CyberPanel on Ubuntu. Here are a few common issues and their solutions:
- Error 503 After Installation:
After installing CyberPanel, you can try one of the following steps if you see a 503 error.
- Check LSCPD Status
systemctl status lscpd
If LSCPD is not running, start LSCPD using:
systemctl start lscpd
- Manually set up virtualevn
source /usr/local/CyberCP/bin/activate pip install --ignore-installed -r /usr/local/CyberCP/requirments.txt deactivate virtualenv --system-site-packages /usr/local/CyberCP systemctl restart lscpd
- Install Logs
If you are still having issues after these steps, you can try to find errors in the install logs, which are located at:
/var/log/installLogs.txt
- Submit Bug Report
If all of the above failed, please submit a bug report.
If you are unable to resolve an issue on your own, don't hesitate to reach out to the CyberPanel support team for assistance. With their expertise and guidance, you can quickly overcome any issues and start using CyberPanel to manage your websites with ease.
Conclusion
Installing CyberPanel on Ubuntu is a straightforward process that can be completed in just a few steps. By following the steps outlined in this guide, you can quickly set up a powerful web hosting control panel that will enable you to manage your websites, email accounts, and DNS settings with ease.
As we have discussed, CyberPanel is an excellent solution for anyone who wants to create and manage websites efficiently. With its user-friendly interface, LiteSpeed web server integration, and advanced security features, CyberPanel provides a top-notch hosting experience that is second to none.
Remember to ensure that your server meets the necessary requirements before attempting to install CyberPanel. If you encounter any issues during the installation process, don't hesitate to consult the CyberPanel documentation or reach out to the CyberPanel support team for assistance.
Overall, CyberPanel is a powerful and user-friendly web hosting control panel that is well worth considering for your next web hosting project. Its ease of use, speed, and security make it an excellent choice for website owners and developers alike.
Follow ME
Hey there! If you're interested in tech or programming articles, you should definitely give me a follow on any of the social media platforms below. I regularly post articles related to tech and programming, and I share valuable resources and insights. Plus, by following me, you'll be able to stay up to date on all the latest and greatest in the world of tech and programming. So, what do you say? Will you give me a follow?
Follow me on Dev.to, Twitter, LinkedIn, GitHub, Medium, Facebook, and my blog's Facebook page.

Top comments (0)