
Kubernetes is the most popular open-source platform for managing containerized workloads and services. Kubernetes abstracts the underlying infrastructure layer. As a result, developers can focus on building applications, then deploy them to any of those environments.
To bring Kubernetes closer to developers, Microtica has created a ready-to-use infrastructure component for Kubernetes. This component uses AWS EKS as a service and sets Kubernetes master and nodes in auto-scaling infrastructure setup. Nodes are EC2 instances based on Kubernetes optimized AMIs.
Components are a core concept in Microtica which allow developers to create and release their custom Cloud infrastructure setup in a standardized way. After the component is created, it can be reused in as many projects and environments as needed.
In addition to the infrastructure setup for Kubernetes, Microtica also offers you CI and CD for microservices. This means that you don’t have to worry about the complex details of the integration with Kubernetes. With this, we cover the whole process of software and infrastructure delivery.
In this article, we will learn how to deploy a microservice in the cloud with our Kubernetes component. Let’s get started by creating your account and project in Microtica. To deploy your first microservice in under 10 mins, follow these steps:
1. Add your AWS Account
First, go into Settings, then AWS Accounts tab, then Add New Account. Follow the steps to connect your account.
Note: All resources will be created on the provided AWS account, expenses will be calculated according to AWS pricing for using the services.
2. Create an environment
With a connected AWS account, you can continue to create your environment in which you’ll deploy your infrastructure. Create an environment following the wizard on Microtica and then continue to add the components we will need.
3. Add components
To successfully set up a working Kubernetes Cluster in which we’ll deploy a microservice, we will need only 2 components: a VPC component and of course a Kubernetes Cluster component. We need the VPC (Amazon Virtual Private Cloud) component to enable us to launch AWS resources into a virtual network that we’ve defined. This virtual network is dedicated to your AWS account. This component sets one AWS VPC, and four subnets (2 public and 2 private subnets).
Here’s how to configure your components to connect them and create the infrastructure.

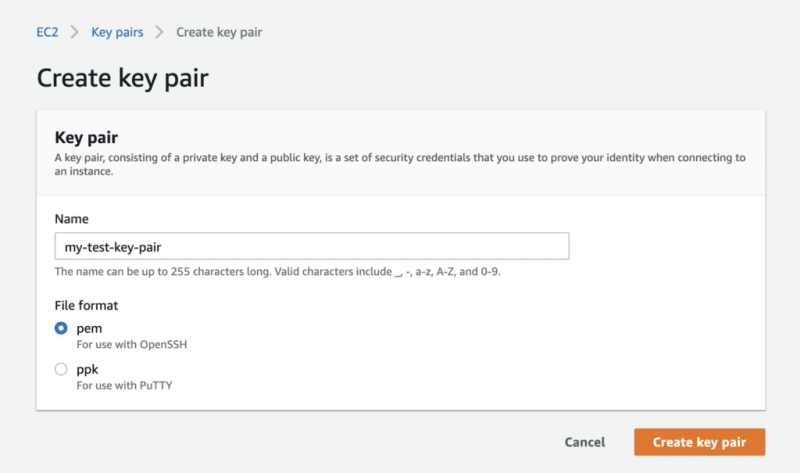
Note: You will need to create an EC2 key-pair from the AWS console. We don’t create it automatically due to security reasons. This key should always be in your possession and kept in a secure place. This key will allow you to access your EC2 instances through SSH.
When configuring the parameters for the Kubernetes Cluster component you can reference the VPC component so you don’t have to manually reenter the values. Microtica will take care of the order in which the components will be deployed in the cloud. This will allow you to have a working environment.

With the configuration set in place, you can deploy your environment by clicking Create Plan. Here you will see a detailed listing of the resources that are about to be added to the environment. Confirming will initiate the deployment and lead you to a page where you can follow the logs and events that are happening. Setting up this infrastructure can take up to 15 mins, so let us get started with our microservice in the meantime.
4. Create a microservice
For the purposes of this example, we will be using a simple Hello World microservice available in Docker hub. First, go to Microservices/Create microservice and follow the wizard in Microtica. For a source select public docker image and paste hello-world. Then, click Next, then Create Microservice and now we have our microservice.
As a result of using a docker image as a source, we already have a built artifact so we can immediately deploy it in the Kubernetes cluster. You can do this from Microservice details — Add to Cluster, or in the Kubernetes Dashboard — Microservices — Deploy.

Microtica offers configuration options when deploying your microservice in a Kubernetes Cluster. You can select the scaling options, and as well setup continuous delivery for your microservice.
After successfully deploying the microservice in the Kubernetes Cluster you can preview your microservice by following the Access URL/hello-world-ms (the name of the service if you’ve changed it). You should see this in your browser window:

AND WE ARE DONE! WE JUST DEPLOYED OUR FIRST MICROSERVICE ON A KUBERNETES CLUSTER 👏
5. Bonus: Cleanup
To remove all the resources we created on your AWS account go to environment details and in the menu select Undeploy. As a result, you’ll get your resources created on AWS cleaned. However, you will still have the configuration in Microtica in case you want to deploy it in the cloud again.

To deploy your custom microservice, create your demo for free now. And remember to stay safe 💚

Top comments (0)