
Okay, so last week we started the process of implementing user authentication with the help of Google's OAuth API and Passport.js. On the server side, we're using Node.js and Express for middleware.
We covered some basics like how to get our Google Client Id and Client Secret and then we set up our Google Strategy within Passport to handle some the functionality under the hood.
Just as a reminder here's what it looked like:
passport.use(new GoogleStrategy({
  // options for the google strategy
  callbackURL: '/googleRedirect',
  clientID: process.env.GOOGLECLIENTID,
  clientSecret: process.env.GOOGLECLIENTSECRET,
}, callback);
What we didn't cover was the callback function inside of that Passport object, so let's discuss that in a little more detail.
But to do that, let's first visualize this entire authentication process a little bit with the help from Google's OAuth documentation:
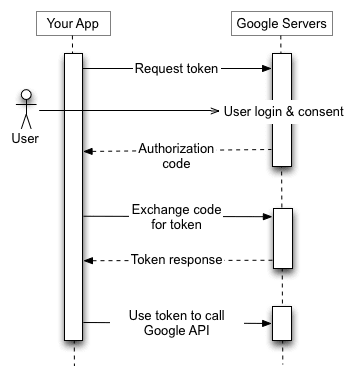
These arrows can be a little confusing so let's break them down step by step:
Our user visits our application and wants to login. For our application, we're only giving the user the option to sign in through Google.
Google informs the user that our application is asking for their information and by signing in, they are giving Google permission to pass their data back to us.
Once the user signs in, Google redirects the user back to our application but within that redirect, the user is also carrying something important: an authorization code.
When the user returns to our site, we aren't immediately given their info. Instead, we're given this authorization code, which we then have to go back to Google and say "Hey, we're good, they came back with this code, can we get their info now?" Google obliges.
Once we have that user data from Google, we can do two things: save that user to our database if they've never visited our website before or, if they have, render the application with any additional data they've saved within our application before.
Our Callback Function
While that seems like a lot of steps, the callback function we've been talking about manages almost all of these for us, so let's finally take a look at that:
(accessToken, refreshToken, profile, done) => {
  // passport callback function
  const {
    id: googleId,
    displayName: username,
    given_name: firstName,
    family_name: lastName,
    picture: photo,
    email: email,
  } = profile;

  const user = {
    googleId,
    username,
    firstName,
    lastName,
    photo,
    email,
  };

  getUser(googleId)
    .then(currentUser => {
      currentUser;

      // if the response includes a user object from our database
      if (currentUser.length) {
        done(null, currentUser[0]);
      } else {
      // if not, create a new user in the database
        createUser(user);
        getUser(googleId)
          .then(newUser => {
            newUser;
            done(null, newUser[0]);
          })
          .catch(err => console.log(err));
      }
    });
};
Wow, that's a doozy! But again, by breaking this down with the steps we listed before, this can make a lot more sense.
Breaking down the callback
What's not in this function are steps 1 through 3, our user has signed in and Google has delivered what they call their "profile", the object that contains all the user info we've requested. But we probably aren't saving all of that profile info to our database and we probably aren't going to name it the same thing they do.
For example, Google saves what is typically considered someone's last name as the key of "family_name", so we'll need to take the value stored there but then re-name the key to whatever our database is expecting.
All of that is done in this part here:
// destructuring the profile object from Google, creating new variable names to be stored in our user object
const {
    id: googleId,
    displayName: username,
    given_name: firstName,
    family_name: lastName,
    picture: photo,
    email: email,
  } = profile;

//creating our user object with all of our new user variables stored as keys

  const user = {
    googleId,
    username,
    firstName,
    lastName,
    photo,
    email,
  };
Next we need to handle step 5 to determine if this user is new (which in that case we need to save them to our database) or, if they've been here before, we need to load our application with their previously entered data. Since we're storing the user's Google ID, that's a perfect thing to look for since we can be sure that it's unique.
One note about this section: this could look different depending on what database you're using and how your database returns data you're searching for, but the overall logic will be similar. For this project, we're using PostgreSQL and PG Promise, which returns an array when searching for a user. If the user is new, you'll get an empty array. If not, that user object will be stored at the index of 0 in the array.
// get the user with this Google ID stored in our database
  getUser(googleId)
    .then(currentUser => {
      // if the response includes a user object from our database
      if (currentUser.length) {
        // call done with that user
        done(null, currentUser[0]);
      } else {
      // if not, create a new user in the database
        createUser(user);
      // once created, retrieve that newly created user
        getUser(googleId)
          .then(newUser => {
      // call done with that newly created user
            done(null, newUser[0]);
          })
          .catch(err => console.log(err));
      }
    });
See, that wasn't so bad! To be frank, the hardest part about this function is building your database methods like getUser or createUser. Once those are operating like you designed them to, it's just a matter of chaining some .then's to your functions (well, in this case, since PG Promise returns a Promise) to complete the cycle.
Looking at our App.js file thus far
Alright, so we've added our callback to our promise object, so let's do a quick review of our app.js file so far. Like I mentioned last week, it's generally better to separate parts that don't directly have to do with your app's server into other files, but we're keeping it on one page for simplicity.
// bringing express into our project
const express = require('express');

// bringing passport into our project
const passport = require('passport');

// bringing a Google "plugin" or Strategy that interacts with Passport
const GoogleStrategy = require('passport-google');

// initializing our app by invoking express
const app = express();

passport.use(new GoogleStrategy({
  // options for the google strategy
  callbackURL: '/googleRedirect',
  clientID: process.env.GOOGLECLIENTID,
  clientSecret: process.env.GOOGLECLIENTSECRET,
}, (accessToken, refreshToken, profile, done) => {
  // passport callback function
  const {
    id: googleId,
    displayName: username,
    given_name: firstName,
    family_name: lastName,
    picture: photo,
    email: email,
  } = profile;

  const user = {
    googleId,
    username,
    firstName,
    lastName,
    photo,
    email,
  };

  getUser(googleId)
    .then(currentUser => {
      currentUser;

      // if the response includes a user object from our database
      if (currentUser.length) {
        done(null, currentUser[0]);
      } else {
      // if not, create a new user in the database
        createUser(user);
        getUser(googleId)
          .then(newUser => {
            newUser;
            done(null, newUser[0]);
          })
          .catch(err => console.log(err));
      }
    });
}));

// assigning the port to 8000
const port = 8000;

// calling the listen method on app with a callback that will execute if the server is running and tell us what port
app.listen(port, () => {
  console.log(`Server listening on port ${port}`);
});
Next week
In the last part of this series, we'll wrap everything up by setting up our routes, which are essentially the strike of the match that get this authentication process started. Plus, these routes are crucial both when the user goes to Google but also when that user comes back with that access code.
And finally, there are some other functions that Passport gives us that we need to use to help our user avoid logging in every time they visit our page.
Just like last week, here are some of the functions that we'll be talking about. Notice something interesting? These functions use a done method just like our callback. Might be important to figure out what exactly that method does, right?
passport.serializeUser((user, done) => {
  // calling done method once we get the user from the db
  done(null, user.googleid);
});

passport.deserializeUser((id, done) => {
  getUser(id)
    .then(currentUser => {
      currentUser[0];
      done(null, currentUser[0]);
    });
});

Latest comments (0)