
Introduction
So you're a pro at frontend development, or maybe you have some decent skills and are eager to jump into backend development but don't know where to start. Try JavaScript, everyone loves JavaScript. Or PHP, it's arguably the most popular programming language for web development, in comparison to JavaScript, that is. But what about Python. Yes. Python can be used for web development. With frameworks like Streamlit, Django and Flask, Python can be used to build scalable web applications for a verity of functions and uses. In this post, you will be getting insight and guidance on how to start building web applications with Django, a powerful python framework.
DISCLOSURE: This is not a frontend project and we will not be focusing on frontend development. We will only go through the steps to implement backed functionality using Django.
Lets get started.
Why Django?
Django is a powerful and high-level Python web framework that enables developers to build secure, maintainable, and scalable websites quickly. With it's "Self-contained" approach, Django offers a comprehensive set of built-in tools and libraries, handling many of the complex web development functions like database management, authentication, managing user privileges through default admin interface, routing, and security. This allows you to focus on bringing your ideas to life without getting bogged down by repetitive tasks.
For beginners, Django is particularly welcoming, with extensive documentation and a supportive community to help you overcome the initial learning curve. Its emphasis on security and best practices makes it a reliable choice for projects of all sizes, from simple blogs to complex applications. If you're looking to dive into web development, Django provides the perfect blend of power, simplicity, and speed to get your projects up and running with confidence.
Table of Content
Introduction
Setting Up Your Environment
Creating a New Django Project
Creating Your First Django App
Understanding Django's Project Structure
Making Migrations
Understanding Django's default admin interface
Rendering Custom Frontend Template
Conclusion
Setting Up Your Environment
In order to use Django, you need to have Python installed. As mentioned earlier, Django is a Python web framework and it’s syntax is based on the Python programming language. Once you have python installed, the next step will be to create a virtual environment and install Django and other necessary packages. Here’s how.
Install Python:
To install python, visit Python's Official Website and download the latest version of Python.
Once downloaded, run the installation package and follow the prompts to get python setup.
Note: You will be prompted on one of the prompt windows to add Python to path, check the box and proceed so you can run python commands from any location or directory in your terminal.
Virtual Environment:
With Python installed, you can now create a virtual environment where Django and all other required site packages will be installed.
You can call Python in any directory by using the 'py' or 'python' keyword.
Open your preferred IDE (Integrated Development Environment), create a project folder and navigate to that same folder in your Command Line.
Create a virtual environment by running the following command.
For windows
python -m venv myvirtualenv
For mac/Linux
python3 -m venv myvirtualenv
This command will create a virtual environment called myvirtualenv. You can name yours whatever you want.
The next step is to activate your virtual environment. Run the following command.
For windows
myvirtualenv\Scripts\activate
For mac/Linux
source myvirtualenv/bin/activate
Creating a New Django Project
Now that you have your virtual environment running and activated, it's time to install Django. Django is the Python web framework we are going to base our development on. To install Django, run the following command in your command line or if your IDE has a dedicated terminal (Like Vscode), you can use that.
pip install django
With Django installed, you can proceed to create a new project. Name yours whatever you want but for the purpose of this guide, let's name ours WebProject.
django-admin startproject WebProject
This command automatically creates some files and folders in your project directory, We'll talk more on these files soon, first, let's create a new app.
Starting a New Django App
Once Django is installed and a new project created, you can create an app using the manage.py command.
Navigate to the project directory:
cd WebProject
Run the following command to start a new app named core
py manage.py startapp core
Register your new app in you projects settings. Go to your project directory and open your settings.py file, search for the INSTALLED APPS field and add 'core' to the end of the list.
INSTALLED_APPS = [
    ...
    'core',
]
Understanding Django's Project Structure
Your new Django project will have the following structure:
WebProject/
│
├── manage.py
├── WebProject/
│   ├── __init__.py
│   ├── settings.py
│   ├── urls.py
│   ├── asgi.py
│   ├── wsgi.py
│
└── core/
    ├── __init__.py
    ├── admin.py
    ├── apps.py
    ├── models.py
    ├── tests.py
    ├── views.py
    ├── migrations/
    │   └── __init__.py
    └── templates/
        └── core/
            └── index.html
WebProject
-
manage.py: A command-line utility for interacting with your project. -
settings.py: Configuration for your Django project. -
urls.py: URL declarations for your project. -
asgi.py: An entry point for ASGI-compatible web servers to serve your Django project. -
wsgi.py: An entry-point for WSGI-compatible web servers to serve your project.
Core
-
__init__.py: Similar to the one in the project page. -
admin.py: Used to register your models with the Django admin interface, allowing you to manage your data through Django’s built-in admin panel. -
apps.py: Contains configuration for the app. Django uses this file to set up the application when it's included in INSTALLED_APPS in settings.py. -
models.py: The file where you define your data models. Each model corresponds to a database table, and Django uses them to interact with your database. -
tests.py: This file is used to write unit tests for your application. Testing ensures that your code works as expected and helps catch bugs early. -
views.py: Contains the logic for handling HTTP requests and returning responses. Views are the core of your web application, connecting models, templates, and the client’s requests. -
migrations/: A directory that stores database migration files, which Django uses to track changes to your models and apply them to your database schema. -
__init__.py: Marks the migrations/ directory as a Python package.
Templates Directory (core/templates/core/):
template.html: A sample HTML template file. Templates are used to define the structure of your web pages, with placeholders for dynamic content provided by views.
Making Migrations
Migrations are ways to implement your model structure into your database.
After creating a model in your models.py file, and defining it's fields and their characteristics, you make migrations and migrate the models so python will implement those defined model characteristic into a database schema. We'll go into model creation in later parts, for now, Django has some auto-generated models which it will use to handle superuser creation and permissions management. More on that soon, for now let's migrate the auto-generated models.
Here's how to do it.
python manage.py migrate
With the default models now migrated, you can run your development server and view your Django app using the runserver command.
In your terminal/cmd, run :
python manage.py runserver
This command will start your development server which you can now view at "localhost:8000 or 127.0.0.1:8000/". Type it in any browser to see your project started.

Django's Admin Panel
Django come's with a built-in powerful admin panel feature that allows developers to manage their web applications with ease. This default interface provides a comprehensive, user-friendly dashboard where you can perform CRUD (Create, Read, Update, Delete) operations on all registered models. Without writing a single line of code for the interface, you can access and manage the database records directly from the admin panel. Once a model is registered with the admin site, Django automatically generates the necessary forms and interface to manipulate the data, this makes project management easy during and after development. To access the admin interface, you'll need to register a Superuser, this superuser will have unrestricted access to the admin panel and have absolute CRUD control for other users and registered models.
Let's create a Superuser.
Run the following command in your terminal at the same location as your manage.py file.
python manage.py createsuperuser
After running the command, you will be prompted to input a username, an email a password and a repeat of the password for confirmation. you will need the username and password to access the admin interface so don't forget it.
With your Superuser now created, run your server using the runserver command and access the admin interface at "localhost:8000/admin"
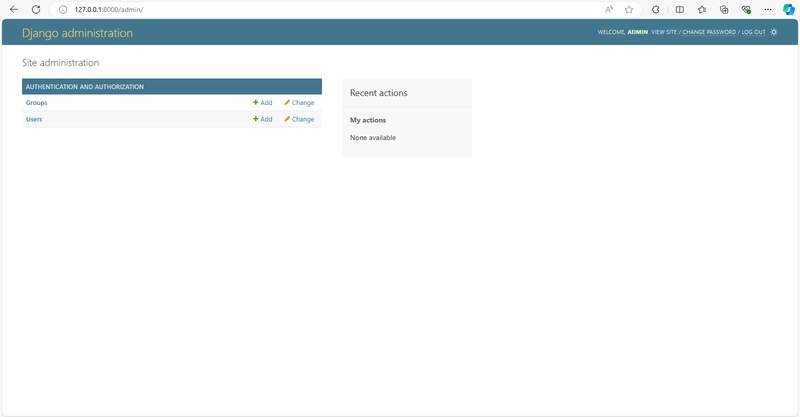
The admin panel's primary advantage is its simplicity and rapid setup.
By simply defining models in your Django application and registering them with the admin interface, you get a fully functional management system. This feature is particularly beneficial during development and testing phases, where quick adjustments and data entry are often necessary. In the newly created admin interface, you can create and manage users (based on user authentication) and create and manage groups to which you can assign specific permissions based on your requirements. You can explore the admin interface to get yourself acquainted with it.
Furthermore, the admin panel supports customization, allowing developers to tailor the interface to their needs, but that's a topic for another day, for now, lets get you ready to display a custom frontend in your project.
Rendering Custom Templates
Now that you have the very basics cleared, it's time to render your own custom frontend template. Maybe you have a portfolio website template you want to use, or something else you'd like to render using Django's powerful template rendering functionality, follow the steps below.
In your core/templates/core/index.html file, include all your template HTML code and I'll show you how to set it up and render it as the main webpage.
First, go to your core app and create a urls.py file. Include the following code.
from django.urls import path
from . import views
urlpatterns = [
    path('', views.home, name='home'),
]
Now in the same folder, locate the views.py file and include the following code:
def home(request):
    return render(request, 'core/index.html')
It should look like this:

Next, go into your project folder where you have settings.py and locate the urls.py file and include the following line of code:
path('', include('core.urls')),
It should look like this:

Understanding How It Works
Form your settings.py where you added core to the installed apps, Django is now aware of the new app you created and it automatically knows which files to look out for. Now back to the urls.py file in your project folder, you set a path which will take an empty string which signifies the default home path, and include core.urls as the destination of that home path.
Now that your projects urls.py points to the urls.py file in your core app (folder), the urls.py in your core app now creates a path for the home file and sets an empty string to signify the default landing page, it then checks your view file for the specified home function defined in your view.py file which renders the core/index.html page as the default landing page it then assigns a name "home" to it, so wherever you want to set a link to that page, you use the assigned name to access the page.
It's a brain twister right? Don't worry you'll get the hang of it as your project continues.
With this setup, Django is now ready to render your frontend template. I hope you have something cool to show us.
Now you can go to the core/index.html file and build the next big website.
Conclusion
By following this guide, you should have a good foundation to build a Django application and render your preferred frontend template. We're going to cover progressively advanced functions in later posts like creating database models and rendering them to the template so stay tuned. Subscribe to to our newsletter so you can get notified when preceding posts are published in the future. I hope you learned from this mini project and have gained valuable information and ideas on leveraging Django for your web development projects.
Feel free to express your thoughts, Ideas and questions in the comment section below, and leave a reaction to show how you feel. Thanks allot for following to the end. Happy coding!

Top comments (0)