The previous owner of my home had already installed surveillance cameras with power-over-ethernet support. There were the cameras and the wiring in place, but nothing connected to them.
As I have a Raspberry PI already constantly running Node-RED for my home automation, I had thought of buying a PoE switch, hooking the cameras to the Raspberry, and enabling the system with some kind of recording software. I knew this would require quite a lot of DIY work and maintenance, so recently went in the other supposedly simpler direction: bought a Hikvision DS-7600 Network Video Recorder. I thought that must be an easy way to get the cameras running, just plug in the devices, and should be ready to go.
Oh boy, I could not have been more wrong! Those cameras did not just plug-and-play.
A hint from Youtube
As it turned out, the Dahua HFW-1300SP cameras were unable to connect to Hikvision NVR, no matter how I tried to configure them from the NVR.
Even though I figured out the name of the cameras after some googling -- at first I thought the manufacturer was called "Alhua" 😂 --, I failed to find much help from the internet, almost every bit of information said I cannot connect the devices of those two manufacturers 😞.

The only promising hint I found was from a Youtube video that suggested Dahua camera to be configured with the following parameters that would make them connect the Hikvision network:
Static IP: 192.168.254.10 (increase the last number as needed)
Subnet mask: 255.255.255.0
Gateway: 192.168.254.1
No PoE switch? DIY!
As I did not have a regular PoE switch at hand, took my ladder and screwdriver, unscrewed the cameras and had them on the table trying to figure out how to power them up.
I looked into my graveyard of old electronics, found an ancient Nokia phone charger which plug matched the 12V extra input the cameras have -- only that one gave out 5V instead of 12V. I almost cut in half the 15V charger of an old IBM laptop to test frying the cameras with higher voltage, but luckily found another power adapter for some old Motorola device, which had 12V output. After a little cutting and soldering, the new power adapter for the cameras was ready to roll.

Resetting the cameras
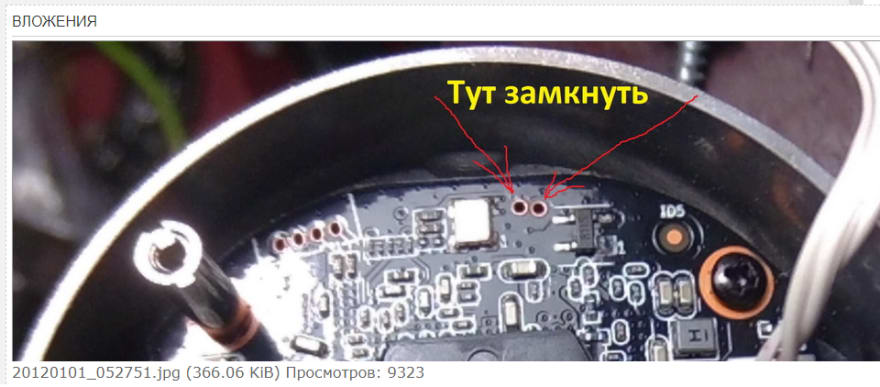
The cameras did boot up with my newly made adapter 🚀, and I got the Dahua configuration tool running in a Windows virtual machine, but there was another problem: the configuration tool was unable to connect to the cameras, probably because someone had changed the default passwords. That can usually be fixed with a simple "hold down the reset", but when I opened up the case of the camera, there was nothing marked as "reset" nor any buttons on the board 🤷
I was almost giving up at that point, but there was a forum post in Russian, which I understood only with the help from Google translate, that helped me a step forward towards the goal.

Connected the holes marked in the picture for 30+s, and after some fiddling with the network settings of my computer, the Dahua configuration tool was able to connect the device 🎉.

Configuring the cameras
Now it was just the matter of getting the right configuration persisted within the cameras, but for whatever the reason, that did not work with the configuration tool 🙈. The cameras still did not connect to Hikvision, and loading the IP configuration from the camera revealed that it was not saved:

The web configuration tool
I thought I had found a solution to the configuration tool not working when I just opened up the camera's IP address and discovered the cameras serve a web-based configuration interface, but there turned out to be one more obstacle on my way: the login screen had a nasty bug which cleared the form after every keystroke or moment, making me unable to insert "admin:admin" to the form 😠.

Tried turning off Javascript, but the web-based tool functionality is written using Mootools and does not work with Javascript turned off. Also tried other browsers, even tested out with Internet Explorer, still no luck.
Professionally, I am a web developer 🤔
It took me some time, but I did find a way to submit the form! I wrote Javascript functions to submit the forms in one shot without letting some buggy callback to clear the form meanwhile 😎.

The same bug was present within the web tool itself, once logged in, but now I already knew how to tackle this problem. This is the call to get the configuration saved to the device when navigated to the right page:
(function configure() {
    $('tcpip_v4_address_0').value = '192';
    $('tcpip_v4_address_1').value = '168';
    $('tcpip_v4_address_2').value = '254';
    $('tcpip_v4_address_3').value = '12';

    $('tcpip_v4_subnet_mask_0').value = '255';
    $('tcpip_v4_subnet_mask_1').value = '255';
    $('tcpip_v4_subnet_mask_2').value = '255';
    $('tcpip_v4_subnet_mask_3').value = '0';

    $('tcpip_v4_gateway_0').value = '192';
    $('tcpip_v4_gateway_1').value = '168';
    $('tcpip_v4_gateway_2').value = '254';
    $('tcpip_v4_gateway_3').value = '1';

    $('tcpip_confirm').click();
})();
You might be thinking the CSS selectors within the jQuery function are not correct, but this is not jQuery, this is Mootools 🤓
Hikvision setup
From there it was just the matter of plugging the cameras to the Hikvision NVR and configuring them as needed 😊.


Aftermath
The whole process of getting the cameras connected to the NVR took me about 5 hours. I had many moments where I did not have enough equipment or information and thought I was stuck for good. When I finally succeeded at about 2AM, I could not believe it. I still have my mind blown on how I had to collect the hints from all over the internet, how much luck I had, and how many different skills I had to put to use in order to succeed.
💡 Never ever expect devices from different manufacturers to just plug-and-play. And never give up 💪
Have fun!


Top comments (0)