
If you are an aspiring game developer or programmer looking to delve into the realm of programming, Scratch is a phenomenal platform to kickstart your journey. It serves as an excellent introduction, particularly for those with limited coding experience. Scratch boasts a high-level, block-based programming language coupled with an intuitive graphical interface, making it an ideal choice for beginners.
Developed by the MIT Media Labs, it has garnered immense popularity for individuals venturing into the realms of programming and logic building. And now, with the added advantage of Scratch's ability to export programs to Android, Web, or desktop applications, it presents itself as the best engaging game development avenue that you can code with Python.
The aim of this article is to show you the basic steps of getting started on Scratch and building a game using it. You’ll understand the fundamental concepts of the platform and will learn how to use it. You’ll be building a game similar to the Chrome Dino game but with minimal features.
Building a Game in Scratch
Now that the article's goal is clear and you also know the platform that will be used, let’s start working on the project. Though the game created here will be much simpler in this case. Building a complex game like the Dino game takes a lot of time and effort and will complicate this article. Instead, for this tutorial, the game will be about jumping over obstacles, and when you hit an obstacle, the game ends.
Scratch helps you build your logic and put the logic in a puzzle-like manner to create programs or games. There are two important terminologies that you need to understand before moving into building it. Let’s discuss them briefly one by one.
What are Sprites?
A sprite is an object or character that can move, interact, and perform various functions on the stage. It's one of the fundamental elements of Scratch projects. Each sprite can have scripts, costumes, and sounds associated with it. In Scratch, you can add new sprites to your project by drawing a new one by yourself, uploading an image, or choosing from Scratch's library of sprites. Once a sprite is added, you can click on it to view and edit its scripts, costumes, and sounds.
What are Code Blocks?
Code blocks or blocks in Scratch are puzzle pieces using which you can create a full-fledged program. Instead of writing code in a textual manner, you can assemble scripts by dragging together jigsaw-like blocks. Each block performs a specific function, and when combined in sequences or structures, they form scripts that define the behaviour of sprites and the overall project.
There are many types of blocks available, and they are divided into multiple categories:
- Motion Blocks: These blocks control the movement of sprites. For example, you can move a sprite by ten steps, turn 15 degrees, etc.
- Looks Blocks: These blocks deal with the appearance of sprites and the stage. For example, you can change the size of a sprite by ten or say 'Hello' for 2 seconds," etc.
- Sound Blocks: As the name suggests, these blocks control the playback of sounds, like playing the sound or stopping all sounds.
- Events Blocks: These blocks define how scripts start. Commonly used event blocks are "when flag clicked" (starts when the green flag is clicked) and "when sprite clicked" (starts when the sprite is clicked).
- Control Blocks: These blocks manage the flow of scripts. For example, "wait 1 second," "repeat ten times," and "if... then... else.” etc.
- Sensing Blocks: They allow sprites to gather information about their environment or user input. Examples like "touching color?" "distance to," and "keyspace pressed?”
- Operators Blocks: These are used for mathematical and logical operations. Examples include "+," "-," "and," "or," and "<" (less than).
- Variables Blocks: They allow users to create and manipulate variables that can store single values.
- My Blocks: You can create your own blocks that encapsulate specific functionalities. This is particularly useful for complex projects or when a certain set of actions needs to be repeated in multiple places.
- Extensions Blocks: Scratch allows for extensions that provide additional blocks for specific purposes, like interfacing with hardware or performing more advanced operations.
Now that you have an idea of the concepts used in Scratch, let’s move forward and build the game.
Creating an Endless Runner Game
The first step to creating the game would be creating a new project in Scratch. Visit the official site and click on the Start Creating button.
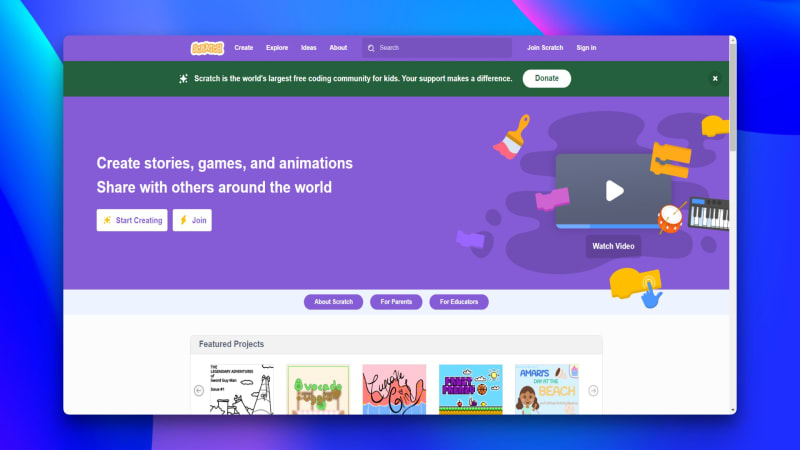
Clicking on this button will create a new project and walk you through Scratch's basic concepts. You can close the tutorials or go through them to learn more.
Once the project is initialized successfully, you are ready to build the game. This game will contain three sprites:
- Runner: This sprite will be the runner in your game. It’ll run through the obstacles. Imagine the Dino in the Chrome Dino game.
- Obstacles: These will be the obstacles that the runner needs to jump. Imagine the Cactuses in the Chrome Dino game.
- Game Over Sprite: This one is optional. It’ll show when the runner hits an obstacle.
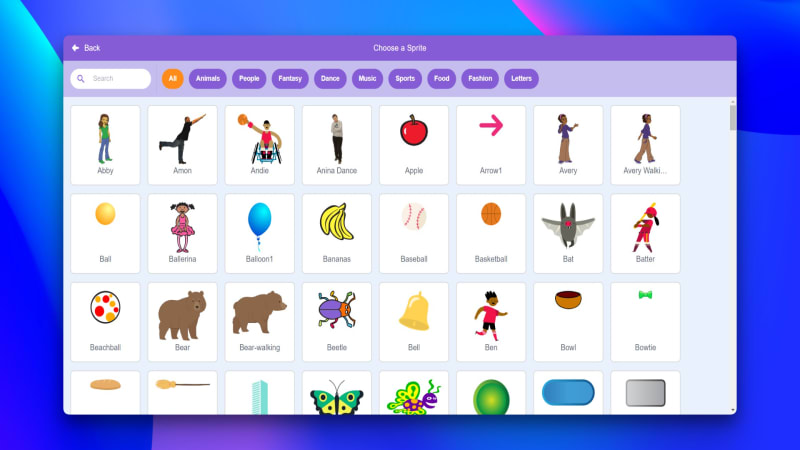
To add a sprite to your project, click on the cat icon that says Choose a Sprite from the bottom right of your screen. You can choose a sprite, draw one, or upload it from your computer. Choose the walking cat sprite from the menu to keep this article simple. Once this sprite is added, choose another one for the obstacle. A banana sprite will be used as an obstacle. And for the optional sprite, choose a crab. Though, you are open to exploration and choose whatever you like.
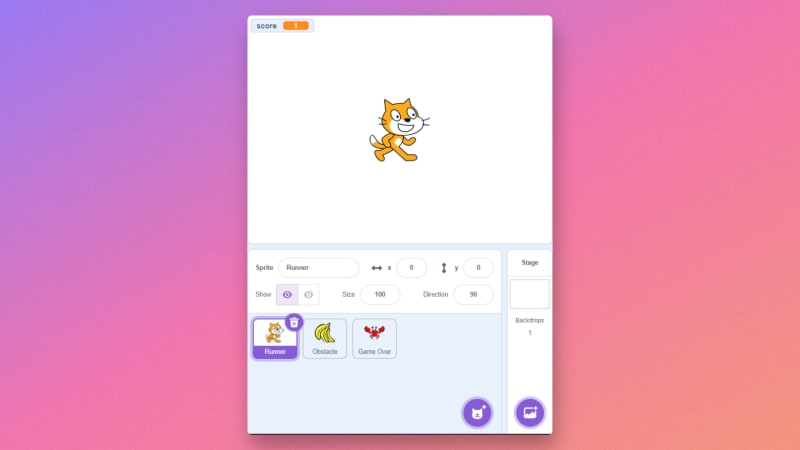
The three sprites should look like this. You can rename each sprite from the Sprite textbox. Clicking on each sprite will give you the code blocks for adding functionalities.
Let’s start by adding functionalities to the runner. The first step is to make the runner move. Here is the code block:
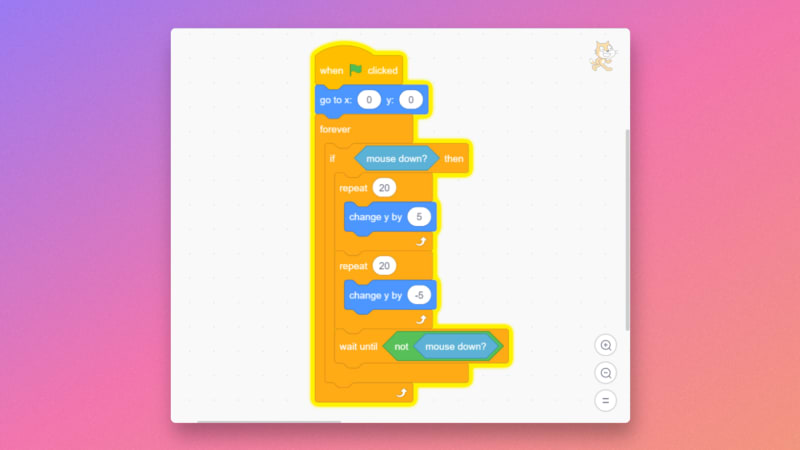
The code can be described as follows:
-
Initialization:
- When the green flag is clicked, set the runner to the center of the screen (Coordinates: x = 0 and y = 0).
-
Jumping Mechanism:
- Whenever a mouse down event is detected:
- First, move the runner upwards by changing its 'y' position to +5.
- Then, move the runner downwards by changing its 'y' position to -5.
- This jumping action should repeat for 20 frames.
- Pause and wait for another mouse-down event to trigger the jump again.
- Whenever a mouse down event is detected:
-
Continuous Running:
- Ensure the above script runs endlessly to maintain the runner's movement.
💡 Remember, the described mechanism ensures that the runner jumps (goes up and then comes down) when the mouse button is pressed. You can adjust the values as needed to get the desired height and speed of the jump.
The next step for the runner is to code the game over logic. This logic is pretty straightforward. Let’s look at the code first, then understand it:

-
Initialization:
- When the green flag is clicked, ensure the runner sprite is visible on the screen.
-
Game Over Logic:
- If the runner comes into contact with an obstacle, broadcast a message titled
Game Over!!!.
- If the runner comes into contact with an obstacle, broadcast a message titled
-
Continuous Running:
- The script should always be active to constantly check for any collision between the runner and the obstacle. This will make sure the game responds instantly if the runner touches an obstacle.
The following code block is to hide the runner on game over. The code block image below is enough for it:

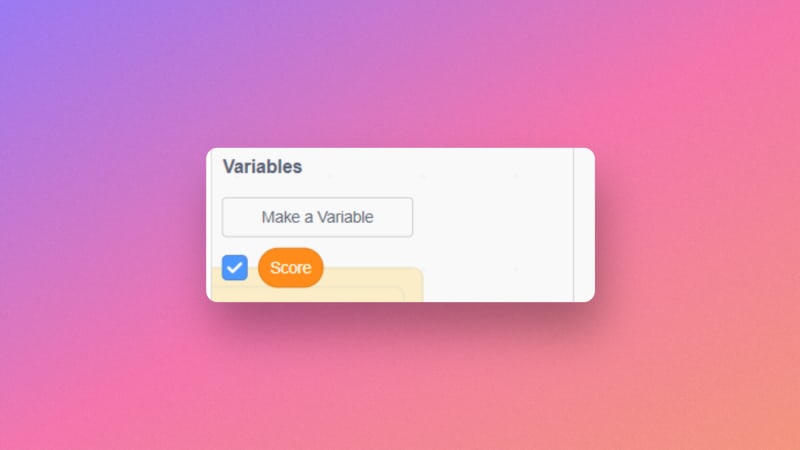
The final code block for the runner is to count the scores. But first, it is essential to create a variable for the score. Follow these steps to create and display the score variable:
-
Creating the Score Variable:
- Go to the "Variables" menu.
- Click on the "Make a Variable" button.
- When prompted, name the new variable "Score" and click "OK."
-
Displaying the Score on Screen:
- In the "Variables" menu, ensure that the checkbox next to the "Score" variable is checked. This will display the score on the game screen.
The logic for this one is also very simple. For every 1 second elapsed, increase the score by one.

The steps for the code block are as follows:
-
Initialization:
- When the green flag is clicked, set the
Scorevariable to zero
- When the green flag is clicked, set the
-
Increment the score:
- Wait for one second, and change the score by one.
-
Continous Running:
- Run this script continuously to increment the score.
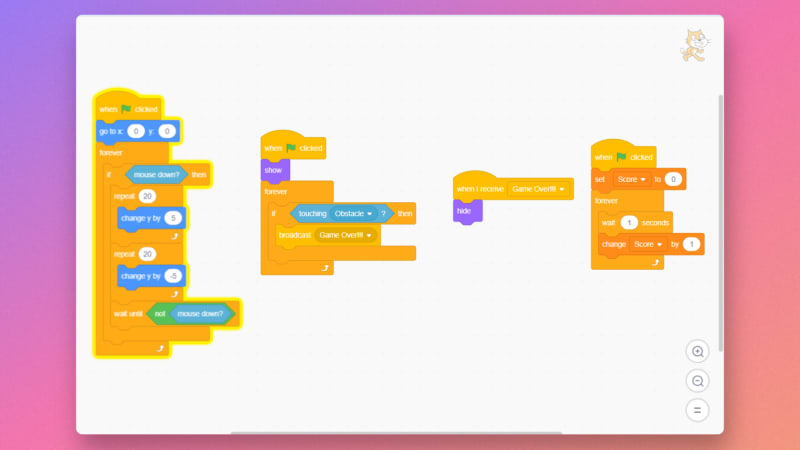
The code for the runner is now ready. The complete code blocks for it should look like the following image:
It’s time to code the obstacle now. The obstacle has three code blocks. One for cloning it, another one for moving it, and a final one when the obstacle touches the edge of the screen. Let’s discuss them one by one.
To add logic to the obstacle sprite, click on the sprite from the sprites menu, and you will see a blank canvas again where you can put all your code blocks. The above image represents the first code block that is used to create clones of the obstacle.
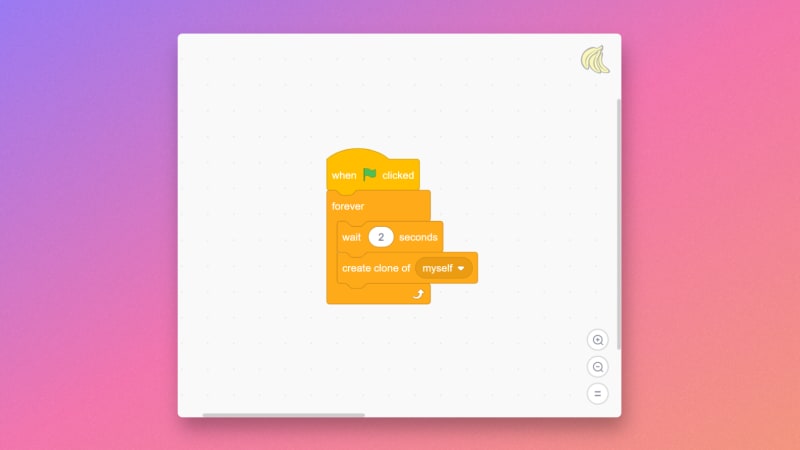
Here’s the pseudo-code for it:
-
Initialization:
- When the green flag is clicked, wait for two seconds.
- After the delay, create a clone of the sprite.
-
Continous Running:
- Ensure that clones of the sprite are continuously created throughout the game's runtime.
The first block is ready. The next one is for the movement of the obstacle. The logic should be like this:
-
Initialization:
- As soon as a clone is created, set its x and y coordinates to the specified pixels.
- Make the clone visible on the screen.
- Shift the clone's x position by -5 pixels to start its movement.
-
Continuous Movement:
- For the duration of the game, ensure the clone's position continuously changes, keeping it in motion.

The final code block is responsible for deleting the clone when it touches the edge of the game screen:
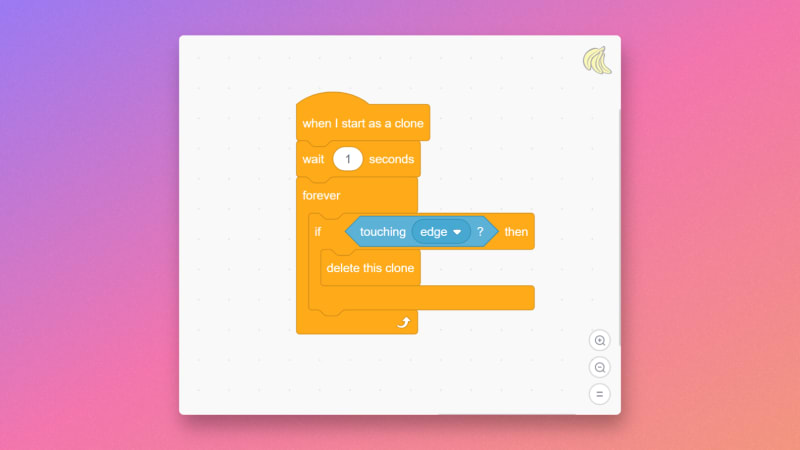
Here is the pseudo-code for it:
-
Initialization:
- Upon the start of a clone, pause for 1 second before any further action.
-
Destroying Clones:
- When the clone touches the edge, delete the clone
-
Continuous Monitoring and Deletion:
- Run this script continuously to keep deleting the clones that touch the edges.
The complete code block for the obstacle should look like this image:

The final code blocks will be for the last sprite, which will be shown when the game is over.
Here are the two code blocks for the game over Sprite:
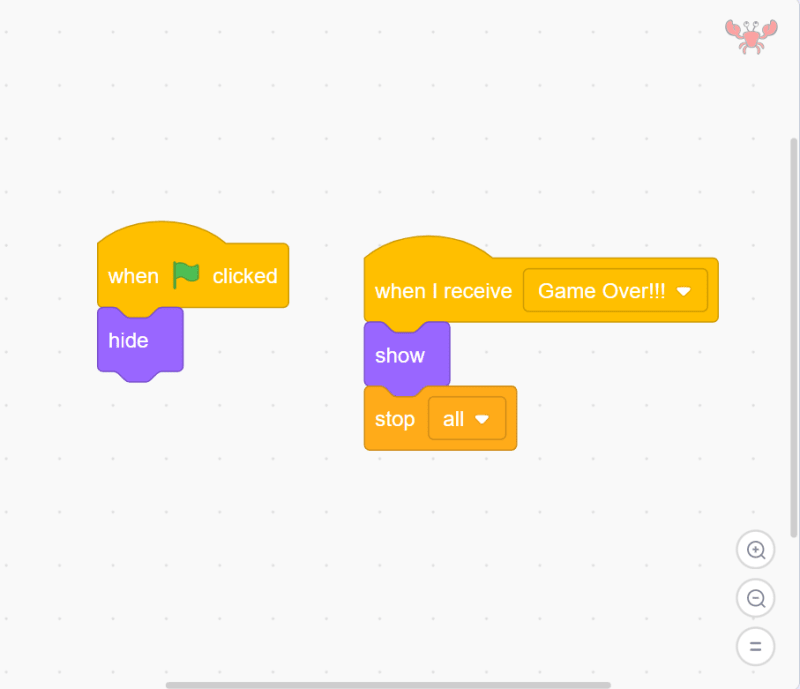
The first code block hides the sprite when the green flag is clicked, and the second one shows the sprite when it receives the Game Over!!! broadcast message. After showing the sprite, it stops all logic in the game.
Your game is now ready. Click on the green flag to play it now. If you want more, you can add more features like a backdrop, audio for jumps, etc.
The GIF below shows the endless runner game you just made:
You can also play the game from here.
Conclusion
You made your own endless runner game using the MIT scratch. You explored how Sprites are added to a Scratch project and add functionalities to them. Scratch has endless opportunities for you to explore. And if you are someone who is into the gaming space very much, visit Sparkian and stay updated with the latest trends in the field.

Top comments (0)