To read this full New Relic blog, click here.
If you need to protect sensitive information and follow data privacy regulations, it's critical to obfuscate your log data, which means obscuring personally identifiable information (PII). But effectively concealing PII in logs might take time to implement, can increase compute resources, and might not work well with all types of logs.
It's vital to obfuscate PII and other sensitive data in your logs because you can ensure confidentiality and integrity of the data, while continuing to use logs to analyze system behavior and troubleshoot issues. You can mitigate the risk of data breaches and unauthorized access and still get your ongoing debugging work done.
This blog post shares helpful tips and code samples for obfuscating logs through client-side Fluent Bit with New Relic infrastructure monitoring. Whether you’re evaluating New Relic with other platforms, or you’re already using New Relic and seeking to safeguard sensitive information, read on to explore advanced configuration options in New Relic. You’ll gain advice on logs obfuscation, including:
The importance of log obfuscation and a few popular approaches
Using Fluent Bit in New Relic infrastructure monitoring
How to obfuscate your logs
How to remove sensitive data from your logs
Log obfuscation is both important and difficult
Log obfuscation is a critical security measure that helps protect computer systems against data breaches and unauthorized access to sensitive information. You might need to remove or obfuscate attributes from your logs to protect sensitive data like email addresses or credit card numbers from customer accounts, so they’re not visible in the logs. Removing or obfuscating these attributes can prevent unauthorized access to sensitive data in case of log leakages or malicious users.
An added bonus of eliminating unnecessary attributes is reducing log sizes, making them easier to manage and analyze. This can boost overall system performance and reduce costs for storing and processing large log files.
Implementing obfuscation for logs is especially challenging. It’s tricky to ensure that the obfuscated logs provide enough information for effective troubleshooting and analysis, the reason you need logs in the first place. This challenge is even more significant when dealing with large, complex systems that generate huge amounts of log data.
A few log obfuscation approaches
To overcome this challenge, engineering teams use various techniques such as redaction, hashing, and encryption to obfuscate sensitive data while maintaining the overall integrity of the log files.
One popular technique involves creating custom rules using Grok patterns or Lua scripts to mask or remove sensitive information from log data.
The process begins by identifying the types of sensitive data that need to be obfuscated. For example, you know that you have IP addresses, credit card numbers, and usernames for your customers.
Then you define custom rules in Grok patterns or Lua scripts to match the sensitive data patterns and specify how they should be masked or removed.
The next step is to test the custom rules against sample log data to ensure they correctly match the intended data patterns and apply the appropriate obfuscation.
After the rules have been tested, you can integrate them into the log processing pipeline with a log management tool like Logstash, Fluent Bit, or FluentD. You can use all of these log management tools to forward the processed logs to New Relic for further analysis.
Finding the right balance between security and usability in your logs
To make sure the logs remain a valuable tool for monitoring system performance and troubleshooting, it’s crucial to balance the level of obfuscation with how useful they are for troubleshooting and analysis. Effective log obfuscation requires careful consideration of the trade-offs between security and usability.
Grok patterns are a helpful pattern-matching tool for parsing data from unstructured log files, and Lua scripts offer more flexibility and control over the log processing pipeline but may require more development effort. The choice between Grok patterns and Lua scripts will depend on the needs and maturity of the log processing pipeline.
How Fluent Bit works with New Relic infrastructure monitoring
Other techniques such as Grok patterns or Lua scripts are available to modify logs, but using Fluent Bit in New Relic infrastructure monitoring is a more straightforward approach to protect sensitive information in logs.
Fluent Bit is an open-source data collector for a unified logging layer, designed to collect, filter, and forward logs and metrics data to various destinations. Embedded as part of New Relic infrastructure monitoring, Fluent Bit is deployed as a client-side agent by default. This means you can accomplish advanced configurations to collect logs and metrics data from multiple sources and send them to New Relic for analysis. The next diagram shows how log forwarding works in New Relic:
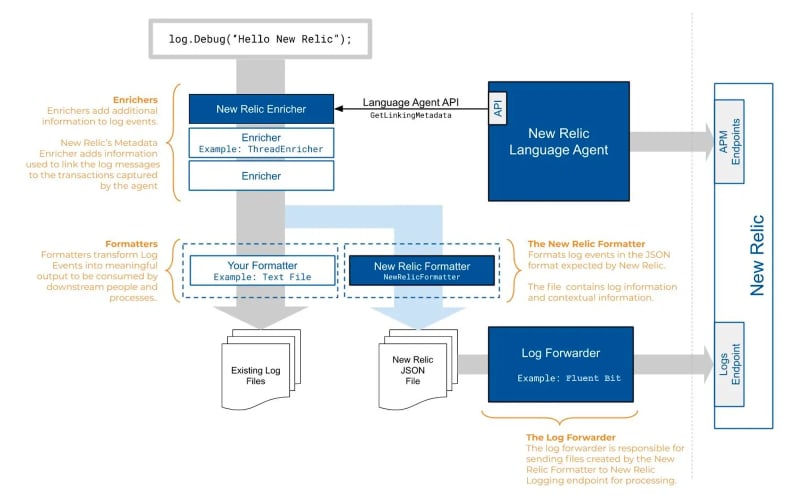
When the New Relic infrastructure agent runs, it processes configuration files in the logging.d directory. As a result, it generates a run-time Fluent Bit configuration file with the necessary [INPUT], [FILTER], and [OUTPUT] sections. If you provided an external Fluent Bit configuration file via the fluentbit option, the agent also declares an @include in the generated configuration file.
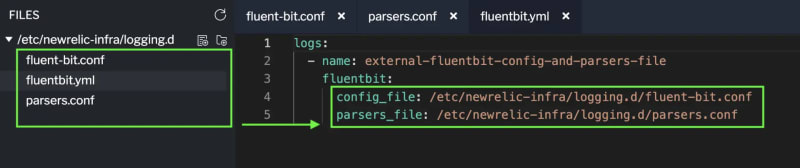
By default, the runtime file uses the default Fluent Bit configuration values because it doesn’t define a [SERVICE] section. But you can customize the configuration settings by creating your own [SERVICE] section in an external Fluent Bit configuration file and including it with the fluentbit option. To use the advanced configuration in Fluent Bit, such as logs obfuscation, you must generate separate configuration and parsers files externally and use them with the fluentbit, config_file, and parsers_file options in the agent.
Here’s an example of using Fluent Bit's additional configuration to forward obfuscated logs:
logs:
  - name: external-fluentbit-config-and-parsers-file
    fluentbit:
      config_file: /etc/newrelic-infra/logging.d/fluent-bit.conf
      parsers_file: /etc/newrelic-infra/logging.d/parsers.conf
The config_file option refers to the path of an existing Fluent Bit configuration file that you can use to customize your Fluent Bit configuration settings. This file includes the necessary [INPUT], [FILTER], and [OUTPUT] sections, among others.
The parsers_file option refers to the path of an existing Fluent Bit parsers file. This file defines custom parsing rules that Fluent Bit can use to extract information from incoming logs. Using parsers, you can transform raw log data into structured data, making it easier to analyze and understand.
Important: To forward logs for common use cases, the infrastructure agent provides simple log forwarding configurations in the logging.d/ directory's YAML files. These files are automatically translated into Fluent Bit configuration files with the correct format and configuration defaults.
Obfuscate your logs using Fluent Bit in New Relic
To start using Fluent Bit in New Relic, you need two files in place: the parsers_file for parsing files and the config_file for modifying records. Follow these steps, using advanced settings with Fluent Bit in New Relic.
Step 1: Disable existing New Relic Logs Configuration
Before using Fluent Bit, you must disable any existing New Relic logs configurations. You'll either need to remove or comment out the following configuration in your YAML file. In this example, the configuration is commented out.
# logs:
#   - name: nginx
#     file: /var/log/nginx.log
#     attributes:
#       logtype: nginx
#       environment: workshop
#       engineer: yourname
#       country: yourcountry
#     pattern: 500|404|400
Step 2: Create the fluentbit.yml file
Create or rename your file to fluentbit.yml, and include this path:
logs:
  - name: external-fluentbit-config-and-parsers-file
    fluentbit:
      config_file: /etc/newrelic-infra/logging.d/fluent-bit.conf
      parsers_file: /etc/newrelic-infra/logging.d/parsers.conf
Here’s an example of the file structure to use with Fluent Bit in New Relic infrastructure monitoring.
Step 3: Create a parsers_file
Create a file called parsers.conf, and include your Fluent Bit parser configuration. You can use the power of the parser filter plugin in Fluent Bit to parse fields in event records. You can extract specific information from your logs and transform it into structured data that’s easier to analyze and understand. You can test these custom rules against sample log data to ensure they match the intended data patterns and apply the appropriate obfuscation.
Here’s the default sample parser provided by Fluent Bit:
[PARSER]
    Name dummy_test
    Format regex
    Regex ^(?<INT>[^ ]+) (?<FLOAT>[^ ]+) (?<BOOL>[^ ]+) (?<STRING>.+)$
Here's an NGINX parser in a regular expression (regex) example:
[PARSER]
    Name   nginx
    Format regex
    Regex ^(?<source>[^ ]*) (?<host>[^ ]*) (?<user>[^ ]*) \\[(?<time>[^\\]]*)\\] "(?<method>\\S+)(?: +(?<path>[^\\"]*?)(?: +\\S*)?)?" (?<code>[^ ]*) (?<size>[^ ]*)(?: "(?<referer>[^\\"]*)" "(?<agent>[^\\"]*)")
    Time_Key time
    Time_Format %d/%b/%Y:%H:%M:%S %z
Using a regular expression pattern, this code defines a custom parser for NGINX access logs. The regular expression captures fields such as the client's IP address, time of the request, HTTP method, URL path, status code, and user agent. The Time_Key directive specifies the time field, and Time_Format defines the time format in the log line. This configuration enables log processing tools to parse NGINX access logs and extract relevant fields for analysis and visualization. For more examples, you can explore parsers provided by Fluent Bit, New Relic, or open source communities.
In the next example, you’ll use
Step 4: Create a config_file
Create a file called fluent-bit.conf file and include a modify configuration where you’ll use one of the most valuable features of Fluent Bit, the Modify Filter plugin. Use this plugin to modify records using rules and conditions. You can change the content of log records based on specific criteria or requirements. This makes it easier to analyze and troubleshoot issues in your system.
Here’s the default sample from Fluent Bit:
[INPUT]
    Name mem
    Tag  mem.local

[OUTPUT]
    Name  stdout
    Match *

[FILTER]
    Name modify
    Match *
    Add Service1 SOMEVALUE
    Add Service3 SOMEVALUE3
    Add Mem.total2 TOTALMEM2
    Rename Mem.free MEMFREE
    Rename Mem.used MEMUSED
    Rename Swap.total SWAPTOTAL
    Add Mem.total TOTALMEM
Here’s an example configuration file to use to obfuscate attributes in your logs:
[INPUT]
    Name              tail
    Tag               nginx
    Path              /var/log/nginx.log
    DB                /var/log/nginx_error.db
    Path_Key          filename
    Parser            nginx
    Mem_Buf_Limit     8MB
    Skip_Long_Lines   On
    Refresh_Interval  30

[FILTER]
    Name record_modifier
    Match *
    Record logtype nginx
    Record hostname ${HOSTNAME}
    Record service_name Coming_From_FluentBit

[FILTER]
    Name modify
    Match *
    Set source XXXXX

[OUTPUT]
    Name newrelic
    Match *
    apiKey INGEST KEY
After applying the configuration file to obfuscate logs through Fluent Bit, your end result will look something like this example.

Step 5: Restart the agent
To use configurations from Fluent Bit, restart the New Relic infrastructure agent. Before restarting, ensure that both your files (fluent-bit.conf and parsers.conf) are correctly referenced in the fluentbit.yml file, as shown back in step 2.
logs:
  - name: external-fluentbit-config-and-parsers-file
    fluentbit:
      config_file: /etc/newrelic-infra/logging.d/fluent-bit.conf
      parsers_file: /etc/newrelic-infra/logging.d/parsers.conf
Here’s the command to restart the New Relic infrastructure agent:
sudo systemctl restart newrelic-infra
Remove sensitive data from logs
In the previous example in Step 4, you learned how to obfuscate a log using Set. Another alternative is to use the Remove operation, a powerful tool for modifying logs. Use it to easily remove unnecessary or sensitive data from a record. Delete a key-value pair from a record, if it exists, using the Record Modifier plugin.
Here’s an example configuration file to remove attributes in your logs:
[INPUT]
    Name              tail
    Tag               nginx
    Path              /var/log/nginx.log
    DB                /var/log/nginx_error.db
    Path_Key          filename
    Parser            nginx
    Mem_Buf_Limit     8MB
    Skip_Long_Lines   On
    Refresh_Interval  30

[FILTER]
    Name record_modifier
    Match *
    Record logtype nginx
    Record hostname ${HOSTNAME}
    Record service_name Coming_From_FluentBit
    Remove_key source

[OUTPUT]
    Name newrelic
    Match *
    apiKey INGEST KEY
After applying the configuration file to remove log data using Fluent Bit, your final result should look something like this example:

Important: Restarting the New Relic infrastructure agent after applying a new configuration is a crucial step to ensure the changes take effect. This step is particularly important because it guarantees that the new configuration settings are loaded and used by the agent. Make sure to restart the agent after applying new configurations, the same as shown in Step 5.
Conclusion
You've reviewed examples of straightforward ways to ensure confidentiality and integrity of log data using Fluent Bit in New Relic infrastructure monitoring.
Specifically, you've learned how to protect sensitive information in logs by obfuscating data with Fluent Bit log configurations. For example, after a key value
To read this full New Relic blog, click here.
Not an existing New Relic user? Sign up for a free account to get started!

Top comments (0)