Here’s a look at what we’re building:

The code for this tutorial can be found on GitHub.
Vue.js is one of the new progressive JavaScript frameworks making the rounds of the front-end world. It is one of the most approachable, versatile and performant frameworks out there, and here at Nexmo, we’ve recently switched our Nexmo Developer Portal to using Vue.js.
In 2018 we (em)powered EMF Camp using Vue.js applications in conjunction with the Nexmo Client SDKs.
I wanted to explore the Vue.js ecosystem some more, and I’ve stumbled upon Nuxt.js. It’s a modular Vue.js framework that makes it easier to get set up for a production application. With Vue.js you usually need a back-end component to handle history mode in URLs, and Nuxt.js takes care of that out of the box. It also adds a layer of abstractions on your URL by providing Middleware out of the box. Middleware are methods that run before your route handling code, and they work both on your Vue.js code and the server.
So I thought that would make an excellent substitute to handle API calls on the server, instead of having to set up a second back-end application. In this blog post, I’m going to use Nuxt.js server middleware to send and receive SMS messages.
For SMS, I’m going to use the Nexmo SMS API, which allows you to send and receive a high volume of SMS anywhere in the world. Once you get your virtual phone number, you can use the API to manage outbound messages (“sending”) and inbound messages (“receiving”).
Prerequisites
Before you begin, make sure you have:
- A Nexmo account
- Node.js installed on your machine
- ngrok to make the code on our local machine accessible to the outside world
- The beta version of the Nexmo CLI:
npm install -g nexmo-cli@beta
Generate a New Nuxt.js Application
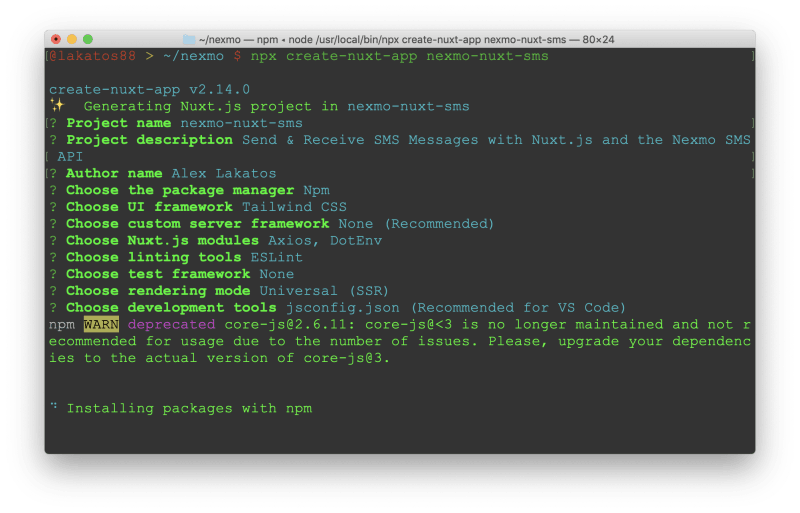
To make it easier to get started, the Nuxt.js team created a CLI tool called create-nuxt-app, that scaffolds a new project and lets you select your way through all the modules you can have in a Nuxt.js application. I’ve used that tool to generate a new project, called nexmo-nuxt-sms.
$ npx create-nuxt-app nexmo-nuxt-sms
I’ve chosen npm as my package manager. I’ve found a nice Tailwind CSS component that I wanted to build with, so I’ve chosen Tailwind as my UI framework. For a custom server framework, I’ve chosen to use none, the Nuxt.js recommendation. For modules, I’ve chosen axios for HTTP requests, and dotenv so I can use an .env file for my build variables. I’m a fan of ESlint, so I’ve chosen that as my linting tool. I won’t write any tests for this blog post, so I chose not to add a testing framework. I’ve chosen Universal as my rendering mode because that gave me Server Side Rendering out of the box. Because my editor of choice for Vue.js is VS Code, I’ve chosen jsconfig.json as the extra development tool for the last step of the scaffolding process.
After the scaffolding was done, I’ve switched directory to my new project, and ran the project using npm run dev. That will start both the client and server processes and make them available at http://localhost:3000. It will also hot reload them every time I make a change, so I can see it live without having to restart the processes.
$ cd nexmo-nuxt-sms
$ npm run dev
The command generated a whole directory structure, which is the cornerstone for Nuxt.js. In the root folder, there is nuxt.config.js, which is the configuration file for Nuxt.js. We’ll update that to add serverMiddleware. The server middleware works by specifying routes and associated JavaScript files to run when those routes are accessed. We’ll create two routes, /api/send and /api/receive, to handle sending and receiving SMS messages through them. At the bottom of it, add a property for serverMiddleware:
export default {
  ...
  },
  serverMiddleware: [
    { path: '/api/send', handler: '~/api/send-sms.js' },
    { path: '/api/receive', handler: '~/api/receive-sms.js' }
  ]
}
Sending an SMS Message
We’ve told Nuxt.js to use the ~/api/send-sms.js when a request on /api/send is made, but we haven’t actually created the file yet. We’ll go ahead and create an api folder, and a send-sms.js file inside of it.
$ mkdir api
$ touch send-sms.js
To send SMS messages with the Nexmo SMS API, we’ll be using the nexmo Node.js SDK. We need to install it first:
$ npm install nexmo
We’re going to use it inside the file, and we need to require it, and then instantiate it with your Nexmo API key and secret. You can find them in your Nexmo Dashboard. Update send-sms.js to look like this:
require('dotenv').config()
const Nexmo = require('nexmo')

const nexmo = new Nexmo({
  apiKey: process.env.NEXMO_API_KEY,
  apiSecret: process.env.NEXMO_API_SECRET
})

export default function (req, res) {
  console.log(req.method, req.url)
}
We’re using dotenv here to take the API key and secret from the .env file instead of adding them in the code directly. So we’ll need to update the .env file in the root of your generated project with the values for NEXMO_API_KEY and NEXMO_API_SECRET.
NEXMO_API_KEY=aabbcc0
NEXMO_API_SECRET=s3cRet$tuff
The file exports a default function that has the default request and response Node.js objects. Because they are there, and I didn’t want to add the extra dependency of express, we’ll use them to create a classical Node.js HTTP server. Let’s update the export in the send-sms.js file to look like this:
export default function (req, res, next) {
  console.log(req.method, req.url)
  if (req.method === 'GET') {
    const url = new URL(req.url, `http://${req.headers.host}`)

    nexmo.message.sendSms(
      process.env.FROM_NUMBER,
      url.searchParams.get('number'),
      url.searchParams.get('text'),
      (err, responseData) => {
        let message

        if (err) {
          message = JSON.stringify(err)
        } else if (responseData.messages[0].status === '0') {
          message = 'Message sent successfully.'
        } else {
          message = `Message failed with error: ${responseData.messages[0]['error-text']}`
        }

        res
          .writeHead(200, {
            'Content-Length': Buffer.byteLength(message),
            'Content-Type': 'text/plain'
          })
          .end(message)
      }
    )
  } else {
    res.statusCode = 200
    res.end()
  }
}
I’m checking to see if the request is a GET request here and then using the “Send an SMS” code snippet to send an SMS. The nexmo.message.sendSms method takes a from, to and text parameters to determine the recipient, sender, and content of the SMS message. It also takes a callback method that is going to run once the API call is completed. I’m taking the from parameter from the .env file, and that’s going to be a Nexmo phone number. The to and text parameters are coming from the query parameters of the incoming HTTP request.
My callback function is an anonymous function, and I’m checking to see if there was an error with the request first. If there was an error, I transform the error object to String and pass that along to the response message. If there was no error, I’m going to look at the message status in the response data. A status of 0 means the SMS was sent successfully, so I’m updating the response message. If the status wasn’t 0, it means there was an error with getting the SMS message from the Nexmo API, through the telecom carrier networks, to a phone. I’ll update the message with the appropriate error text.
Because this is a Node.js server, I need to explicitly write the request header with a 200 status, the Content-Length and Content-Type of the message, before I can send the message on the request.
There is also a fallback for all non-GET requests to return an empty 200 OK response.
Buy a Nexmo Number
You’ve probably noticed I’ve used process.env.FROM_NUMBER as my sender id, and that means Nuxt.js is going to look for it in the .env file. Before we can add it there, we’ll need to buy an SMS enabled phone number in the Nexmo Dashboard.
We could also buy a number through the Nexmo CLI, and I’m going to do just that. In case you haven’t used the Nexmo CLI before, you need to set up it with your Nexmo API key and secret before we can use it.
$ nexmo setup NEXMO_API_KEY NEXMO_API_SECRET
We’ll use the number:search command to look for an available number before we buy it. The command accepts a two-letter country code as input (I’ve used GB for UK numbers), and we can specify a few flags to narrow down the returned list of available phone numbers. I’m using --sms to flag SMS enabled numbers, --size=5 to limit the size of the returned list, and --verbose to return a nicely formatted table with additional information about the available phone numbers.
$ nexmo number:search GB --sms --size=5 --verbose
The response I got looked a bit like this:
Item 1-5 of 7633

msisdn       | country | cost | type       | features
------------------------------------------------------
447451272708 | GB      | 1.25 | mobile-lvn | VOICE,SMS
447451272710 | GB      | 1.25 | mobile-lvn | VOICE,SMS
447451272713 | GB      | 1.25 | mobile-lvn | VOICE,SMS
447451272714 | GB      | 1.25 | mobile-lvn | VOICE,SMS
447451272719 | GB      | 1.25 | mobile-lvn | VOICE,SMS
I’ve picked the first number in the response, so let’s go ahead and buy that number on the Nexmo platform.
$ nexmo number:buy 447451272708 --confirm
Now that you own that phone number, let’s go ahead and add it to the .env file.
NEXMO_API_KEY=aabbcc0
NEXMO_API_SECRET=s3cRet$tuff
FROM_NUMBER=447451272708
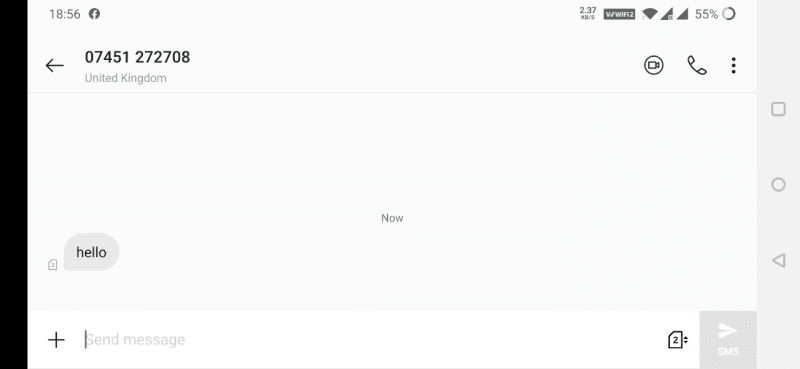
We can test the endpoint we created, make sure it works. Because it’s a GET request, we don’t need an additional tool like Postman, we can use the URL directly in the browser. If you load a URL with a query like http://localhost:3000/api/send?text=hello&number=YOUR_PHONE_NUMBER, replacing YOUR_PHONE_NUMBER with your mobile number, you should get an SMS with the text hello on your phone.
Receiving an SMS Message
When a Nexmo phone number receives an SMS message, Nexmo will pass that message to a Webhook you have specified in the Nexmo Dashboard. We’ll need to create the /api/receive endpoint, publicly expose it to Nexmo via ngrok, and then link it in the Nexmo Dashboard.
We’ve already registered the /api/receive endpoint with the Nuxt.js server middleware, let’s go ahead and create the file to handle it. Inside the api directory, create a receive-sms.js file.
$ cd api
$ touch receive-sms.js
The file works similarly to the send-sms.js file we created earlier, it has the same export default function syntax, receiving a Node.js request and response object. Let’s go ahead and fill out the receive-sms.js file with a POST request handler, that builds the request body from chunks, and then logs it to the console.
export default function (req, res) {
  console.log(req.method, req.url)
  if (req.method === 'POST') {
    const body = []
    req.on('data', (chunk) => {
      body.push(chunk)
    })
    req.on('end', () => {
      const sms = JSON.parse(body)
      console.log(sms)
    })
  }

  res.statusCode = 200
  res.end()
}
I’m checking to see if the incoming request is a POST request, and then listen in on the request data chunks, adding them to a body array. When the request ends, I’m parsing the body into JSON, and logging that to the console. That’s going to effectively be the SMS data coming from Nexmo. Nexmo expects a 200 OK status on the request, so I’m responding with that.
Our Webhook endpoint is live on localhost now, but we need to expose it to the internet, so Nexmo can access it. We’re going to use ngrok to do that.
Run ngrok
If you haven’t used ngrok before, there is a blog post that explains how to use it. If you’re familiar with ngrok, run it with http on the 3000 port.
$ ngrok http 3000
After ngrok runs, it will give you a random-looking URL, that we’ll use as the base for our Webhook later on. Mine looks like this: http://3dea3250.ngrok.io.
Link the Webhook to Nexmo
In order to set up the webhook URL, go to the little gear icon next to your phone numbers in the Nexmo Dashboard and fill in the “Inbound Webhook URL” field with YOUR_NGROK_URL/api/receive.
Or we can use the Nexmo CLI link the Nexmo phone number you bought earlier with the Webhook URL from ngrok:
nexmo link:sms 447451272708 http://YOUR_NGROK_URL.ngrok.io/api/receive
You can send an SMS message now from your phone to your Nexmo phone number, and you should see it logged in the terminal where you Nuxt.js application is running.

Creating a Vue.js UI
We’ve created the server functionality to send and receive SMS messages, it’s time to create a UI to interact with that functionality from the browser.
First, let’s clean up the existing UI Nuxt.js created for us. Replace the contents of the /layouts/default.vue file with:
<template>
  <div>
    <nuxt />
  </div>
</template>

<style>
html {
  background-color: #4299e1;
}
</style>
I’m using a Mac Terminal template from tailwindcomponents.com, so let’s go ahead and replace the contents of the <template> tag in the /pages/index.vue file with the new UI:
<template>
  <div class="w-1/2 mx-auto py-20">
    <div class="w-full shadow-2xl subpixel-antialiased rounded h-64 bg-black border-black mx-auto">
      <div
        id="headerTerminal"
        class="flex items-center h-6 rounded-t bg-gray-100 border-b border-gray-500 text-center text-black"
      >
        <div
          id="closebtn"
          class="flex ml-2 items-center text-center border-red-900 bg-red-500 shadow-inner rounded-full w-3 h-3"
        />
        <div
          id="minbtn"
          class="ml-2 border-yellow-900 bg-yellow-500 shadow-inner rounded-full w-3 h-3"
        />
        <div
          id="maxbtn"
          class="ml-2 border-green-900 bg-green-500 shadow-inner rounded-full w-3 h-3"
        />
        <div id="terminaltitle" class="mx-auto pr-16">
          <p class="text-center text-sm">
            <logo />Terminal
            <logo />
          </p>
        </div>
      </div>
      <div id="console" class="pl-1 pt-1 h-auto text-green-500 font-mono text-xs bg-black">
        <p class="pb-1">
          Last login: {{ new Date().toUTCString() }} on ttys002
        </p>
        <p v-for="counter in counters" :key="counter.id" class="pb-1">
          <span class="text-red-600">@lakatos88</span>
          <span class="text-yellow-600 mx-1">></span>
          <span class="text-blue-600">~/nexmo/nexmo-nuxt-sms</span>
          <span class="text-red-600 mx-1">$</span>
          <span v-if="!counter.message" class="blink" contenteditable="true" @click.once="stopBlinking" @keydown.enter.once="runCommand">_</span>
          <span v-if="counter.message">{{ counter.message }}</span>
        </p>
      </div>
    </div>
  </div>
</template>
I’ve modified the template slightly to match the colors to my terminal setup and update the user information to match my terminal as well.
The edits I did happen in the console div, so let’s take a look at that. I’m using {{ new Date().toUTCString() }} to get the current date and display it on screen.
I’m then using the Vue.js v-for directive to loop through a counters array and display either a blinking underscore or a message in the terminal window, for every entry of the counters array. The blinking underscore has a contenteditable flag on it, which means you can edit the contents of it in the browser. I’m using the @click directive to run a JavaScript stopBlinking function the first time a user clicks on it, and stop it from blinking. The same HTML tag has a @keydown.enter directive on it as well, to run a runCommand function the first time a user hits the Enter key, effectively sending the command to the terminal.
We’ll need to create the initial counters array in the Vue.js data structure, and create the methods for stopBlinking and runCommand. Let’s replace the <script> tag in the same file with:
<script>
import Logo from '~/components/Logo.vue'

export default {
  components: {
    Logo
  },
  data () {
    return {
      counters: [{ id: 0 }]
    }
  },
  mounted () {
  },
  methods: {
    stopBlinking (event) {
      event.target.classList.remove('blink')
      event.target.textContent = '\u00A0'
    },
    async runCommand (event) {
      const splitCommand = event.target.textContent.trim().split(' ')
      event.target.contentEditable = false
      if (splitCommand.length > 3 && splitCommand[0] === 'nexmo' && splitCommand[1] === 'sms') {
        const sms = await this.$axios.$get(`/api/send?text=${splitCommand.slice(3).join(' ')}&number=${splitCommand[2]}`)
        this.counters.push({ id: this.counters.length, message: sms })
      } else {
        this.counters.push({ id: this.counters.length, message: `Unrecognized command "${splitCommand[0]}".` })
      }
      this.counters.push({ id: this.counters.length })
    }
  }
}
</script>
The runCommand method is async, and it stops the HTML element from being contentEditable. It also splits the command from the terminal into 4 parts, the command name, the argument, the phone number, and the text message. The method checks to see if there are more than 3 parts in the command and that the first one is nexmo and the second one is sms. If that’s the case, it makes an HTTP GET request using axios to the /api/send endpoint we created earlier, passing along the text and number from the command. It then uses the message it receives back to display on the UI.
If the command is not nexmo sms number text, it displays a generic error in the UI. Once that’s done, it adds a new line with a blinking underscore to the UI, waiting for the next command.
I’ve also replaced the contents of the <style> tag to position the Nuxt.js logos at the top of the terminal window, and create the blinking animation for the underscore.
<style>
.NuxtLogo {
  width: 10px;
  height: 10px;
  position: relative;
  margin: 0 10px;
  bottom: 2px;
  display: inline-block;
}

.blink {
  animation-duration: 1s;
  animation-name: blink;
  animation-iteration-count: infinite;
}

@keyframes blink {
  from {
    opacity: 1;
  }

  50% {
    opacity: 0;
  }

  to {
    opacity: 1;
  }
}
</style>
This will give you the ability to send SMS messages from the Vue.js UI, but it doesn’t allow for receiving SMS messages yet. Because the SMS receiving Webhook is triggered by Nexmo, we can’t know from the UI code when there is a new SMS to request it. We’ll need to add some sort of polling mechanism to it.
Add WebSockets
I’m not a fan of long polling, so instead, I decided to build a WebSocket client/server pair for it. For the server, I’m using the ws npm package, so we’ll need to install it:
$ npm install ws
To build the WebSocket server, let’s edit the /api/receive-sms.js file, to create a WebSocket server at the top of it. I’m also replacing the part that logs the SMS to the console, to send it on the WebSocket instead.
const WebSocket = require('ws')
let websocket = {}
const wss = new WebSocket.Server({ port: 3001 })
wss.on('connection', (ws) => {
  websocket = ws
})

export default function (req, res, next) {
  console.log(req.method, req.url)
  if (req.method === 'POST') {
    const body = []
    req.on('data', (chunk) => {
      body.push(chunk)
    })
    req.on('end', () => {
      const sms = JSON.parse(body)
      websocket.send(`Message from ${sms.msisdn}: ${sms.text}`)
    })
  }

  res.statusCode = 200
  res.end()
}
The server is starting on port 3001, and sending the SMS message as soon as it’s finished building from the request. We’ll need to add a WebSocket client to the UI as well, to receive the message and display it to the UI. Let’s update the /pages/index.vue file, specifically the mounted() method, to create a WebSocket client as soon as the Vue.js component finished mounting.
mounted () {
  console.log(process.env.WS_URL)
  const ws = new WebSocket(process.env.WS_URL)

  ws.onmessage = (event) => {
    this.counters[this.counters.length - 1].message = event.data
    this.counters.push({ id: this.counters.length })
  }
},
The WebSocket client connects to the process.env.WS_URL, and sets a listener for messages. When there is a new message on the WebSocket, it updates the last command on the screen with the event data received from the server, i.e. the SMS message. It also adds a new line in the UI, with a blinking underscore.
You’ve noticed we’re using the process.env.WS_URL, so we need to add it to our .env file.
WS_URL=ws://localhost:3001
Because the Vue.js UI needs to know about the environment file, we need to add an entry about it to the Nuxt.js config file, nuxt.config.js.
env: {
    wsUrl: process.env.WS_URL || 'ws://localhost:3001'
},
Try It Out
You can load http://localhost:3000/ in your browser, click on the blinking underscore and type nexmo sms YOUR_PHONE_NUMBER hello. After you press Enter on the keyboard, the SMS should be delivered to your phone. If you reply to that SMS, you can see it appearing in your browser as well.

I hope it worked and you’ve just learned how to send and receive SMS messages with the Nexmo APIs and Nuxt.js.


Top comments (0)