TL;DR
Learn how to use AWS.Messaging by implementing Claim-Check pattern.
The Claim-Check pattern allows workloads to transfer payloads without storing the payload in a messaging system. The pattern stores the payload in an external data store and uses a “claim check” to retrieve the payload. The claim check is a unique, obscure token or key. To retrieve the payload, applications need to present the claim-check token to the external data store.
Source code: https://github.com/NikiforovAll/aws-claim-check-dotnet
Introduction
☝️The blog post will focus on code implementation and usage of
AWS.MessagingandAspireand not on the details of the Claim-Check pattern.For more details I highly recommend seeing Azure/Architecture Center/Claim-Check pattern
Traditional messaging systems are optimized to manage a high volume of small messages and often have restrictions on the message size they can handle. Large messages not only risk exceeding these limits but can also degrade the performance of the entire system when the messaging system stores them.
The solution to this problem is to use the Claim-Check pattern, and don’t send large messages to the messaging system. Instead, send the payload to an external data store and generate a claim-check token for that payload. The messaging system sends a message with the claim-check token to receiving applications so these applications can retrieve the payload from the data store. The messaging system never sees or stores the payload.
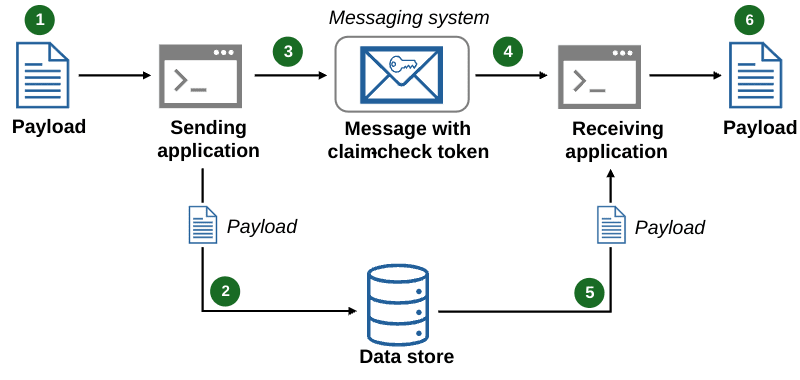
- Payload
- Save payload in data store.
- Generate claim-check token and send message with claim-check token.
- Receive message and read claim-check token.
- Retrieve the payload.
- Process the payload.
When to use Claim-Check pattern?
The following scenarios are use cases for the Claim-Check pattern:
- Messaging system limitations: Use the Claim-Check pattern when message sizes surpass the limits of your messaging system. Offload the payload to external storage. Send only the message with its claim-check token to the messaging system.
- Messaging system performance: Use the Claim-Check pattern when large messages are straining the messaging system and degrading system performance.
For example, AWS SQS has a message size limit of 256 KiB. See Amazon SQS message quotas for more details.
What is AWS.Messaging?
The AWS Message Processing Framework for .NET is an AWS-native framework that simplifies the development of .NET message processing applications that use AWS services such as Amazon Simple Queue Service (SQS), Amazon Simple Notification Service (SNS), and Amazon EventBridge. The framework reduces the amount of boiler-plate code developers need to write, allowing you to focus on your business logic when publishing and consuming messages.
The Message Processing Framework supports the following activities and features:
Sending messages to SQS and publishing events to SNS and EventBridge.
Receiving and handling messages from SQS by using a long-running poller, which is typically used in background services. This includes managing the visibility timeout while a message is being handled to prevent other clients from processing it.
Handling messages in AWS Lambda functions.
FIFO (first-in-first-out) SQS queues and SNS topics.
OpenTelemetry for logging.
For a good introductory blog post see AWS Developer Tools Blog / Introducing the AWS Message Processing Framework for .NET (Preview)
Implementation
Goal
🎯 Assume we want to process pdf documents provided by users to extract key phrases and store these key phrases for further processing.
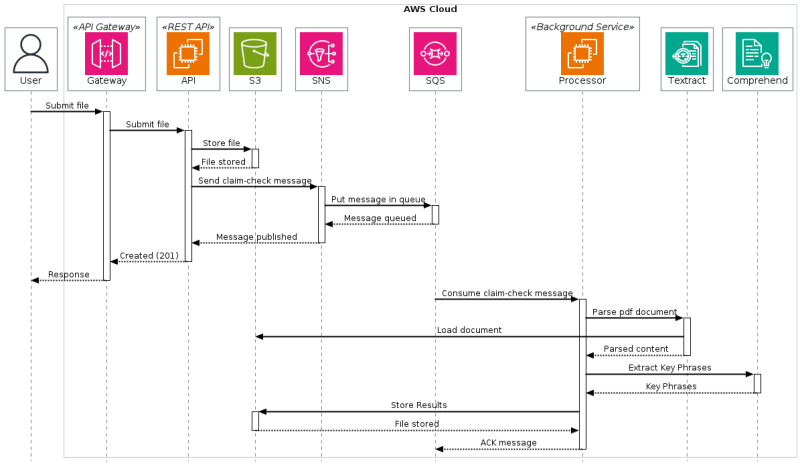
Here’s a step-by-step explanation of the process:
- File Submission: A user submits a file through an API Gateway. This could be any document that needs to be processed, such as a PDF file.
- File Storage: The API Gateway forwards the file to a REST API running on an EC2 instance. The API then stores the file in an S3 bucket and sends a message to an SNS (Simple Notification Service) topic with the location of the file in S3 (this is known as a claim-check pattern).
- Message Queuing: The SNS topic puts the message into an SQS (Simple Queue Service) queue for processing. The API returns a 201 response to the API Gateway, which then returns a response to the user indicating that the file was successfully submitted.
- File Processing: A background service running on another EC2 instance consumes the message from the SQS queue. This service retrieves the file from S3 and sends it to Amazon Textract for parsing.
- Text Extraction: Amazon Textract loads the document, extracts the text, and returns the parsed content to the background service.
- Key Phrase Extraction: The background service then sends the parsed content to Amazon Comprehend to extract key phrases.
- Result Storage: The key phrases are then stored back in S3 by the background service. The service acknowledges the message in the SQS queue, removing it from the queue.
This workflow allows for the asynchronous processing of documents at scale. The user gets a quick response when they submit a file, and the heavy processing is done in the background, allowing the system to handle a large number of file submissions.
❗🤔 Arguably, in the world of AWS, there are cloud-native alternatives to the canonical claim check pattern. For example, you can subscribe to S3 events from a lambda function, but my goal is demonstrate how to use AWS.Messaging and Claim-Check pattern implementation and not to provide reference solution to these problem.
Code
The solution consist of Api, Processor (Worker) components, and AWS resources defined via CloudFormation.
This application is based on Aspire integration for AWS. Basically, it bootstraps the the CloudFormation stack for your application during the AppHost startup.
// AppHost/Program.cs
using Amazon;

var builder = DistributedApplication.CreateBuilder(args);

var awsConfig = builder.AddAWSSDKConfig().WithProfile("default").WithRegion(RegionEndpoint.USEast1);

var awsResources = builder
    .AddAWSCloudFormationTemplate("DocumentSubmissionAppResources", "aws-resources.template")
    .WithReference(awsConfig);

builder.AddProject<Projects.Api>("api").WithReference(awsResources);

builder.AddProject<Projects.Processor>("processor").WithReference(awsResources);

builder.Build().Run();
The code above is based on couple of NuGet packages:
- Aspire.Hosting.AWS - Provides extension methods and resources definition for a .NET Aspire AppHost to configure the AWS SDK for .NET and AWS application resources.
- Aspire.Hosting.AppHost - Provides the core APIs and MSBuild logic for .NET Aspire AppHost projects.
To glue everything together, we need to take a look at CloudFormation template - “aws-resources.template”. The interesting part here is the Outputs section. It serves as a contract between your application and infrastructure defined through Aspire.
{
    "AWSTemplateFormatVersion": "2010-09-09",
    "Parameters": {},
    "Resources": {
        // skipped content, see source code for more details.
    },
    "Outputs": {
        "DocumentQueueUrl": {
            "Value": {
                "Ref": "DocumentQueue"
            }
        },
        "DocumentTopicArn": {
            "Value": {
                "Ref": "DocumentTopic"
            }
        },
        "DocumentBucketName": {
            "Value": {
                "Ref": "DocumentBucket"
            }
        }
    }
}
In order to reference Outputs in our code I added next code:
// ServiceDefaults/Extensions.cs
public static AwsResources AddAwsResources(this IHostApplicationBuilder builder)
{
    var awsResources = builder.Configuration.GetSection("AWS:Resources").Get<AwsResources>()!;

    // validate, consume at runtime via IOptions if needed.
    builder
        .Services.AddOptions<AwsResources>()
        .Configure(options => builder.Configuration.Bind("AWS:Resources", options))
        .ValidateOnStart();

    return awsResources;
}
And the model:
// ServiceDefaults/AwsResources.cs
public class AwsResources
{
    [Required]
    [Url]
    public string DocumentQueueUrl { get; set; } = default!;

    [Required]
    public string? DocumentTopicArn { get; set; }

    [Required]
    public string? DocumentBucketName { get; set; }
}
Now once we have the infrastructure ready, we can take a look at the components.
File Upload via API
It is very intuitive and easy to work with AWS.Messaging, all we need is to define a publisher:
// Program.cs
var builder = WebApplication.CreateBuilder(args);

builder.AddServiceDefaults();
var awsResources = builder.AddAwsResources();

builder.Services.AddAWSService<IAmazonS3>();

builder.Services.AddAWSMessageBus(messageBuilder =>
{
    messageBuilder.AddMessageSource("DocumentSubmissionApi");

    messageBuilder.AddSNSPublisher<DocumentSubmission>(awsResources.DocumentTopicArn);
});

var app = builder.Build();

app.MapUploadEndpoint();

app.Run();
Here is how to use it:
app.MapPost(
    "/upload",
    async Task<Results<Created, BadRequest<string>>> (
        IFormFile file,
        [FromServices] IOptions<AwsResources> resources,
        [FromServices] IAmazonS3 s3Client,
        [FromServices] IMessagePublisher publisher,
        [FromServices] TimeProvider timeProvider,
        [FromServices] ILogger<Program> logger
    ) =>
    {
        if (file is null or { Length: 0 })
        {
            return TypedResults.BadRequest("No file uploaded.");
        }

        using var stream = file.OpenReadStream();
        var bucketName = resources.Value.DocumentBucketName;
        var key = Guid.NewGuid().ToString();

        await s3Client.PutObjectAsync(
            new PutObjectRequest
            {
                BucketName = bucketName,
                Key = key,
                InputStream = stream
            }
        );

        var response = await publisher.PublishAsync(
            new DocumentSubmission { CreatedAt = timeProvider.GetLocalNow(), Location = key }
        );

        logger.LogInformation("Published message with id {MessageId}", response.MessageId);

        return TypedResults.Created();
    }
);
File Processing via Worker
Note, in this case we need to provide an SQS Queue Url to listen to.
// Program.cs
var builder = Host.CreateApplicationBuilder(args);

builder.AddServiceDefaults();

var awsResources = builder.AddAwsResources();

builder.Services.AddAWSService<IAmazonTextract>();
builder.Services.AddAWSService<IAmazonComprehend>();
builder.Services.AddAWSService<IAmazonS3>();

builder.Services.AddAWSMessageBus(builder =>
{
    builder.AddSQSPoller(awsResources.DocumentQueueUrl);

    builder.AddMessageHandler<DocumentSubmissionHandler, DocumentSubmission>();
});

builder.Build().Run();
Here is the handler:
public class DocumentSubmissionHandler(
    IAmazonTextract amazonTextractClient,
    IAmazonComprehend amazonComprehendClient,
    IAmazonS3 s3Client,
    IOptions<AwsResources> resources,
    ILogger<DocumentSubmissionHandler> logger
) : IMessageHandler<DocumentSubmission>
{
    public async Task<MessageProcessStatus> HandleAsync(
        MessageEnvelope<DocumentSubmission> messageEnvelope,
        CancellationToken token = default
    )
    {
        logger.LogInformation("Received message - {MessageId}", messageEnvelope.Id);

        var bucketName = resources.Value.DocumentBucketName;
        var key = messageEnvelope.Message.Location;

        var textBlocks = await this.AnalyzeDocumentAsync(bucket, key, token);

        var keyPhrases = await this.DetectKeyPhrasesAsync(textBlocks, token);

        await this.StorKeyPhrases(keyPhrases, bucket, key, token);

        return MessageProcessStatus.Success();
    }
}
OpenTelemetry support
The awesome thing about Aspire and AWS.Messaging is the native OpenTelemetry support, here is how to add AWS.Messaging instrumentation:
// ServiceDefaults/Extensions.cs
public static IHostApplicationBuilder ConfigureOpenTelemetry(
        this IHostApplicationBuilder builder
)
{
    builder.Logging.AddOpenTelemetry(logging =>
    {
        logging.IncludeFormattedMessage = true;
        logging.IncludeScopes = true;
    });

    builder
        .Services.AddOpenTelemetry()
        .WithMetrics(metrics =>
        {
            metrics
                .AddAspNetCoreInstrumentation()
                .AddHttpClientInstrumentation()
                .AddRuntimeInstrumentation();
        })
        .WithTracing(tracing =>
        {
            tracing
                .AddAspNetCoreInstrumentation()
                .AddHttpClientInstrumentation()
                .AddAWSInstrumentation() // <-- add this
                .AddAWSMessagingInstrumentation(); // <-- and this
        });

    builder.AddOpenTelemetryExporters();

    return builder;
}
The result of file upload from Aspire Dashboard:
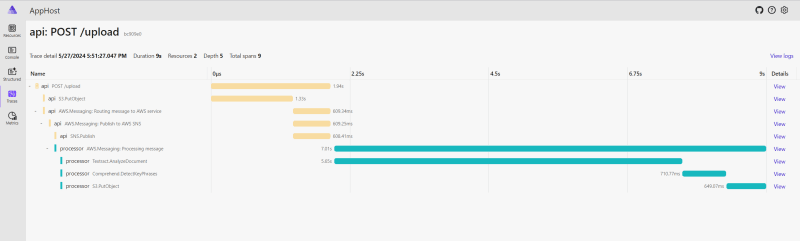
💡 Aspire is great for investigating how distributed systems work. We can use it to deepen our understanding of Claim-Check pattern in our case.
Conclusion
In conclusion, leveraging the power of AWS.Messaging coupled with Aspire can significantly streamline the process of .NET and AWS Cloud development. These tools simplify the complexities associated with development of distributed systems.
References
- https://github.com/awslabs/aws-dotnet-messaging
- https://aws.amazon.com/blogs/developer/introducing-the-aws-message-processing-framework-for-net-preview/
- https://learn.microsoft.com/en-us/azure/architecture/patterns/claim-check
- https://docs.aws.amazon.com/sdk-for-net/v3/developer-guide/msg-proc-fw.html
- https://www.enterpriseintegrationpatterns.com/patterns/messaging/StoreInLibrary.html
- https://docs.aws.amazon.com/prescriptive-guidance/latest/automated-pdf-analysis-solution/welcome.html

Top comments (0)