Learn how to use utility-first CSS framework Tailwind CSS with Angular using ngx-build-plus.
This guide works for both Tailwind CSS v1 and v2 and Angular v10 and v11.
Angular Project
You need the Angular CLI to create a new Angular project.
ng new app-name --style=scss
cd app-name
Follow the instruction to manually configure Angular w/ Tailwind 🍬🍫🍪 or jump directly to the shortcut.
Setup
Start by adding dependencies for Tailwind, Postcss and ngx-build-plus for angular.
npm i -D tailwindcss autoprefixer postcss postcss-import postcss-loader postcss-scss

ng add ngx-build-plus
Create a webpack.config.js in your root folder to configure Postcss with Tailwind.
touch webpack.config.js
module.exports = {
  module: {
    rules: [
      {
        test: /\.scss$/,
        loader: 'postcss-loader',
        options: {
          postcssOptions: {
            ident: 'postcss',
            syntax: 'postcss-scss',
            plugins: [
              require('postcss-import'),
              require('tailwindcss'),
              require('autoprefixer'),
            ],
          },
        },
      },
    ],
  },
Now open angular.json file to apply the extra webpack config to generate Tailwind styles during ng build, ng serve and ng test. If you used the schematics ng add ngx-build-plus it automatically replaces @angular-devkit/build-angular with ngx-build-plus in your angular.json. Additionally, add the extraWebpackConfig to each build step. In the end your angular.json should look like this:
"architect": {
  "build": {
-   "builder": "@angular-devkit/build-angular:browser",
+   "builder": "ngx-build-plus:browser",
    "options": {
+     "extraWebpackConfig": "webpack.config.js",
      ...
    }
    ...
  },
  "serve": {
-   "builder": "@angular-devkit/build-angular:dev-server",
+   "builder": "ngx-build-plus:dev-server",
    "options": {
+     "extraWebpackConfig": "webpack.config.js",
      ...
    }
    ...
  },
  "test": {
-   "builder": "@angular-devkit/build-angular:karma",
+   "builder": "ngx-build-plus:karma",
    "options": {
+     "extraWebpackConfig": "webpack.config.js",
      ...
    }
    ...
  },
Perfect, now it's time to generate the Tailwind config npx tailwindcss init or for full config npx tailwindcss init --full.
Almost there. Add Tailwind base styles to your src/styles.scss file
@import 'tailwindcss/base';

@import 'tailwindcss/components';

@import 'tailwindcss/utilities';
Now go ahead serve your app, you are ready to style your Angular app with Tailwind utility classes.
… wait a moment, we need to purge the unused CSS styles from Tailwind.
Remove unused CSS Styles
We can use the new purge option in tailwind.config.js.
module.exports = {
  purge: ['./src/ **/*.html', './src/** /*.ts'],
  theme: {
    extend: {},
  },
  variants: {},
  plugins: [],
};
Unused styles are removed by Tailwind when you run your build with NODE_ENV set to production. Add "build:prod": "NODE_ENV=production ng build --prod", to your scripts in package.json. Now run npm run build:prod to get a production build with only used Tailwind styles.
CSS instead of SCSS
Using CSS instead of SCSS? No problem. You don't need to install postcss-scss.
npm i -D tailwindcss autoprefixer postcss postcss-import postcss-loader

ng add ngx-build-plus
Update also your webpack.config.js:
module.exports = {
  module: {
    rules: [
      {
        test: /\.css$/,
        loader: 'postcss-loader',
        options: {
          postcssOptions: {
            ident: 'postcss',
            syntax: 'postcss',
            plugins: [
              require('postcss-import'),
              require('tailwindcss'),
              require('autoprefixer'),
            ],
          },
        },
      },
    ],
  },
};
Finally add Tailwind base styles to src/styles.css.
@import 'tailwindcss/base';

@import 'tailwindcss/components';

@import 'tailwindcss/utilities';
Shortcut aka Angular Schematics
If you also think the steps above are tedious … Don't look any further.
Angular Schematics 💪 to the rescue. Gary created a schematic to add Tailwind to an Angular project. Simply run the schematic to automatically configure Tailwind:
ng add ngx-tailwind
Use Tailwind CSS utility classes
Now go crazy with Tailwind's CSS utility classes in your Angular app.
Add them to your HTML template class, [class.hover:...]="true" or use them with ngClass
<span class="inline-block bg-red-500 rounded-full px-3 py-1 text-sm font-semibold text-white" [class.hover:bg-red-700]="hoverMe">
  #angular
</span>
Add it to your stylesheet
span {
  @apply inline-block bg-red-500 rounded-full px-3 py-1 text-sm font-semibold text-white;
}

span:hover {
  @apply bg-red-700;
}
Note : @apply is not compiled when using it in an Angular library due to missing support for postcss of ng-packagr
Or use @HostBinding in your *.ts files
@HostBinding('class')
get classes() {
  return 'bg-red-500 px-4';
}

@HostBinding('class.hidden')
get classes() {
  return this.isHidden;
}
Add the following snippet to your src/app.component.html to see if Tailwind styles the following card. (Don't worry about the picture its random)

<div class="max-w-sm mx-auto mt-10 rounded overflow-hidden shadow-lg space-y-4">
  <img
    class="h-64 w-full object-cover object-center"
    src="https://source.unsplash.com/random"
    alt="Random unsplash photo"
  />
  <div class="px-6">
    <div class="font-bold text-xl">Angular w/ Tailwind</div>
    <p class="text-gray-700 text-base">
      Lorem ipsum dolor sit amet, consectetur adipisicing elit. Voluptatibus
      quia, nulla! Maiores et perferendis eaque, exercitationem praesentium
      nihil.
    </p>
  </div>
  <div class="px-6 pb-4 space-x-2">
    <a
      href="https://angular.io"
      target="_blank"
      rel="noreferrer"
      class="inline-block bg-red-500 rounded-full px-3 py-1 text-sm font-semibold text-white hover:bg-red-700"
    >
      #angular
    </a>
    <a
      href="https://tailwindcss.com"
      target="_blank"
      rel="noreferrer"
      class="inline-block bg-indigo-500 rounded-full px-3 py-1 text-sm font-semibold text-white hover:bg-indigo-700"
    >
      #tailwind
    </a>
    <a
      href="https://notiz.dev"
      target="_blank"
      rel="noreferrer"
      class="inline-block bg-blue-200 rounded-full px-3 py-1 text-sm font-semibold text-gray-700 hover:bg-blue-400"
    >
      #notiz
    </a>
  </div>
</div>
In the next post you will create an Angular component for a floating form field based on my last post Floating Form Field with Tailwind CSS.
Migrations
Upgrading from Tailwind CSS v1 to v2
To upgrade you project from Tailwind CSS v1.x to v2.0 run the following install command
npm i -D tailwindcss@latest postcss@latest autoprefixer@latest postcss-import@latest
Read the full Upgrade Guide to update your custom tailwind.config.js (e.g. your color palette) and replace removed classes from your template (e.g. shadow-outline and shadow-xs).
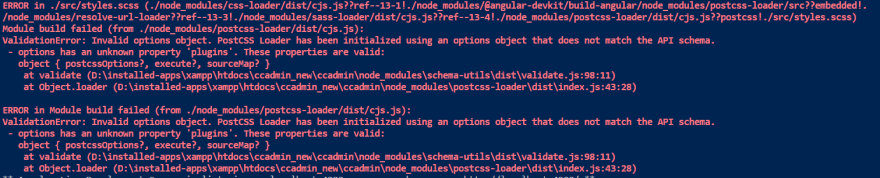
Update postcss-loader from 3.x to 4.x
postcss-loader has new breaking changes when updating from version 3.x to 4.x. Huge thanks to @phileagleson 👏 who pointed out that options for Postcss have moved to the postcssOptions. Therefore, update your webpack.config.js as follows when updating to postcss-loader@4.x
module.exports = {
  module: {
    rules: [
      {
        test: /\.scss$/,
        loader: 'postcss-loader',
        options: {
-          ident: 'postcss',
-          syntax: 'postcss-scss',
-          plugins: () => [
-            require('postcss-import'),
-            require('tailwindcss'),
-            require('autoprefixer'),
-          ],
+          postcssOptions: {
+           ident: 'postcss',
+            syntax: 'postcss-scss',
+            plugins: [
+              require('postcss-import'),
+              require('tailwindcss'),
+              require('autoprefixer'),
            ],
          },
        },
      },
    ],
  },
};
All webpack.config.js examples are updated to use the new postcssOptions for postcss-loader@4.x.

Top comments (2)
I have this problem when i try to start the app. I follwo exactly all your instructions. Can you please help me? :
Hi looks like you are using
postcss-loaderin version 4.x. Update your webpack.config.js as followsThe blog post has been updated to reflect the changes needed for
postcss-loader4.x