Sometimes, Google Tag Manager can be overwhelming. I do like it when it works, but it requires a lot of tinkering before getting the wanted results. Before I start, I must say that I am not an expert in any way with Google Tag Manager, the suggested approach below is just an example of how one can go about solving an issue we experienced working on a project that used VueJS to present the user with a cookie consent banner. We had to provide the user with the option to opt-out or opt-in from certain groups. The “statistics” group included Google Analytics. There might be a prettier solution, however, most of the articles out there only cover scenarios where the website already uses a service such as Cookiebot, OneTrust or other alternatives.
 Photo by Luke Chesser on Unsplash
Getting started with Google Tag Manager and Google Analytics
Firstly, we need to set up Google Tag Manager into our existing project and import Google Analytics. Bear in mind, it is really important to remove any previous code related to tracking before adding GTM (I will talk about this later). We will start by adding a new account to Google Tag Manager. For account name, you can choose the name of your project, the name of the company you are working for or anything else you like. Make sure to keep it consistent, soon you might end up with a dozen of projects!
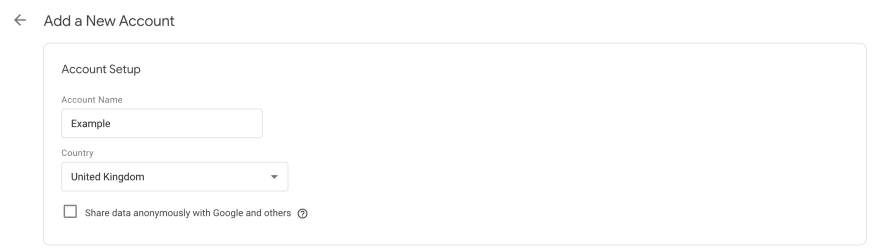 Setup account’s information
The account will be the main holder for the containers. A container is simply a bundle of scripts that will execute following some criteria. An example of having multiple containers for one account is if you want to split the various scripts that will run on the main domain and the subdomain. Therefore, you will setup a container for example.com and staging.example.com . We will also pick Web as a targeted platform. Everything here can be changed later on!
 Setup a container for the current account
After you are done setting up everything, you will be prompted with code snippets that you can directly import into your project.

Note: You do not need the second code snippet if you are not planning on supporting older browser.
However, I prefer using a dedicated package that will act as a wrapper around Google Tag Manager. The package will provide one more level of abstraction. Since the project uses VueJS heavily, I came across this lightweight package https://github.com/mib200/vue-gtm that also automatically loads the GTM script. There are also some additional configuration that you can do, such as enable or disable it based on a condition and more!
npm install vue-gtm --save
and then import it in your main script, in my case app.js
import VueGtm from 'vue-gtm';

Vue.use(VueGtm, {
    id: 'GTM-P42GL2L'
});
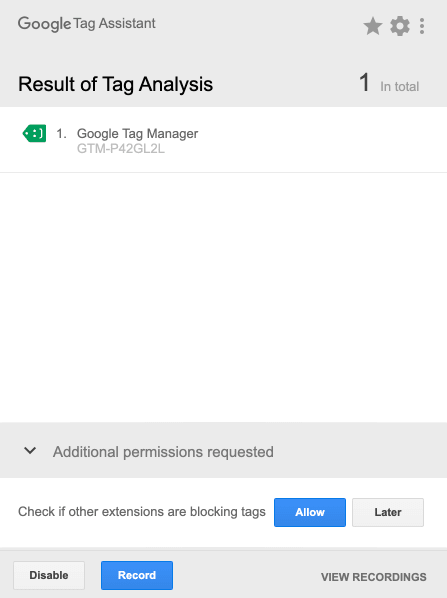
Now, we want to make sure that we only load GTM and nothing else! This is really important, we do not want to track the same thing twice! A neat way to check for this is by using the Tag Assistant extension, available only on Chrome.

Now, navigate to the url of your site and enable the extension (you will probably need to reload when you enable it). You should be displayed with only one tag that has been fired.
However, you might also end up with a “HTTP response code indicates tag failed to fire: Status 404. This could be due to an empty or un-published container”.

The warning is pretty self-explanatory, make sure you publish your container or preview it. Both will work. Make sure your container if published for production!

Now that we have everything up and running, we can add our Google Analytics Tracking ID to GTM (I assume you already have such, it should be in the format UA-XXXXXXXXX–X). To add a script to your site you need to add a tag in Google Tag Manager. Your tag’s configuration should looks as follows:

For a tag to be fired (a script to be loaded) on your website, you need to set up a trigger for it. The trigger that we are going to set will read a value from a cookie and based on that fire the tag. Therefore, if the tag is not fired then the user would not get GA cookies set in the browser. We want to fire the tag on all pages so we will select “Page View” as a trigger. But, we also want to restrict this by checking whether we are allowed to fire the tag or not. This can be done by selecting the “Some Page Views” option and adding a new variable or choosing from the existing ones.

In our case, we would want to make a custom variable that holds the consent value. Now, there are few options that we can pick. The first one is to make a new variable of type “Custom Javascript” and have some code inside that reads from the document.cookie . While this is a realistic approach, it requires placing logic inside GTM, which I am not fan of. A better approach, in my opinion, is to read from a global javascript variable. As far as I know, most of the popular cookie consent services use a similar approach. This global variable can be controlled from the website.


Then, our Page View Trigger should fire only when the user consented to statistics.

We are pretty much done. Now, we only need to add the trigger to the tag we made. On the website, you can present the user with a custom banner, popup or anything else you want. When the user agrees or declines, you can set a cookie which will keep track of the consent. This cookie can be used to set the global variable (every time the page reloads). The good thing now is that GTM does not rely on a cookie, but rather on a global variable that can be set in various ways: local storage, cookies etc.
Conclusion
The amazing part of Google Tag Manager is that it is highly customizable. There are various ways of implementing a GDPR form with it. To finish of, here is a list of great resources where you can explore more about GDPR and GTM:
Analytics Mania https://www.analyticsmania.com/post/gdpr-cookie-consent-notification-with-google-tag-manager/
Sebastian Wismayer https://sebastianwismayer.com/blog/step-by-step-visual-guide-to-gdpr-conform-cookie-consent/
Simo Ahava has an amazing blog dedicated to GTM tips & tricks. I highly recommend checking him out at https://www.simoahava.com/categories/gtm-tips/
Thank you for reading this article! Hope you found it interesting and helpful. You can find me on Twitter (@NikolayTsanov).

Top comments (0)