
Unlike Windows operating systems, a considerable number of packages are installed via CLI on UNIX based operating systems.
Thus, we'll go through installation on git Mac, which happens to be a prominent member of the UNIX related OS.
Shall we get to it 🏂.
Open terminal (CLI) on your Mac
On your Mac, do one of the following:
Click the Launchpad icon in the Dock, type Terminal in the search field, then click Terminal.-
Check if git exist on your machine 💻 already. To do this type the following in your terminal then press enter. If git does not exist, it will prompt for installation.
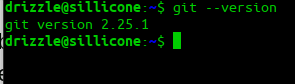
git --version
` Next install brew, the package manager for mac, I'll leave a guide to installing brew in the additional resource section of this post 😚.
-
Once you have brew up and running, enter the following command in your terminal. `
brew install git
` This will download and install git on your machine.
While the process is on, it might be a good time to grab a cup of coffee ☕, we're just getting started 🙂. -
The terminal will inform you once the installation is completed. To verify the installation, type the following in your terminal and press enter.`
git --version
`
This should give an output similar to one in the image below;
Very well then, we just installed git on you machine.
Should you encounter any error, be sure to add them to the comment section, dev.to community got your back so do I

Top comments (0)