As web development professionals, we care about choosing the best framework, the most current library, applying good practices in Javascript and CSS, being careful of the semantics in HTML to improve SEO, we are improving the accessibility of our content, we package and we divide the files to optimize the load... But what about images?
Images on the web
Images are a very important part of the web. Surely with the constant advance of technology and improvemenets in connectivity, in the future the content might be more video-based than image-based. No matter what, our goal of improving user's experience will remain. After all, that's what our work really is about.
According to HTTP Archive, 50% of the data transferred to load a web page are images (JPEG, PNG and GIF). In August 2019, images on mobile represented 911KB of the content loaded for the average 1.8MB site, and on desktop there were 1MB of images on an average site weighting 2MB.

Image Optimization Image eXperience is everyone's business
A few days ago, in the article Performance Web in modern times, Michelangelo wrote about a situation where he had problems planning an activity for the weekend: "Where I should see the movie schedules, it renders white on white. I think it is loading, I am not sure ... the train has arrived and my mobile goes to the pocket. I will try later using another cinema's website...".
It is very likely that the white text of the schedules is set as an overlay of a fantastic and incredible image of a key scene of the last film premiere, perfectly contrasted, perfectly framed to draw the attention of the viewer and show the schedules to watch that great movie ... but, the image has not been loaded.
Let me introduce the term IX, short for Image eXperience. There are several points to consider for a good IX, beyond passing the images through a compressor that promises to optimize our images in the most effective way.
In the development of a website there are several roles, whether in teams, people or someone who exercises more than one of those roles: product, UX, design, development, QA, up to DevOps (or what is now known as SRE) in the deployment phase. Each of these roles has the responsibility of offering the best for the user, providing the maximum value to the product, taking care of the details.
Let's continue with the example of the cinema schedule page that Michelangelo could not see. Given this situation, these are the questions that I ask myself and that could have been used as a checklist in the process of ideation, design, development and deployment of that page:
- Is an image really necessary to offer that information?
- If white text has been chosen in order to keep a high contrast with the background image, why has a background color not been set in case the image is not displayed?
- Is that image optimized for mobile devices?
- If it is an image in JPEG format, why is it not a progressive JPEG, so IX is improved?
- If it is a critical image to highlight the product (in this case it makes perfect sense), why has the preload of that image not been taken into account?
- Has a budget not been defined for the images?
- Has anyone tested using different connection speeds?
As you can see, the optimization of images for the web is not only about choose the percentage of compression when saving an image. There are many things to consider and many people that can intervene and detect a possible failure in a part of the product as critical as the example above.
Explaining all these points in depth would be enough content for a wholee book... Actually, I am already working on it 🤪
Optimization Adventure Time
Given that we want to show images on our site, the most common question is "where do I start to optimize my images?".
Optimization from graphic editors
Graphic editors are first in line when talking about optimization. Software like Photoshop, Affinity Photo, Pixelmator, PaintShopPro, Paint.net or GIMP among others. Let's not forget Sketch, which despite not focused on image editing, it is widely used to create user interfaces(1).
Photoshop
It is the most used image editor by design teams. Interestingly it is not the one that offers more optimization options. In its latest version, CC 2019 features an export dialog window with some improvements to generate images of various densities, as can be seen in the left column, but it does not leave us much choice regarding the image format and configuration parameters.

We can export to PNG, JPG, GIF and SVG (yes, SVG, generates an SVG file with the image embedded using base64)_. Beyond the quality percentage(2) we don't have many configuration parameters to export the images. WebP is not supported.
In previous versions of Photoshop (and in recent ones under the name "Save the Web ... (legacy)"), we can select from some predefined configurations, always according to the criteria of the Adobe team. One of the parameters that I miss in Photoshop is Chroma Subsampling(3) through which we could better optimize the optimization according our criteria. Instead they maintain a subsampling of 4:4:4 (1x1) between the values 51% to 100% of the quality percentage and below 51% apply a subsampling of 4:2:0 (2x2). That is why you can see a remarkable change between an image exported at 51% and the same image at 50%.
Affinity Photo
Affinity Photo is another image editor that is gaining traction among the design community. So let's see what it offers us for exporting images.

We can see that in the export dialog they feature more formats to select from(4), but let's not fool ourselves. From those, we have PNG, JPEG, GIF and SVG that are supported on web browsers. Like Photoshop, it keeps a simple setting to choose the compression level with a slide bar to select values between 1% and 100%.
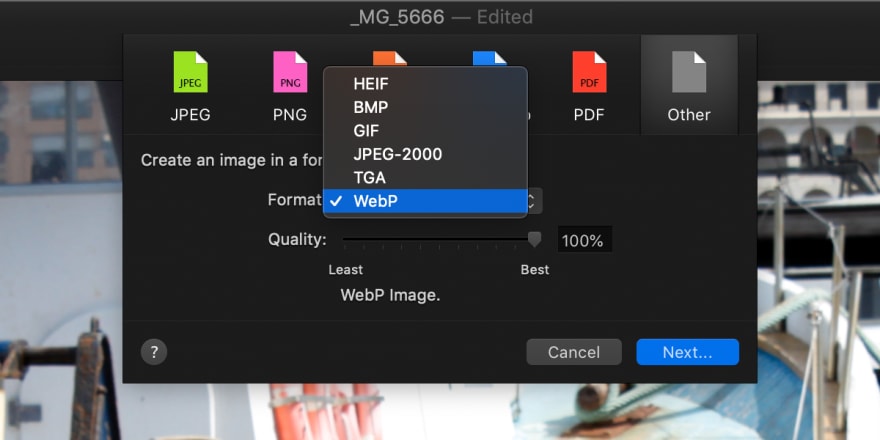
Pixelmator
Pixelmator is a very interesting and economical alternative for image editing. It has the same setting for choosing the compression level as the previous editors, but we can see that they have added the WebP format as an option to improve the optimization of our images. With WebP we can also select the quality percentage(5).
GIMP
GIMP might possibly be the least used tool in the world of design. It is an Open Source tool, with a large community behind it, and that can be seen in the many configuration parameters that we have available in the advanced options when exporting an image.

We can configure more advanced parameters such as smoothing, restart markers, subsampling or DCT method(6). They are configuration parameters that can put us away, and even make us spend a lot of time testing.
Other editors
There are many editors and we cannot analyze them all. Most follow the same approach of showing a value scale to choose the quality loss, with some editors supporting WebP.
Optimization from applications
In the previous section we have analyzed the tools that are usually used by design teams for image editing. A way to go beyond in optimization is using a dedicated desktop application for this goal.
Wait, we have said that IX is everyone's business. Thus, here we will show tools that all roles involved in the development of a product can use. Let's dig into some of these.
If you are in a Mac environment, the best option (IMHO) is ImageOptim(7) by Kornel Lesiński and it's also free.
Like most desktop applications in Mac environments, one of the features that makes it stand out is a simple appearance, yet very powerful and professional.
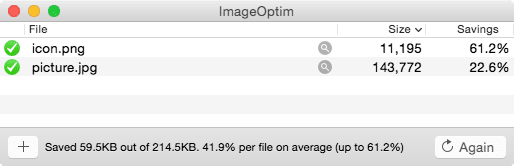
By simply dragging an image, a group of them or a folder, the application starts working, optimizing all the images. Keep in mind that what you do is replace the original image with the optimized one. That is a topic that I would like to comment on, but we will see it in the next section.
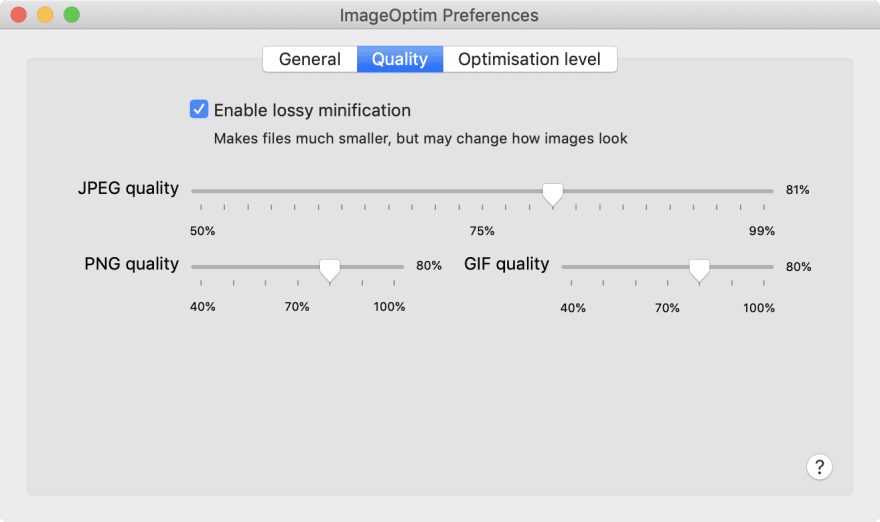
The default setting offers a compression of the images without loss, that means we won't see any visual changes, but we will reduce the size. We have the option to check the Enable loss and minification checkbox to select quality percentages for optimization with quality loss.
One of the things I like most about ImageOptim is that behind its simplicity it hides a list of compressors(8) to get the best results in each case. It goes through each of the compressors that we have marked in the list on each of the images and picks the image with the best result. That process takes a while, but I can assure you it is worth it.

There are alternatives to ImageOptim for Windows and Linux as we can see on their own web.
I leave you reference of other applications (for Mac) that you can try. Many of them are not free, but have trial versions for a few days.

Of these alternatives, the one I like is Optimage. On their web they promise it is more effective(9) that ImageOptim. It is a more complete application, since it allows us to change the image format, change its dimensions, we can configure the output folder and add prefix/suffix to not overwrite the original images. JPEGmini Pro is very focused on the world of photography, and really achieves very impressive results.
Optimization from CLI tools in local
We also have interesting options for more tech-savvy people who want to control the configuration based on parameters and automate the optimization of images. We can install and configure the native compressors(10), the vast majority in C, as is the case of MozJPEG or WebP(here we have it precompiled).

Example of CLI command to compress an image with MozJPEG

Example of CLI command to convert a JPEG image to WebP
We also have npm packages that offer us a wrapper with a much simpler API and that we can integrate into our Javascript application workflow.
One of these packages is next-optimized-images with options that go far beyond compressing the images, as it contains other packages as a dependency which can generate LQIP(11) images with lqip-loader or responsive-loader that generates the different sizes of the responsive images that we need on our site. It uses several packages of imagemin for image optimization so let's take a look at it.
imagemin
Imagemin is not a GitHub repository, but an organization with all the repositories (37).
It is a very modular system, and its base package imagemin has 3 encoders (JPEG, SVG and WebP) defined as dependencies, but we can add all we need.
We will see that there are a couple of patterns in the names of the repositories of this organization:
- image-[compressor], such as image-webp that has the module or plugin to work with WebP images.
- [compressor]-bin, such as cwebp-bin that contains a compiled version for each of the supported operating systems.
This approach makes it a very versatile solution, since the modules can be maintained, updated and published separately.
It can be used both as CLI (Command Line Interface) with imagemin-cli and from Javascript. Here you will find examples of implementation in mpm, Gulp and Webpack from some exercises of a course I taught at Escuela IT. In these examples you can see that I always keep the original image, to be able to compress always from the original image and not re-compress an image that has already been compressed, and sometimes by another compressor.
It is not a good idea to do recompress an image. In this video you can see an example of what happens when doing it:
The format with the best results is FLIF(12), but it is a format that is not supported by current browsers, so MozJPEG could be a viable option. But as I said, I prefer to keep the original image, in PNG if possible, to preserve all the information and generate from it, the compressed image and/or change of format.
Imagemin is the most comfortable option if what we want is to automate the compression of the images in the process of production. Both because of the amount of plugins, and for the ease of integrating them into our stack.
Take into account the time to find the correct parameters for the best result, since each imagemin plugin has its own scale of values for optimization (it might ring a bell, since the same happens in image editors).
Optimization of images with third-party online services
Another option is to use an online service such as Cloudinary, imgix, Fastly's Image Optimizer, ImageOptim API or Kraken. These services offer us much more than optimize, resize or change their format, like a cache service and CDN. This is an option to consider if our product is visited from different parts of the world.
Each of them has its own functionalities, advantages, configurations and integrations, butbeing a Cloudinary MDE I will talk about Cloudinary 😊
To know more about Cloudinary's features you can check the web. I want to talk about the features that I like, which I think provide value, both for us as demanding developers and for the IX.
Let's start by saying that in the plans they offer there is a free one that we can use to try the service without many limitations.
Image Optimization
We can optimize both the images that we upload to the Media Library on our account with the /upload/ method, as well as with remote images, with the /fetch/ method(13)

For this example we will use the API using the url

Between the type /upload/ and the image version /v1570203279/, we have the transformation methods, in this case I have put f_auto, which refers to automatic format(14). This parameter will deliver the image in the best possible format according to the client's request. If our client supports WebP, it will deliver WebP. If our client supports JPEG 2000, as it is the case of Safari, it will consider it, regardless of the original image format.
Let's look at an example.

In the image we see an example of one of the images on the Cloudinary website, in this case homepage-XX.png, there are requests for the different Media Query sizes because I have forced it. The original image is in PNG format and we can see that although the request made by HTML is .png, Cloudinary delivers a WebP image for Chrome and Firefox, and in the case of Safari it delivers a JPEG 2000 format. The JPEG 2000 format is larger than WebP, but Safari currently does not support that image format, instead it receives a JPEG 2000 image that it can render and that is smaller than JPEG and the original PNG.
Responsive images
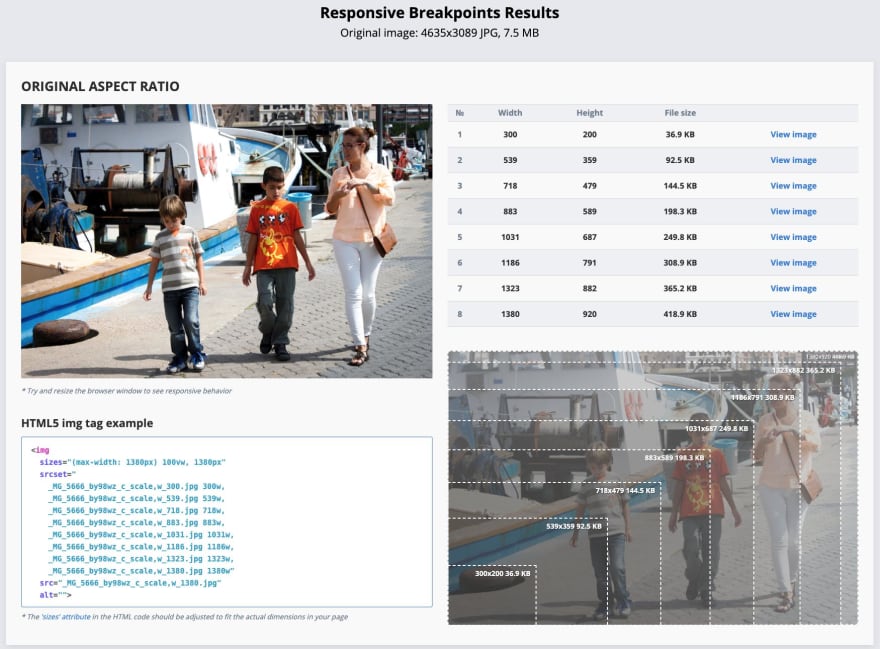
The optimization of the images not only has to do with the compression and quality of the image, we must also consider delivering them to the correct dimensions according to the device, pixel density(15) and media queries. Here, Cloudinary pleasantly surprises us again with Responsive Breakpoints Results, a tool to generate all the images and the code to create the media queries we need.
Implementation, scalability and integration
Another thing I like about Cloudinary is the great support they offer for different SDKs for implementation: HTTPS/HTTP, Ruby, PHP, Python, Node.js, Java, JS, jQuery, React, Angular, .Net, Android and iOS. We also have them available Open Source.
Their add-ons make the solution scalable. We can activate (these are paid) services for Auto-Tagging with Machine Learning, remove the background of the images with Cloudinary AI Background Removal or apply style transfer with Neural Artwork Style Transfer.
As for integration, it is very interesting to see that we can integrate through CMS-eCommerce integrations with Salesforce Commerce Cloud, Magento, Wordpress or Zapier.
This does not end here
There are many features, add-ons, plugins, and tools. If you want to have a simple and visual guide of the highlights of Cloudinary, here is a website where you can play with the API and some of the photos that were taken at the JS Camp 2019, CloudiCam.dev
One more thing
Other online services
There are many online services to compress images which usually compress the images one by one, and not by batch as desktop applications do. I just want to comment a couple of them that I find interesting:
- Squoosh. What I like about this application is that it runs entirely in the browser. It has been developed by the engineers at Google, it is open source and uses WebAssembly to run the [codecs] in the browser binaries](https://github.com/GoogleChromeLabs/squoosh/tree/4a01d0d548bf51e75ddb1d9e3d0259b5ab1c87b5/codecs) written in C or C ++.
- Compress-Or-Die uses the traditional format of running compression on the server side. What I like is that it offers many customization options, all of them documented, with very good results. It also includes an image analyzer with very detailed image information.
Ooops! Do not forget to optimize any image
It is very easy to make the (unconsciously) mistake of not optimizing our images, but we have an option to integrate one of the following tools.
ImgBot
A service to optimize images based on Magick.NET (a .NET library for ImageMagick) that we can integrate with our GitHub repository. We can configure it to indicate how often it will parse our images, define folders, images or extensions to ignore, as well as the level of compression. The most interesting thing is that it generates a Pull Request with the suggestion of optimized images.
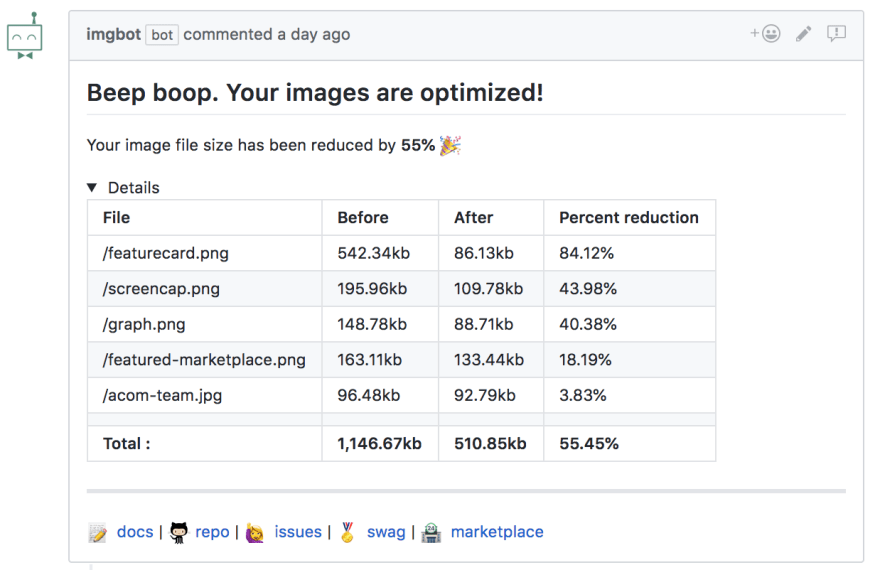
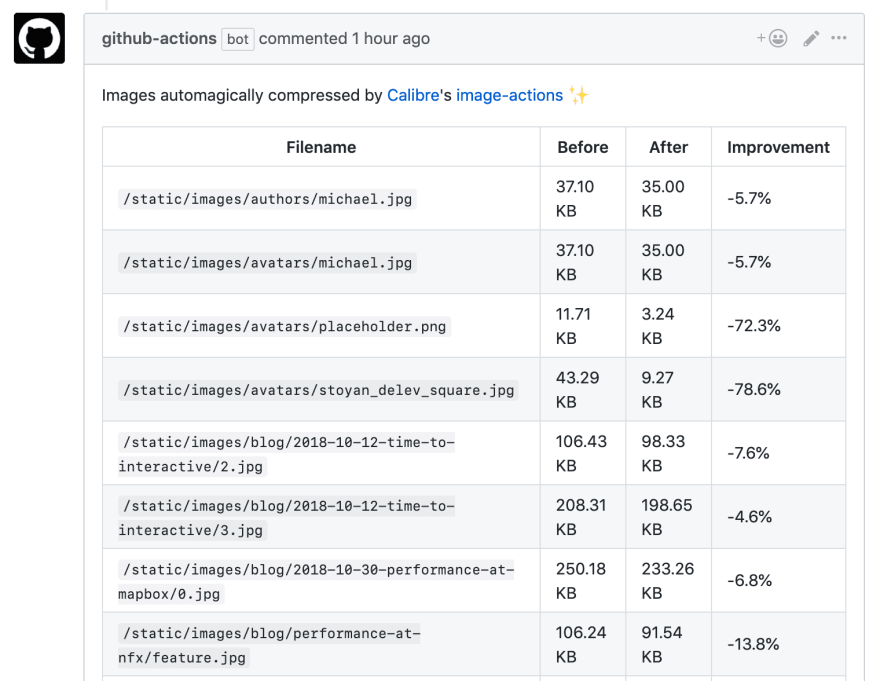
image-actions
With the recent release of Actions from GitHub, the people of Calibre have worked on a solution similar to that of ImgBot. The philosophy is the same, generate a Pull Request with optimized images.
The shoemaker's son...
All the images in this article have been optimized with ImageOptim, mostly in format PNG as they are screenshots with text. PNG is the ideal format to maintain quality and not generate noise around texts.
List of optimized images with ImageOptim(16):

Resources
- Essential Image Optimization, I think it is the best and most complete image optimization guide, maintained by Addy Osmani.
- Tools for image optimization
- ImageOptim-CLI
- Benchmarks of Image Optimization Tools
- Native image lazy-loading for the web!
- Optimization of images
- 5 steps to speed up your image heavy website
- State of the Web: Top Image Optimization Strategies
- Converting Images To WebP
- How To Create and Serve WebP Images to Speed Up Your Website
- Use Imagemin to compress images
- Low Quality Image Placeholders (LQIP) Explained
- JPEG Compression Algorithm
- Finally understanding JPG
- Finally understanding PNG
Image and Video Optimization Course
Finally, I want to share that I am working on an online Optimization course Images and Videos.

Notes
- (1) I add Sketch as an application to export images since in mobile application environments it is more common to use PNG files for the application interface. In general, in web environments, the interfaces defined in Sketch end up being represented with CSS in a simple way.
- (2) Each editing program, compression application or compressor by command line, has its own scale of values to measure the quality of compression. This makes a fair comparison between different programs virtually impossible. Here is an article How to compare images fairly of Kornel Lesiński where he talks about it.
- (3) You can investigate more about the impact of Subsampling (Chroma Subsampling in English) here Chroma (or Color) Subsampling
- (4 ) In Photoshop, if instead of exporting we select "Save as ...", it offers a large number of image formats "Graphic file formats", most not compatible with browsers.
- (5) WebP is a lossy image format that sacrifices a lot of quality, so I recommend validating the image quality in low quality percentages
- (6) GIMP has very documentation well, in the [Save/export images] section (https://docs.gimp.org/2.10/es/gimp-images-out.html) we will have all the details of the parameters that we can configure in this window.
- (7) If you look for ImageOptim in the App Store, you will find an application called Image optimizer Compression, which is not the application ImageOptim we are talking about.
- (8) In the list of compressors that ImageOptim uses is Guetzli from Google. It is a very effective compressor quality/weight of the images, but it is extremely slow in the process. If we select that compressor in the configuration, ImageOptim will notify us with a very deterrent message "It can take up to 30 minutes per image. Your system may not respond while Guetzli is running."
- (9) I am working in a comparison of those applications, stay tuned to twitter.
- (10) I leave you a link to the repository images-optimization-env where you can do compression tests with native compressors on Mac (I compiled the source codes on my machine). I used npm only to manage the scripts, so it doesn't require installation.
- (11) My partner and friend José M. Pérez tells us about this technique in the article How Medium does progressive image loading (October 2015)
- (12) FLIF is the acronym for Free Lossless Image Format, a new lossless image format with a few ratios Very interesting compression, you can find more information on the official website flif.info.
- (13) Cloudinary Delivery Types
- (14) Cloudinary Supported image formats.
- (15) Pixel density(Wikipedia).
- (16) In the column Best tool we can see the codec or combination of codecs used for compression. By default this column is not visible, you can add it with the right button (context menu) in the column header.

Top comments (0)