
After we successfully deploy a PHP application in cluster environment, we still need some efforts to make the application to be stateless. One of them is building centralized session management. In this post, I will demonstrate how we can provision an Amazon DynamoDB table using AWS CDK and how to configure our application to securely use the created table for session storage. I will also demonstrate how to set up the local environment to test the session using Docker compose and Localstack.
This post is part of series Building Modern PHP/Yii2 Application using AWS (or see here for Indonesian version).
By default, PHP will store its session into local directory, usually in /tmp for Linux distributions. Since we are using load balanced multiple PHP applications, this can cause problem. We cannot really guarantee a single user will access the same application that will access the same file. Yes, we can set the Application Load Balancer to use Sticky Session so the load balancer can use cookie to target same instance for the same user. But consider when container stops because autoscaling suddenly scale down or case of the container fails. This will log users out who are still using that instance and cause bad experience.
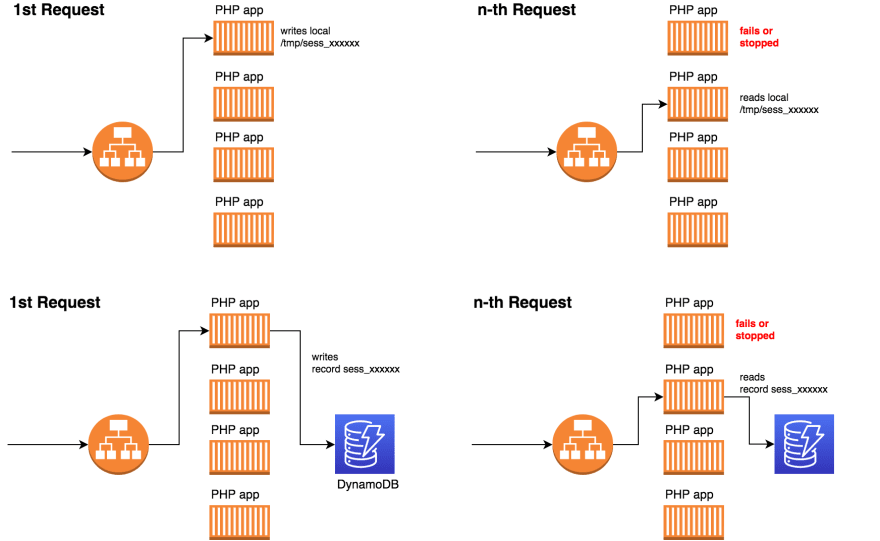
To solve this, we are going to use DynamoDB as a centralized session storage. Since DynamoDB is a fully managed key-value database and it can delivers within single-digit miliseconds, it is a fitting solution for this challenge.
Using Session in Yii2
We are going to pick up from previous article where we create CI/CD Pipeline. You can access the code here.
In order to use session feature in Yii2, we will use predefined session from Yii application components. We can set a value into the component and the value will persist during the user's sessions.
The following code shows a controller where we are going to demonstrate using sessions.
Controller TestController will be able to receive query parameter name. If we pass a value with the query parameter name, it will save into the session. Otherwise it will get the previously set sessions. The controller will output the value stored in the session and the ID of the session.
After that we will enable routing so that we can access the controller through path /test/index. Add the following configuration to override the default urlManager component..
//file: /config/web.php
//put this in the `components` list of values.

//  'components' => [
//      .....
        'urlManager' => [
            'enablePrettyUrl' => true,
            'showScriptName' => false,
            'rules' => [
            ],
        ],
We can try deploying the new code using CDK command deploy. (I changed the stack name to MyWebStack to differentiate between the stack in the previous article).
cdk deploy MyWebStack
You can test by accessing URL <URL>/test/index, try setting the query parameter name using URL <URL>/test/index?name=foobar, and try the URL without query paramater. Note that sometimes the foobar shows up in the browser, but sometimes it does not.


DynamoDb Session Class
Fortunately for us, AWS SDK for PHP already provides an interface to use DynamoDB as session handler for PHP with class Aws\DynamoDb\SessionHandler. This class implements the core PHP interface SessionHandlerInterface. Yii2 also provides a nice binding with the SessionHandlerInterface with its class yii\web\Session which is the default class for session. We just need to pass the instance of DynamoDb SessionHandler to handler attribute of Yii2 Session class.
To install AWS SDK PHP composer dependencies, execute the following command.
composer require aws/aws-sdk-php
We then need to create a Session class to wrap the session access. The class will extends yii\web\Session, instantiate the SessionHandler from DynamoDB client, and pass it to handler.
Setting Up Local Environment
Now we are going to test this in the local environment. We are going to use Localstack docker image to mock DynamoDb. Localstack provides various mocks for AWS services, but here we are going to use only DynamoDb. This way, we don't need to test in the AWS environment that can take sometime to wait.
The DynamoDb will be accessible through url http://localstack:4569. We will set this in the environment variables alongside the Table name. We also need to provide fake AWS credentials and region in the environment.
environment:
  AWS_REGION: 'ap-southeast-1'
  AWS_ACCESS_KEY_ID: 'fake-access-key'
  AWS_SECRET_ACCESS_KEY: 'fake-secret-key'
  DYNAMODB_SESSION_TABLE_NAME: 'Sessions'
  DYNAMODB_ENDPOINT_URL: 'http://localstack:4569'
To initialize the DynamoDb table for storing sessions we will use the script below. The script will create a new DynamoDb table in the localstack. The table will be called Sessions and will have one hash key named id. It should be executed after the docker compose run.
Configuring Local Access
The following code will override the default session component to use our Session class. It will obtain the environment variables AWS_REGION, DYNAMODB_ENDPOINT_URL and DYNAMODB_SESSION_TABLE_NAME to the class so the class can pass it to the DynamoDB client and session handler.
//file: /config/web.php
//put this in the `components` list of values.

//  'components' => [
//      .....
        'session' => [
            'class' => app\components\Session::class,
            'clientConfigs' => [
                'version' => '2012-08-10',
                'region' => $_ENV['AWS_REGION'],
                'endpoint' => $_ENV['DYNAMODB_ENDPOINT_URL'] ?? null
            ],
            'sessionConfigs' => [
                'table_name' => $_ENV['DYNAMODB_SESSION_TABLE_NAME']
            ]
        ]
The final configuration will look like below.
Running in Local
We now have all the things we need to run the local environment. Execute this command to run the application.
docker-compose up -d
You may want to wait until all the containers complete the start up. Then execute this command to initialize the session table.
docker-compose exec localstack sh ./localstack-setup.sh
The site can be accessed in the http://localhost:8080. You can try the test controller by http://localhost:8080/test/index and http://localhost:8008/test/index?name=petra. Of course the session will be persistent since we only have 1 server to access.
Writing CDK Code
We are going to write the CDK code to provision DynamoDB table to store the sessions. But first we need to install the DynamoDB CDK module in the Node packages.
npm update
npm install @aws-cdk/aws-dynamodb
Here we only need to update the WebApp construct. The final code will look like this.
Now the code explanation.
The following code will provision a new Table with a single partition key called id and type String. This id attribute will store the session ID.
    private createSessionTable(): dynamodb.Table {
        return new dynamodb.Table(this, 'Sessions', {
            partitionKey: {
                name: 'id',
                type: dynamodb.AttributeType.STRING,
            }
        });
    }
After that, the following code will grant permission for the Fargate task's Task Role to update and write session to DynamoDB. We only need five permissions for this GetItem, UpdateItem, DeleteItem, Scan, and BatchWriteItem.
const actions = [
    "dynamodb:GetItem",
    "dynamodb:UpdateItem",
    "dynamodb:DeleteItem",
    "dynamodb:Scan",
    "dynamodb:BatchWriteItem"
]
this.sessionTable.grant(taskDefinition.taskRole, ...actions);
Finally, in the following code, we will pass through the environment variable AWS_REGION the region for the DynamoDB client to resolve and DYNAMO_SESSION_TABLE_NAME for the created DynamoDB table name.
taskImageOptions: {
    image: ecs.ContainerImage.fromAsset('.'),
    environment: {
        AWS_REGION: region,
        DYNAMODB_SESSION_TABLE_NAME: this.sessionTable.tableName,
    }
},
To apply this new resources and configurations, execute the following command.
cdk deploy MyWebStack
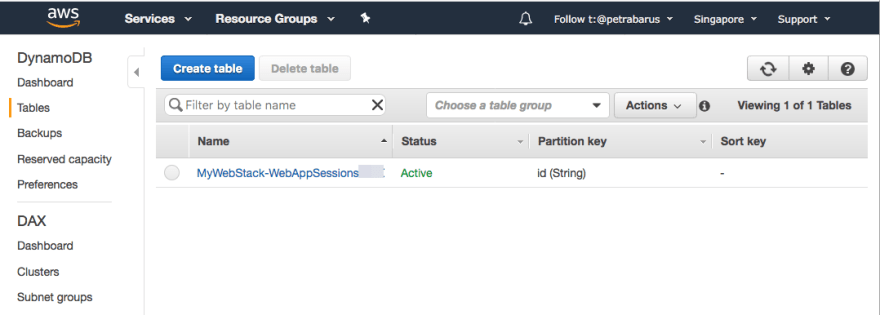
If you open the DynamoDB console, you can see the created new Table.
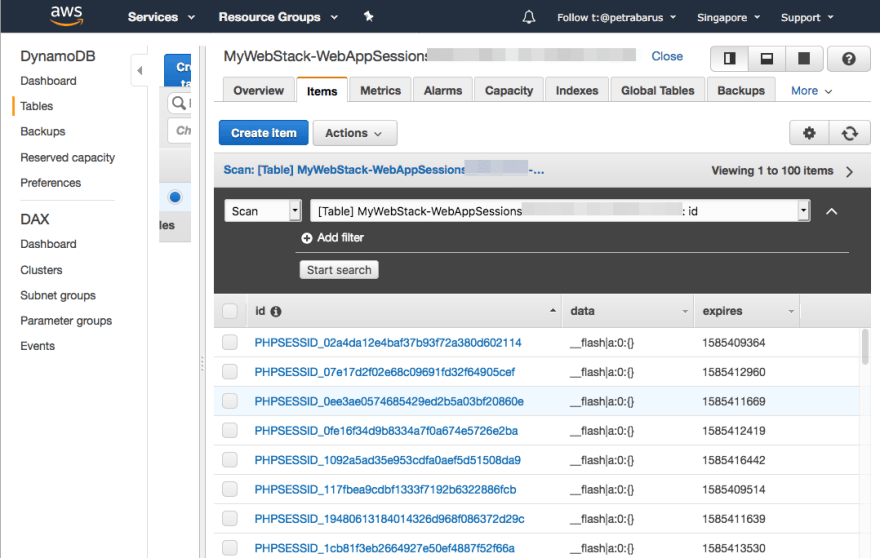
You can see the sessions are already filling up.
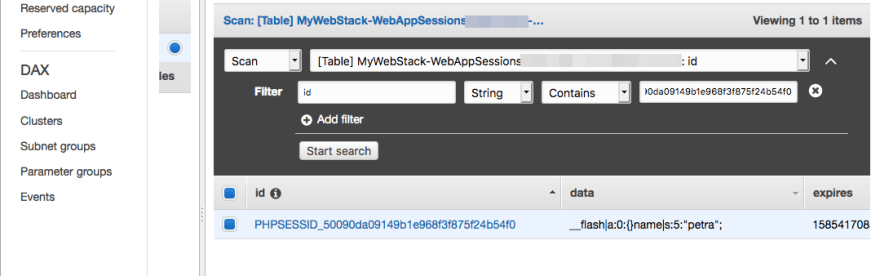
You can check the assigned value from the application by scanning the record ID of the row with the session ID. The image below shows that we have set name in the data attribute.
Wrapping Up
That concludes the tutorial on how to use DynamoDB for sessions storage. NOTE If you are still experimenting with this, please don't forget to destroy the resources by executing cdk destroy to avoid incurring cost.
I hope the explanation helps your development effort. I will remind you that this post is part of series Building Modern PHP/Yii2 Application using AWS. If there is any use cases that you would like to see me cover, please don't hesitate put it in the comments. Looking forward for the next post!

Top comments (0)