Overview
In this article, I will create a Doctor Consult android application in which I will integrate HMS Core kits such as Huawei ID, Crash and Analytics.
Huawei ID Service Introduction
Huawei ID login provides you with simple, secure, and quick sign-in and authorization functions. Instead of entering accounts and passwords and waiting for authentication, users can just tap the Sign in with HUAWEI ID button to quickly and securely sign in to your app with their HUAWEI IDs.
Prerequisite
- Huawei Phone EMUI 3.0 or later.
- Non-Huawei phones Android 4.4 or later (API level 19 or higher).
- HMS Core APK 4.0.0.300 or later
- Android Studio
- AppGallery Account. App Gallery Integration process
- Sign In and Create or Choose a project on AppGallery Connect portal.
- Navigate to Project settings and download the configuration file.
- Navigate to General Information, and then provide Data Storage location.
App Development
- Create A New Project.
- Configure Project Gradle.
- Configure App Gradle.
- Configure AndroidManifest.xml.
- Create Activity class with XML UI. MainActivity:
public class MainActivity extends AppCompatActivity {
    Toolbar t;
    DrawerLayout drawer;
    EditText nametext;
    EditText agetext;
    ImageView enter;
    RadioButton male;
    RadioButton female;
    RadioGroup rg;
    @Override
    protected void onCreate(Bundle savedInstanceState) {
        super.onCreate(savedInstanceState);
        setContentView(R.layout.activity_main);
        drawer = findViewById(R.id.draw_activity);
        t = (Toolbar) findViewById(R.id.toolbar);
        nametext = findViewById(R.id.nametext);
        agetext = findViewById(R.id.agetext);
        enter = findViewById(R.id.imageView7);
        male = findViewById(R.id.male);
        female = findViewById(R.id.female);
        rg=findViewById(R.id.rg1);

        ActionBarDrawerToggle toggle = new ActionBarDrawerToggle(this, drawer, t, R.string.navigation_drawer_open, R.string.navigation_drawer_close);
        drawer.addDrawerListener(toggle);
        toggle.syncState();
        NavigationView nav = findViewById(R.id.nav_view);
        enter.setOnClickListener(new View.OnClickListener() {
            @Override
            public void onClick(View view) {
                String name = nametext.getText().toString();
                String age = agetext.getText().toString();
                String gender= new String();
                int id=rg.getCheckedRadioButtonId();
                switch(id)
                {
                    case R.id.male:
                        gender = "Mr.";
                        break;
                    case R.id.female:
                        gender = "Ms.";
                        break;
                }
                Intent symp = new Intent(MainActivity.this, SymptomsActivity.class);
                symp.putExtra("name",name);
                symp.putExtra("gender",gender);
                startActivity(symp);

            }
        });
        nav.setNavigationItemSelectedListener(new NavigationView.OnNavigationItemSelectedListener() {
            @Override
            public boolean onNavigationItemSelected(@NonNull MenuItem menuItem) {
                switch(menuItem.getItemId())
                {
                    case R.id.nav_sos:
                        Intent in = new Intent(MainActivity.this, call.class);
                        startActivity(in);
                    break;

                    case R.id.nav_share:
                        Intent myIntent = new Intent(Intent.ACTION_SEND);
                        myIntent.setType("text/plain");
                        startActivity(Intent.createChooser(myIntent,"SHARE USING"));
                        break;

                    case R.id.nav_hosp:
                        Intent browserIntent = new Intent(Intent.ACTION_VIEW);
                        browserIntent.setData(Uri.parse("https://www.google.com/maps/search/hospitals+near+me"));
                        startActivity(browserIntent);
                        break;
                    case R.id.nav_cntus:
                        Intent c_us = new Intent(MainActivity.this, activity_contact_us.class);
                        startActivity(c_us);
                        break;

                }
                drawer.closeDrawer(GravityCompat.START);
                return true;
            }
        });
    }


}
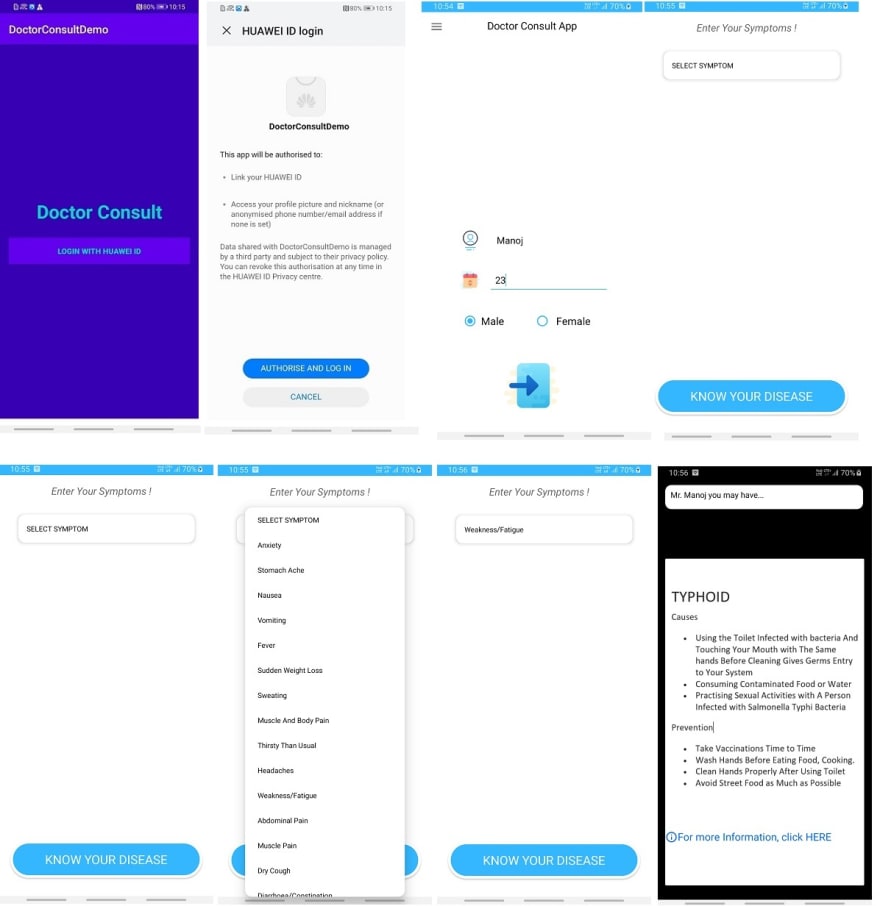
App Build Result
Tips and Tricks
Identity Kit displays the HUAWEI ID registration or sign-in page first. You can use the functions provided by Identity Kit only after signing in using a registered HUAWEI ID.
Conclusion
In this article, we have learned how to integrate Huawei ID in Android application. After completely read this article user can easily implement Huawei ID in the Doctor Consult application.
Thanks for reading this article. Be sure to like and comment to this article, if you found it helpful. It means a lot to me.
References
HMS Docs:
https://developer.huawei.com/consumer/en/doc/development/HMSCore-Guides/introduction-0000001050048870

Oldest comments (0)