
I’ll be guiding you through some fundamental artisan command creation implementations. Our objective is to develop an artisan command that sends email to every active user in the database.
Artisan is the command line interface included with Laravel. Artisan exists at the root of your application as the artisan script and provides a number of helpful commands that can assist you while you build your application.
Let's get started.
Step 1: Modify the User Migration Schema
I’m assuming that you just created a fresh Laravel application. Let’s add a new column to the user migration file, which Laravel has already produced.
Go to the users migration and modify accordingly.
Schema::create('users', function (Blueprint $table) {
    $table->id();
    $table->string('name');
    $table->string('email')->unique();
    $table->timestamp('email_verified_at')->nullable();
    $table->string('password');
    $table->boolean('is_active');
    $table->rememberToken();
    $table->timestamps();
});
I added the boolean column “is_active” which indicates whether the user’s account is active or inactive.
Then run the php artisan migrate to run your migrations.
Step 2: Generate fake user data and seed data
We will need to generate fake data for the user table. The UserFactory class is already created by Laravel upon installation.
Go to database\factories\UserFactory.php and make modifications to it. I will be adding the key-value pair ‘is_active’ =>fake()->boolean().
public function definition()
{
    return [
        'name' => fake()->name(),
        'email' => fake()->unique()->safeEmail(),
        'email_verified_at' => now(),
        'is_active' =>fake()->boolean(),//generate 1 or 0
        'password' => '$2y$10$92IXUNpkjO0rOQ5byMi.Ye4oKoEa3Ro9llC/.og/at2.uheWG/igi', // password
        'remember_token' => Str::random(10),
    ];
}
Next, we go to the database\seeders\DatabaseSeeder.php and uncomment the following:
\App\Models\User::factory(10)->create();// add 10 records to the user table
Then we can run php artisan db:seed to seed our data.
Step 3: Generate a command and define appropriate values.
Create a new command by running
php artisan make:command SendMailToActiveUsers.
Go to the newly created command class, app/Console/Commands/SendMailToActiveUsers.php and define appropriate values for the signature and description properties of the class. These properties will be used when displaying your command on the list screen.
The signature property also allows you to define your command’s input expectations. Modify your signature and description properties.
protected $signature = 'send:active-user-mail';
/**
* The console command description.
*
* @var string
*/
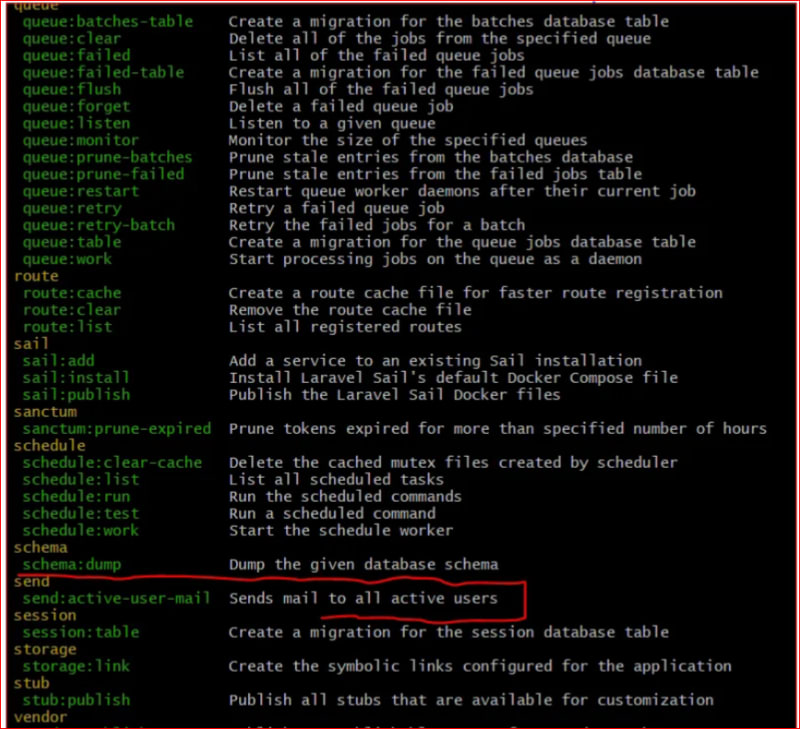
protected $description = 'Command sends mail to all active users';
Now you can view your newly created command by running the php artisan list command to view the list of all commands.
Step 4: Generate Mailables class
I will be generating Markdown Mailable. The Markdown mailable messages allow you to take advantage of the pre-built templates and components of mail notifications in your mailables. Run the command.
php artisan make:mail ActiveUser — markdown=emails.active-user
The command above will create the app/Mail/ActiveUser.php class and a blade file, resources/views/emails/active-user.blade.php.
Note: You can customize the blade template message with any text of your choice. Also configure Laravel’s email services via your application’s config/mail.php configuration file.
Step 4: Implement logic
- First, I’ll place DB-related functionality into Eloquent models by defining the query constraints in the User model class using the Eloquent local scope. In app/Models/User.php, define the following method:
/**
 * Scope a query to only include active users.
 */
public function scopeActive($query): void
{
    $query->where('is_active', 1);
}
- Second, I will implement my logic in the SendMailToActiveUsers class handle method (created in step 3).
Modify the handle method in app/Console/Commands/SendMailToActiveUsers.php to this
use App\Mail\ActiveUser;
use App\Models\User;


public function handle()
{
    $activeUsersEmail = User::active()->pluck('email');
    foreach ($activeUsersEmail as $user) {
        Mail::to($user)->send(new ActiveUser());
    }
    return Command::SUCCESS;
}
Explanation
The active scope methods were used when querying the user model. The pluck() method retrieves a collection of values from a single column of the database table, in this case, the email column of the active users. It returns a Laravel collection containing only the values of the email column of the active users.
Send individual emails in a loop by passing an instance of your mailable class to the send method
Note: There are a few ways to improve this technique so that fewer requests are made to your mail server. You can batch process the email sending procedure to send emails instead of sending each one one at a time in a loop. To outsource the email sending process, you may also think about leveraging Laravel’s queueing system.
Test
Run php artisan send:active-user-mail to send mail.

Top comments (0)