![Cover image for The GitHub Mechanics Behind Contributing to Open Source Documentation - [Step by Step] 🛠️🚀](https://media.dev.to/cdn-cgi/image/width=1000,height=420,fit=cover,gravity=auto,format=auto/https%3A%2F%2Fdev-to-uploads.s3.amazonaws.com%2Fuploads%2Farticles%2Fgy412kyzj0uhjv2mmwo5.png)
tl;dr
- Read the project's documentation and utilise your "beginner eyes" to find improvements
- Copy the entire project: Fork + Clone the repository
- Add your changes + save them
- Make sure the main repo and your repo are in sync repos - if not, use: git pull + git stash
- Update your changes from your local computer to your online repository: git push
- Submit your contribution: create your pull request
- Get yourself a nice cold beer and wait for maintainers to review your PR 🍺
Hey friends 👋,
Did you ever felt that twinge of excitement when you stumbled upon a cool open-source project and thought, “Ahhh I wish I could contribute but I’m just not that good yet…” 🤕
Well, my job today will be to try to prove you wrong… and I think I might succeed (sorry but not sorry 💚).
In case you didn’t know, a solid start to contributing to open source usually happens when developers help contribute to the project’s documentation.
In this article, you will learn:
- How to contribute to documentation by raising a pull request
- Concept of
git pullandgit stashwhen some edge cases happen.
After completing this, you can visit quine.sh, which helps you discover open-source projects to contribute to. It matches projects based on your preferred topics and programming languages (here's a short playlist to let you know how to use it). The use of it is completely free. 🫶
Note: Your contributions are subject to the approval of the project's maintainer(s). You will wait for the answer from the maintainer(s) who could either accept, decline or ask for changes to your contributions. 😀
Today, you will submit your pull request to React’s documentation - one of the most famous front-end JavaScript libraries.
However, you can pick any project of your liking and follow the below steps. 🙃🪄
Everything you see on the React Documentation is written in a file on GitHub, which illustrates the point of open source. You can change what appears on the official website by uploading changes to a GitHub file - I find that quite mind-blowing! 🤯
Are you a little bit nervous to get started? Don’t worry, I got you. 🤝
Requirement: If this is the first time you have contributed to anything on open source, you must read and do the steps shown in this article (alternatively, you can watch the Youtube video). This will take you only 10 min. 🧢
WARNING ⛔️: Git is your essential tool for open-source contributions, linking your local computer to GitHub via your terminal. Struggling with Git is NORMAL! If issues arise when following the step-by-step, don't hesitate to consult Google, ChatGPT, or StackOverflow. Remember, virtually every coder encounters Git challenges. 🫶
For the 95% of us that prefer videos instead of text, find the below video to assist you in contributing! 🌟

👩💻 Step-by-Step
1. Read the Documentation
1️⃣ Go to React Documentation.
2️⃣ Utilise your fresh pair of eyes to find typos or areas that could be improved. Since it is your first time reading the documentation, find when things start becoming unclear, and consider if some improvements could be made. This is something that is very hard for existing contributors to discern.
In the spirit of learning about the mechanics behind contributing to documentation, I will utilise an example of changing only one sentence. However, it is best to focus on finding typos and actual documentation contributions to maximise your chances of getting your contribution accepted by the project maintainers. 🚀
3️⃣ Once you found the area you want to modify, head to React GitHub repository to find the original code file. Copy React’s documentation sentences/paragraphs where you want to add modifications and paste them into GitHub’s search bar. Choose the option Search in this repository.

At this point, you have found the exact file where the source code is based - keep a note of it for later on.
2. Fork and Clone React Repo = Copy Repo onto my own GH and local computer
1️⃣ Head back to the main react page and fork the repository.
2️⃣ Open your terminal and navigate to the folder (also called directory in technical terms) of your choice.
3️⃣ Copy the HTTPS link from the repo by clicking on the double square shown below.
4️⃣ Clone the repo by running git clone PASTE-YOUR-HTTPS-LINK-HERE inside your terminal. Now you have a local copy of React on your local computer 💻
3. Add Your Changes and Save Them
1️⃣ Before going further, read the “CONTRIBUTING.md” page guideline and the “Code Of Conduct. This is a super important step as you sometimes learn about specific rules that each repo has when contributing. Note: React’s README page is perfect for going through in details contributions and this can be used for future contributions.🫡
2️⃣ Now open the react project with your favourite coding environment.
3️⃣ Find the file you want to modify using the file path from step 1.4. In my case, it was src/content/learn/index.md
4️⃣ Add your changes and save them.
5️⃣ Review your changes by running on your terminal git diff. At this point, you will see what changes you have made and should be ready to commit!
You can jump straight into step 6 - if you want to. However, I would like to make sure you can handle some edge cases, such as when the original React repository on GitHub changed while you have made changes. 🤔
4. Check your Online GitHub Repo is the same as the main react repo
You are about to update what is in your local computer into what is on your online forked GitHub repo - yayyyy!
However, the right thing to do is head online to your GitHub repo and ensure you have the latest version of react official’s repo. This is because sometimes, while you are working, the main repository could have gotten some changes, so it is in your best interest to ensure you have the most up-to-date version.
To go about it, it is straightforward: head over to your online repo and click on “Sync fork”. If you are behind on some of the changes, GitHub will automatically update your version to the latest version.

5. If not in Sync → use Git Stash
To proceed, you need to understand the concept of git pull. 👇
When you run the git pull command in your terminal, you check if someone else has changed any part of the file you've been working on. If the original repository has changed, you make sure with git pull that you “pull the latest updates” into your computer. This lets you keep your code up-to-date with the latest changes from the remote repository.
In other words, running git pull is a way to check if someone else has changed the same lines of code and bring those changes into your version of the project.
Now your turn: 🪄
1️⃣ Run in your terminal git pull to ensure you are up-to-date with the repo. Here you will encounter an error since you know that your current version is behind the latest version of React.
Note: If the changes were made to other files, you won’t get an error and you can proceed without needing git stash (and you could jump straight into step 6).
2️⃣ Run git stash. This will temporarily save changes you have made to your working directory without committing them yet. They will be hidden for the time being while allowing you to get the version of the files from your online GitHub repository.
3️⃣ Run git pull again. This will now pull the latest version from your online GitHub repo into your local computer.
4️⃣ Run git stash pop. You should see now in your IDE the changes. Delete the changes you don’t want and keep the ones you want.
6. Git push = Upload your changes to your GH account
1️⃣ Run git status to display the state of the working directory and the staging area. It is always a good practice to run it as you essentially get to see “what’s happened”. 👀
2️⃣ Run git add . This adds all the changes you did onto Git.
3️⃣ Add a comment to your commit by running: git commit -m "grammatically updated the tech doc”.
4️⃣ Run git push. You will be asked to authenticate yourself if this is your first time pushing changes. I advise you to read my previous article from step 4.4-4.8.
5️⃣ You may receive an error, after which you should copy and run this: git push origin HEAD
7. Create Your Pull Request = Update your changes to the Main React Repo
Alright, we are so close to it now! One last push 🪄
1️⃣ Head back to your forked repository on GitHub.
2️⃣ Click on Contribute and then click on Compare and pull request.
3️⃣ Describe your commit message and why you made the changes - its always a good time to go back to the Contributing guidelines to check whether you have done everything properly. 🌟
4️⃣ Click on “Pull Request”! 🎉🍾👯♀️
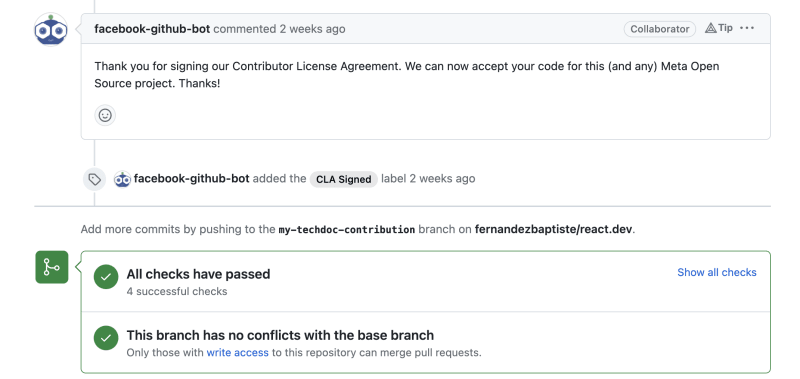
5️⃣ Your pull request is now on its way! Meta will prompt you to sign their Contributor License Agreement. I attach a picture below so you can see what it should look like:

After this, all you need to do is wait. What is happening is React’s project owners (also called maintainers), need to accept your pull request (it is also called merging a pull request).
Depending on your contributions, you can get it accepted, declined or maintainers could ask for some adjustments.
This is entirely dependent on the type of contributions you have given so as long as what you added/modified makes sense, your contribution should get accepted! 🌟
That’s it people!
All in all, you should be so proud of yourself. This has been quite technical, especially with learning the GitHub mechanics. However, you did it splendidly. 💃
So sit back and relax as you have just done everything you needed! ☀️🧘♂️🎉
We know it is always super tough the first time, and it's really cool you got to this point - so proud of you! 👯♀️💚
You have now learned an approach to contributing to documentation. However, note that this is not the most common approach but it does serve as a good starting ground. We will look in later articles the approach to first raise an issue, then discuss things with the maintainer before submitting a PR!
If you are ready to start contributing to other projects, we have compiled a list of projects with easy issues you can start on. Check out the list of projects on quine.sh, and here's a short playlist in case you are blocked. 🚀
If you haven't yet, you could join our discord server if you need any help or have any questions. 🫶


Top comments (8)
This post came in good time. Was wondering were l could start with this journey. Thank you for sharing @fernandezbaptiste .
I'm so glad you liked it Chantal! Is there any content that you would like to see? Interested to know about what would help you :)
Perfect complete guide for beginners!
Thanks for the nice comment Raja 🫶
Nice end to end walkthrough. I particularly feel that point about seeing things in the documentation that the core maintainers may not.
Great to hear this. Thanks a lot for the comment 🫶
Really nicely written and super informative!
Thanks a lot Abhi - let me know the next documentation you contribute to! 🪄