✅ LET'S INTEGRATE APPWRITE
*We'll start by creating a new folder in our src directory, go Ahead create a folder with name Appwrite src/appwrite *
Now create a new file in that folder with name appwrite.auth.js
Now Following are the steps to completely setup the auth file :
1) Import Appwrite
import Appwrite from 'appwrite'
2) Setup SDK and Project :
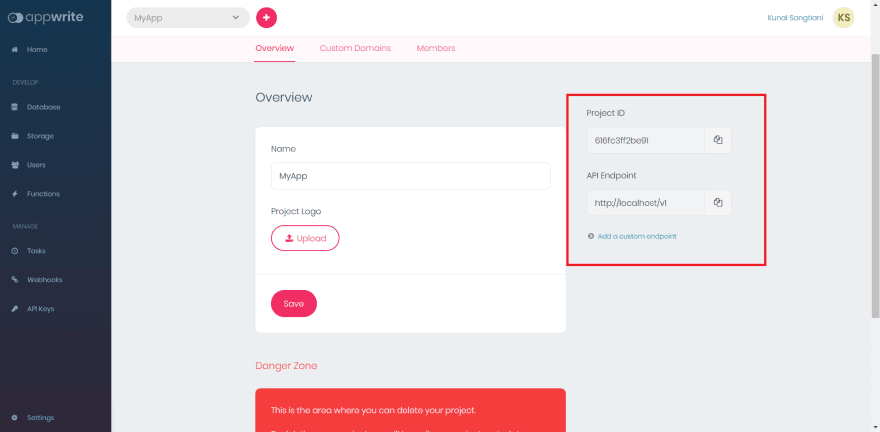
For this step you'll need your project Id and end point , for that,
🔷Open your Appwrite console on http://localhost/console/
🔷Go to App settings.
🔷There you'll find your project Id and API End Point
Copy those details then put those details in setEndpoint and setProject
const sdk = new Appwrite();

sdk
    .setEndpoint('https://[HOSTNAME_OR_IP]/v1') // Your API Endpoint
    .setProject('5df5acd0d48c2') // Your project ID
;      .setProject('5df5acd0d48c2') // Your project ID
;
3) Creating User :
Now from here we'll be using appwrite's API, for this you can either use axios, fetch statement anything you're comfortable with
We'll directly return the response of the API from the config function.
export const createUser = (email,password,name)=>{
    return sdk.account.create(email,password,name);
}
And now we'll make use of this function in our Signup component file . We'll configure our handleChange function to create Account when user hits signup
Navigate to src/components/SignUp.component.jsx
Firstly we'll import createUser function from appwrite.auth.js
import { createUser } from '../appwrite/appwrite.auth';
Then we'll configure handle change and handle Submit function to respond to the event and create the user.
  handleSubmit = (event) => {
    event.preventDefault();
    const email = this.state.email;
    const password = this.state.password;
    const displayName = this.state.displayName
    createUser(email, password, displayName).then(
      (res) => console.log(res),
      (err) => alert(err.message)
    );
  };

  handleChange = (event) => {
    const { value, name } = event.target;

    this.setState({ [name]: value });
  };
For now, we're not doing much with the response, as soon as we setup loginUser functionality we'll add it here as well so as soon as user register he'll be logged in.
3) Logging User in :
Again, we'll go to our appwrite file to create a function loginUser which has two required parameters : Password and Email
export const loginUser = (email,password)=>{
    return sdk.account.createSession(email,password);
}
and we'll create a function to get the current logged in user.
export const getCurrentUser = () =>{
    return sdk.account.get();
}
account.get() doesnt have any required parameters.
...
We also need to create a function for Google SignIn :
export const signInWithGoogle = ()=>{
    return sdk.account.createOAuth2Session('google');

}
createOAuth2Session takes one paramter : Provider.
Now we'll configure our SignIn page to login user:
Navigate to src/components/SignIn.component.jsx
Firstly, we'll import loginUser and signInWithGoogle function in signUp file :
import { loginUser, signInWithGoogle } from '../appwrite/appwrite.auth';
  handleSubmit = (event) => {
    event.preventDefault();
    const email = this.state.email;
    const password = this.state.password;
    loginUser(email, password).then(
      (res) =>console.log(res),
      (err) =>console.log(err)
    );
  };

  handleChange = (event) => {
    const { value, name } = event.target;

    this.setState({ [name]: value });
    console.log(this.state);
  };
We also need to configure the googleSignIn button :
<CustomButton onClick={signInWithGoogle} isGoogleSignIn>
{''}
 Sign in with google {''}
</CustomButton>
5) Final Configurations :
We've successfully setup the complete authentication, all left for us to do is to configure our _app.js file to show user the homepage as soon as user is logged in.
Navigate to _app.js Here we'll import getCurrentUser function
import { getCurrentUser } from "./appwrite/appwrite.auth";
Now,In our App Component we'll define the state with property of user default to null
  state = {
    user: null,
  };
And we'll also use componentDidMount() lifecycle method to detect if user is logged in or not
  componentDidMount() {
    getCurrentUser().then((res) => {
      this.setState(
        {
          user: res["$id"],
        },
        (err) => {
          console.log(err);
          this.setState({
            user: null,
          });
        }
      );
    });
  }
If we don't get any error, that means we've a valid user so we'll set state to that user's id, otherwise we'll keep the user null.
Now, if user is logged in we must have a homepage to show it to them. So go Let's create a new file and call it homepage.jsx in src directory.
In that file we'll add content with a logout button that we want to show to the user as soon as user logs in.
For logout functionality we'll add a function in our appwrite file,
export const logoutUser = ()=>{
    return sdk.account.deleteSession('current');
}
account.deleteSession() takes a default parameter : SessionId but we can also put 'current' to denote the current session.
we'll import this logoutUser function in our _app.js and create a new function in our App component to delete the session and logout the user :
 DeleteSession = ()=> {
    logoutUser().then(
      (res) => {
        this.setState({ user: null });
        console.log(res);
      },
      (err) => console.log(err)
    );
  }
Now we'll pass this function as a prop to the Homepage from _app.js so the state will force the rerender of the page and bring user to the signin page again.
import CustomButton from './Utils/CustomButton'


const Homepage = (props)=>{
    return (
        <div>
            <h1>Welcome Home!!</h1>
            <CustomButton onClick={props.logOut}></CustomButton>
        </div>
    )
}

export default Homepage
Feel free to create and design Homepage file according to yourself.
Now navigate back to _app.js there we'll first import our Homepage then Conditionally render Homepage according to our state.
import { getCurrentUser } from "./appwrite/appwrite.auth";

  render() {
    return (
      <div>
        {this.state.user === null ? (
          <SignInAndSignUpPage></SignInAndSignUpPage>
        ) : (
          <Homepage logOut={this.DeleteSession} />
        )}
      </div>
    );
  }
Alright! So we've finally Completed our Login Page. Congratulations you've successfully built your first app with Appwrite!🥳


Top comments (0)