How to decrease volume size? one of my friend ask me this question.
You might be wondering, can we decrease EBS volume size? The answer is NO. It is impossible to decrease EBS volume size. When you have 100GB EBS and you decide to modify it into 30GB you will get error : The size of a volume can only be increased, not decreased. That’s terrible …
But don’t worry. We could also do the trick to decrease EBS volume size. However, it is not easy task as it is not a straightforward. Here is the trick :
- Snapshot the volume
- Create a new smaller EBS volume
- Attach the new volume
- Format the new volume
- Mount the new volume
- Copy data from old volume to the new volume
- Prepare the new volume
- Detach and unmount old volume
Getting started
Let’s exercise.
Assume we have :
- Instance named my-instance in
ap-southeast-1azone - 100GB EBS volume size named
old-volume - We wish to decrease into 30GB and name it
new-volumeWe would need to shutdown the instance to prevent inconsistencies.
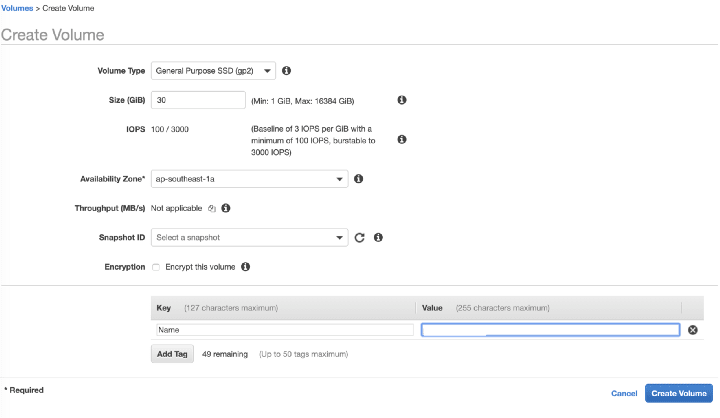
Create a new smaller EBS volume
- Make sure instance is shutdown
- Go to Elastic Block Store Volumes
- Click Create Volume
- Choose the same volume type same with your old volume
- Enter your desired size; In our case 30.
- Choose availability zone; The volume will be available to instance in the same availability zone, which is ap-southeast-1a .
- Add tag with Key : Name and value : new-volume
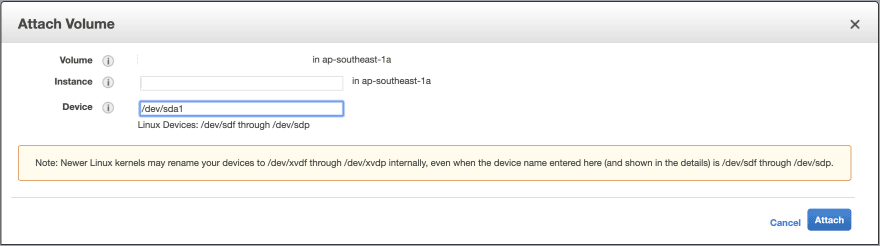
Attach the new volume
- Right click on the new volume.
- Click Attach Volume.
- Choose instance name my-instance .
- Click Attach.
We could start the instance and login to SSH. List all available volume with lsblk. The new volume is in /dev/xvdf.
Format the new volume
- Check whether the volume have any data or not using command
sudo file -s /dev/xvdf. - If it is displaying
/dev/xvdf: data, it means the volume is empty. We could format the volume. - If it is displaying other than above output, it means the volume have data. DO NOT format the volume if you saw this output.
- Format the volume using command
sudo mkfs -t ext4 /dev/xvdf.
Mount the new volume
- Create directory to mount using command
sudo mkdir /mnt/new-volume. - Mount new volume into directory using command
sudo mount /dev/xvdf /mnt/new-volume. - Check volume with command
df -h; The new volume should be mounted now.
Copy data from old volume to the new volume
- Use rysnc to copy from old volume to the new volume
sudo rsync -axv / /mnt/new-volume/. - Relax and wait until it’s finished. Get a coffee!
Prepare new volume
- Install grub on new-volume using command
sudo grub-install --root-directory=/mnt/new-volume/ --force /dev/xvdf. - Unmount new-volume
sudo umount /mnt/new-volume. - Check UUID using command
blkid. - Copy UUID from
/dev/xvda1(paste anywhere to backup this UUID); This is your old UUID. - Use tune2fs to replace UUID
sudo tune2fs -U COPIED_UUID /dev/xvdf; COPIED_UUID is the string value from point 4. - Check the system label from old-volume using command
sudo e2label /dev/xvda1; It will display string like cloudimg-rootfs . - Replace new-volume label with old-volume label using command
sudo e2label /dev/xvdf cloudimg-rootfs. - We can logout SSH now.
Detach old volume
 1.  Stop instance `my-instance`
 2.  Detach `old-volume`
 3.  Detach `new-volume`
 4.  Attach new-volume to `/dev/sda1`
 5.  Start instance my-instance
After we finish all steps above, we could check our instance by login into SSH.
We could delete old-volume and snapshot-old-volume if our system works correctly. I prefer to keep snapshot for a week / month before deleting it.
Conclusion
We cannot straightforward decreasing the size of EBS volume. All we can do is to create a new smaller volume.
Hope it’s help!

Top comments (0)