Introduction
Recurrent neural network models have increasingly become powerful models for neuroscience research as we saw in this year’s COSYNE meeting. They can be used to e.g. generate model data for testing analysis methods; or infer connectivity between brain areas based on real neural data.
Despite their obvious practical use, it can sometimes be difficult to make the leap from a written down RNN model in a paper to its practical application in code. Moreover, although frameworks have made it easier than ever to prototype machine-learning models, in neuroscience research we are often interested in network statistics other than standard outputs like accuracy and learning rate - we may instead want to extract layer activations and weights at different stages during model training as a proxy for real neuron activity and connectivity.
This guide is an attempt to develop and explain some simple RNN examples in the Keras framework that are inspired by and applicable to neuroscience applications.
Colab notebooks
Example 1 - MNIST
Example 2 - Data Generation
Example 3 - Connectivity
Example 1 - Simple MNIST
To show the general structure of an RNN in Keras, we’ll start with the classic MNIST example. Here we will obtain a labeled sequence of images of hand drawn digits and train an RNN model to predict the represented digit in the image:
In python, let’s start with the necessary imports and loading the MNIST dataset:
import numpy as np
from tensorflow import keras
from keras.callbacks import ModelCheckpoint
from matplotlib import pyplot as plt
from keras import backend as K

# load the dataset
mnist = keras.datasets.mnist
(x_train, y_train), (x_test, y_test) = mnist.load_data()
x_train, x_test = x_train / 255.0, x_test / 255.0
sample, sample_label = x_train[0], y_train[0]
Here we simply load the standard MNIST dataset from the keras library and split it into train and test datasets. x_train and x_test are input data (sequences of images), y_train and y_test are target labels (digits from 0-9).
As a sanity check, let’s plot some of the input images along with their labels. Looping through the first 10 examples in the training dataset and plotting with the labels we obtain:
# show examples
n_examples = 10
plt.figure()
for i in range(n_examples):
   plt.subplot(1, n_examples, i+1)
   plt.imshow(x_train[i])
   plt.title(y_train[i])
plt.show()
So far so good. Now let’s define some model parameters and build the actual model:
# model parameters
input_dim = x_train[0].shape[0]
output_size = 10
epochs = 10
units = 64

# build model
model = keras.models.Sequential()
model.add(keras.layers.SimpleRNN(units, input_shape=(input_dim, input_dim)))
model.add(keras.layers.BatchNormalization())
model.add(keras.layers.Dense(output_size))

model.summary()
First we defined an input dimension parameter input_dim based on the input image shape (28x28 pixels). We then set define output_size = 10 since we want 10 classification classes (digits 0-9). epochs defines the number of training repetitions, and units is the number of neurons we want in our RNN.
Next we use Keras’ sequential model interface to stack network layers on top of each other. First we add a standard RNN layer with SimpleRNN, then a normalization layer for the output and finally a fully connected dense output layer with 10 nodes. Invoking model.summary() should print:
Model: "sequential"
_________________________________________________________________
Layer (type)                 Output Shape              Param #
=================================================================
simple_rnn (SimpleRNN)       (None, 64)                5952
_________________________________________________________________
batch_normalization (BatchNo  (None, 64)                256
_________________________________________________________________
dense (Dense)                (None, 10)                650
=================================================================
Total params: 6,858
Trainable params: 6,730
Non-trainable params: 128
Let’s step through one layer to understand the network we created. We have a SimpleRNN layer with an output shape of (None, 64) and 5952 total parameters. Where does the output shape information come from? Remember we created our RNN layer with 64 neurons, so an output of 64 in one shape dimension makes sense. The first shape dimension showing None corresponds to the batch or trial number, i.e. the number of examples we will feed to the network over training. Keras allows us to be vague with this number and represent it as None so that we can feed in training datasets of different sizes easily without violating the input dimensions of the layer. We took advantage of this fact before already with the line:
model.add(keras.layers.SimpleRNN(units, input_shape=(input_dim, input_dim)))
An RNN input shape in Keras should have 3 dimensions: batch, timestep, feature but we only provided 2 dims of shape input. This is because the batch dimension is implied by Keras, assuming we will feed in datasets of different lengths.
What about the number of parameters for the RNN layer? We have 64 units in the RNN which are recurrently connected (all connected to each other), which gives us 64*64 = 4096 trainable parameters. Our image input is 28x28 pixels, which the RNN represents as 28 sequences of 28 features, therefore 28 feature channels are passed to the 64 RNN units giving an additional 28*64=1792 parameters. In total now we have 1792+4096=5888 parameters. Finally we have the 64 bias terms for the RNN units, giving the final parameter number of 5952.
Training a model in Keras is similarly simple, we just need to add:
# train
model.compile(
   loss=keras.losses.SparseCategoricalCrossentropy(from_logits=True),
   optimizer="sgd",
   metrics=["accuracy"]
)

history = model.fit(
   x_train, y_train, validation_data=(x_test, y_test), batch_size=1000, epochs=epochs
)
We use the compile function to define the training loss function, the optimizer and our output metrics. Since we are predicting a categorical variable (digit) we use sparse categorical cross-entropy here for the loss function. Our optimizer is standard stochastic gradient descent and we ask the training to keep track of accuracy (% trials the model predicts the digit from the input image). Finally we call model.fit() with the training and validation test sets. Leaving this to train we’ll see some output appear:
Epoch 1/10
60/60 [==============================] - 3s 29ms/step - loss: 2.2067 - accuracy: 0.2987 - val_loss: 1.7675 - val_accuracy: 0.4677
Epoch 2/10
60/60 [==============================] - 1s 20ms/step - loss: 1.3351 - accuracy: 0.5689 - val_loss: 1.3675 - val_accuracy: 0.6531
Epoch 3/10
60/60 [==============================] - 1s 18ms/step - loss: 0.9991 - accuracy: 0.6946 - val_loss: 1.0370 - val_accuracy: 0.7391
Epoch 4/10
60/60 [==============================] - 1s 19ms/step - loss: 0.8169 - accuracy: 0.7563 - val_loss: 0.8105 - val_accuracy: 0.7897
Epoch 5/10
60/60 [==============================] - 1s 20ms/step - loss: 0.6963 - accuracy: 0.7922 - val_loss: 0.6728 - val_accuracy: 0.8142
Epoch 6/10
60/60 [==============================] - 1s 20ms/step - loss: 0.6205 - accuracy: 0.8149 - val_loss: 0.5768 - val_accuracy: 0.8389
Epoch 7/10
60/60 [==============================] - 1s 20ms/step - loss: 0.5545 - accuracy: 0.8340 - val_loss: 0.5140 - val_accuracy: 0.8552
Epoch 8/10
60/60 [==============================] - 1s 20ms/step - loss: 0.5008 - accuracy: 0.8500 - val_loss: 0.4637 - val_accuracy: 0.8644
Epoch 9/10
60/60 [==============================] - 1s 20ms/step - loss: 0.4618 - accuracy: 0.8630 - val_loss: 0.4319 - val_accuracy: 0.8741
Epoch 10/10
60/60 [==============================] - 1s 19ms/step - loss: 0.4256 - accuracy: 0.8751 - val_loss: 0.4006 - val_accuracy: 0.8813
After 10 epochs, we have a model that can predict digit from an image with >80% accuracy, pretty good!
As a sanity check, let’s add some code using the model to predict a digit from one of our dataset images:
# prediction example
test_image = x_train[0]
test_image = test_image[np.newaxis, :]
y_pred = model.predict(test_image)[0]
plt.figure()
plt.imshow(test_image[0])
plt.title(np.argmax(y_pred))
plt.show()
Which outputs:
We created a variable test_image with the first image from x_train. Since this is a 2D image, and the RNN model expects an extra batch dimension we pad the image with an empty extra dimension in the next line. Then we generate the prediction y_pred using model.predict() with our test_image. Next, we plot the image and title it with the output prediction. Remember that the model output is a 10-element vector where each element represents a prediction probability of each of the digits 0-9. To get the actual predicted digit, we use np.argmax() to find the element with the largest probability. As it turns out, this corresponds nicely to the input image!
If you’re a neuroscientist, and the RNN is the ‘brain’ you’re studying, you may not care particularly about the accuracy of the model network. After all we already know that our brains can recognise and classify these digit images. Instead, you might be more interested in the how - how are the network neurons behaving during presentation of each image. In an artificial neural network, layer activations can be thought of as analogous to neural activity in the brain. Activations are the outputs of neurons in a layer after they receive their input from the previous layer.
If you delve into the properties of the model you just trained, you will notice that the activations for each layer are not stored. This makes sense since all we need to store for the model training is the input, output and updated weights between layers. Storing the activations for each training step and input would cost a lot of storage. To get the layer activations for a particular image input, we need to do some extra Keras magic. Sticking with the test_image we already defined, we’ll add some code to explore the activations:
# activation example
layer_idx = 0
out_func = K.function([model.input], [model.layers[layer_idx].output])
out_vals = out_func([test_image])[0]
print(out_vals)
Giving us the output:
[[ 0.56697565  0.09797323 -0.89703596  0.5188298  -0.12455866  0.047839
  -0.7718987  -0.8179464   0.51488703 -0.3178563  -0.13602903  0.7039628
  -0.22956386  0.23199454  0.49808362 -0.1646781   0.18231589 -0.52438575
  -0.7650064   0.26156113 -0.14623232  0.81333166  0.3180512  -0.4301887
  -0.8027709   0.07813827  0.41824704 -0.8176996   0.02754677  0.2746857
   0.64864177  0.59684217  0.51136965  0.6604145  -0.25604498  0.30178267
   0.31990722 -0.7244299   0.78560436 -0.42247573 -0.16835652 -0.197974
   0.1738112   0.61906195 -0.69502765  0.3859463  -0.09267779  0.27790046
   0.09295665 -0.07516889  0.83438504 -0.15787967 -0.553465   -0.67424375
   0.06541198 -0.1020548  -0.7939734  -0.09875299  0.20282765  0.63470924
  -0.33998007 -0.04162058 -0.33605504 -0.15319426]]
Here we set a layer_idx of 0 (corresponding to the first layer in our network, the RNN). Then we used the keras backend library to define a Keras function called out_func that uses the model input to produce the output of the model at the layer index we provide. We then use this function with our test_image. The output is a 64-element vector corresponding to the activations of our 64 RNN neurons after being presented with the test image.
Example 2 - Generating ground-truth data for testing analysis methods
In the 2018 paper “Unsupervised Discovery of Demixed, Low-Dimensional Neural Dynamics across Multiple Timescales through Tensor Component Analysis”, Williams et al. use the statistics of a RNN to test the utility of their tensor component analysis method. The advantage of using an ANN here is that they have access to the ground truth of layer activation and connection weights to compare against the results of the TCA method.
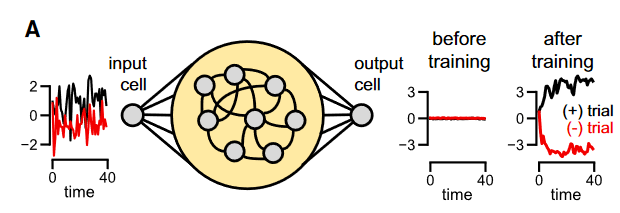
The data generation strategy of this paper is shown below, reproduced from the paper’s 3rd figure:
The input to the network is 40 timesteps of random noise, with some offset such that it has a slightly negative or slightly positive mean value across time. The network is trained to report the sign of the input with a high magnitude. The two rightmost panels show the activation across time of a (+) and (-) responsive cell in the RNN before and after training. Over time, their responses diverge to produce either positive or negative drive to the output cell.
Let’s recreate this model in Keras.
First we need to create the input data and its target labels to train on. Remember that an RNN in Keras expects 3D shaped data with the dimensions corresponding to batch, timestep, feature. Each input has 40 timesteps of a single feature, and we’ll make 100,000 training samples, so we need 100,000x40x1 input data. Each input needs a label for the model training (the overall sign of the input) which need only be a single positive or negative number. To perform the necessary imports and define this dataset:
import numpy as np
from tensorflow import keras
from keras.callbacks import ModelCheckpoint
from matplotlib import pyplot as plt
from keras import backend as K

# create the dataset
data_n = 100000
timepoints = 40
sign_vec = (np.random.randint(2, size=(data_n, 1)) * 2) - 1

input = np.random.rand(data_n, timepoints) - 0.5  # random values centered around 0
input = input + (sign_vec * 0.2)
input = input[:, :, np.newaxis]  # reshape for RNN
output = sign_vec * 3

# plot the dataset
plt.figure()
for i in range(100):
   c = 'k' if sign_vec[i] == 1 else 'r'
   plt.plot(input[i, :], c)

plt.show()
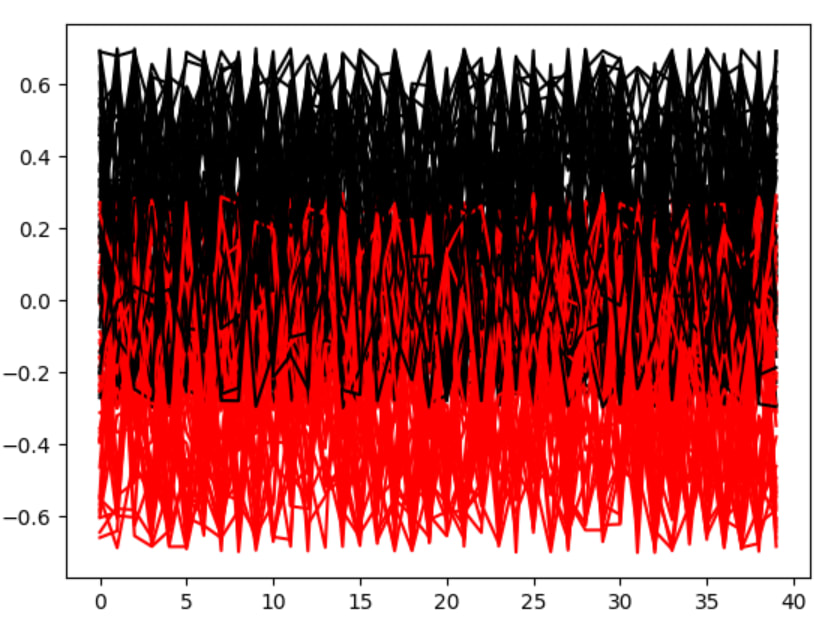
Let’s step through this code. First we create a variable sign_vec to generate a random sequence of positive or negative numbers. We use numpy’s randint function to create 100,000 random integers of either 0 and 1, then scale these so that we get either -1 or 1. Next we define input as a matrix of random numbers of size 100000x40 with mean zero. Then we add the sign_vec sequence to shift each entry slightly positive or negative according to the elements in sign_vec. We add an extra dimension to input such that it satisfies the input requirements for our eventual RNN. Finally, we generate the output labels for training by simply scaling sign_vec so we get either a -3 or +3 label. The end result is a dataset of 40-element vectors that are slightly positive or negative, and a corresponding label describing the sign. The last code segment plots the first 100 examples of this dataset and colours by sign:
Next we need to build the model:
# build model
units = 50
model = keras.models.Sequential()
# have to return sequences to get the actual unrolled response across time
model.add(keras.layers.SimpleRNN(units, return_sequences=True, input_shape=(timepoints, 1)))
model.add(keras.layers.Dense(1))
model.summary()
This is very similar to our previous model with a few key adjustments. This time we’ll use 50 units and define a SimpleRNN layer with input shape of timepointsx1 (40x1) to match the incoming training data. Notice we added an extra argument to the SimpleRNN layer - return_sequences=True. When we provide input data to an RNN with multiple timepoints, internally the RNN is calculating output for the first timestep and passing that output as input for the next timestep calculation. If return_sequences is False, we only pass the final state of those recurrent timestep calculations. In our case, we want to see RNN activations at each timestep so we set this to True to get access to data about the RNN at each step of the sequence. Finally, we add a single unit dense layer as our network output. We only need one unit here since our training labels are just a single positive or negative number. Invoking model.summary() gives:
Model: "sequential"
_________________________________________________________________
Layer (type)                 Output Shape              Param #
=================================================================
simple_rnn (SimpleRNN)       (None, 40, 50)            2600
_________________________________________________________________
dense (Dense)                (None, 40, 1)             51
=================================================================
Total params: 2,651
Trainable params: 2,651
Non-trainable params: 0
In our previous MNIST example we only analysed the network after it had finished training. In this case, we want to compare the network before and after training. Model training in Keras does not automatically save the model structure at each step of training, so we need to add an extra step here to save a snapshot of our model periodically through training:
# set a history callback to save weights after each epoch
weights_file_prefix = "tmp/model_"
model.save(weights_file_prefix + "untrained.h5")
checkpoint = ModelCheckpoint(weights_file_prefix + "{epoch}.h5", save_freq='epoch')
All we do here is define a save path and use model.save() to save the randomly initialized weights of the model before training starts. Then we define a ModelCheckpoint from the Keras callbacks module. All this does is provide a callback function for the training procedure that saves a model snapshot every training epoch.
Now we can move on to training the model:
# train
epochs = 10
model.compile(
   loss="mse",
   optimizer="sgd",
   metrics=["mse"]
)

history = model.fit(
   input, output, batch_size=1000, epochs=epochs, callbacks=[checkpoint]
)
This is again very similar to our MNIST training example with some small adjustments. First, in this case we don’t really care about the output being exactly -3 or +3, we just want it to skew towards those values - therefore we just use mean squared error (“mse”) as both the loss function and metric in model.compile(). In model.fit() we also add our previously defined ModelCheckpoint to the training callbacks.
After the model has finished training we’d like to see whether we reproduced the neuron behavior from Williams et al. To do this, we need to extract a neuron’s activation across time in response to either a positive or negative stimulus:
# try a prediction on the trained network
n_examples = 100
neuron = 0

plt.figure()
for i in range(n_examples):
   input_test = input[i][np.newaxis, :, :]
   y_pred = model.predict(input_test)

   # get activations for rnn layer
   out_func = K.function([model.input], [model.layers[0].output])
   out_vals = out_func([input_test])
   out_activation = out_vals[0][0, :, :]

   c = 'k' if sign_vec[i] == 1 else 'r'
   plt.plot(out_activation[:, neuron], c)
plt.ylim(-1, 1)
plt.show()
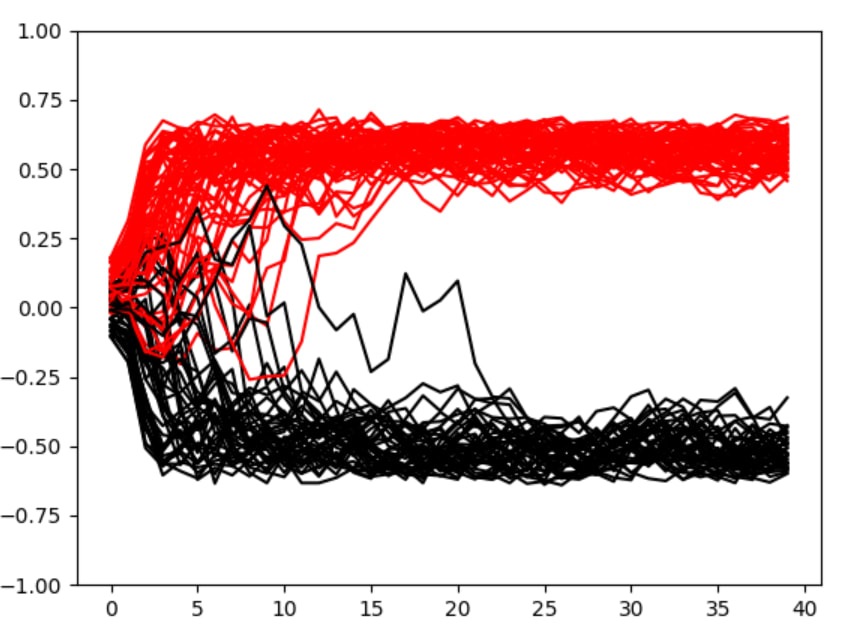
Here we loop through 100 examples of training data and use the activation extraction trick to get activations over time for one of the neurons in the RNN. Then we plot the activation time course and colour by the sign of the input vector:
Good! This neuron diverges in its activity over time depending on the input sign much as in the paper.
Next let’s repeat this process for the untrained network. To do this, we’ll load a model snapshot from earlier in the training and apply the same process:
# repeat for the untrained network
model.load_weights(weights_file_prefix + "untrained.h5")
plt.figure()
for i in range(n_examples):
   input_test = input[i][np.newaxis, :, :]
   y_pred = model.predict(input_test)

   # get activations for rnn layer
   out_func = K.function([model.input], [model.layers[0].output])
   out_vals = out_func([input_test])
   out_activation = out_vals[0][0, :, :]

   c = 'k' if sign_vec[i] == 1 else 'r'
   plt.plot(out_activation[:, neuron], c)
plt.ylim(-1, 1)
plt.show()
This is exactly the same as in the previous step but we added model.load_weights() with the first model snapshot we generated before the onset of training. Running this we get:
This replicates the analogous result in the paper in which the same neuron, before training, has overlapping responses to the two input types.
Example 3 - Inferring connectivity
With certain neuroscience techniques (e.g. 2p imaging) we can generate rich data about the activity of groups of neurons over time and in response to different stimuli. In many cases, we’d also like to infer something about the connectivity of these neurons to understand the circuit architecture they operate in.
Without electron microscope or paired-patch recordings how could we think about doing this with a dataset? One approach might be to model sets of neurons with groups of RNNs. Using real data from neuronal recordings we could train the RNNs to match their responses to the real neurons in response to some stimulus. Once responses are sufficiently similar between the real neurons and the RNN, we can analyze the connection weights in the RNN to infer connectivity between the real neurons.
In this example we will imagine that we are able to image two putatively connected populations of neurons simultaneously. We are also able to stimulate certain subgroups of one of the neuronal populations. Therefore, we can observe the effect of different stimulation combinations on the first population on output of the second population. To model this situation, we will generate a ‘teacher’ network in place of real neuronal recordings. This network will be a 2-layer RNN with known connection weights that we’ll feed with random input in the first layer to produce a series of outputs in the second layer. We don’t need to train this network as it will just serve the purpose of producing an input-output dataset from a network with known weights. We will use this dataset to train a second network with the same architecture - the ‘student’ network. This network will learn to reproduce the input-output relationship of the teacher network over the training procedure. When the student network produces comparable responses to the teacher network we can extract its connection weights and see if it has correctly inferred the connectivity of the teacher network.
The architecture of both teacher and student networks is represented below:
We have an input RNN into which we feed input data. This is fully connected (represented by black arrow) to the 2nd RNN which produces our output.
Based on what we’ve done so far, it seems simple to construct this network; we might write something like this:
neurons = 10

model = keras.models.Sequential()
model.add(layers.SimpleRNN(neurons, return_sequences=True, input_shape=(1, neurons)))
model.add(layers.SimpleRNN(neurons, input_shape=(1, neurons)))
model.summary()
This would indeed produce a fully connected 2-layer RNN structure. We also set return_sequences=True on the first layer to ensure all input data sequences are transferred to the second layer. However, if we invoke model.summary() we’ll encounter an issue:
Model: "sequential"
_________________________________________________________________
Layer (type)                 Output Shape              Param #
=================================================================
simple_rnn (SimpleRNN)       (None, 1, 10)             210
_________________________________________________________________
simple_rnn_1 (SimpleRNN)     (None, 10)                210
=================================================================
Total params: 420
Trainable params: 420
Non-trainable params: 0
For 10 neurons in the first RNN layer, we expect to have 10*10=100 recurrent connections which gives us 100 parameters. The remaining 110 parameters come from the connections between the RNN and the input layer, + the bias terms for each connection. Although we didn’t explicitly define it, the input layer is inferred by Keras in our sequential model. Since we set our input_shape=(1, neurons) we told Keras to expect a 10-element input. This input layer is also fully connected to our first RNN layer by default in Keras so we end up with an extra 10x10 connections (+ 10 bias terms).
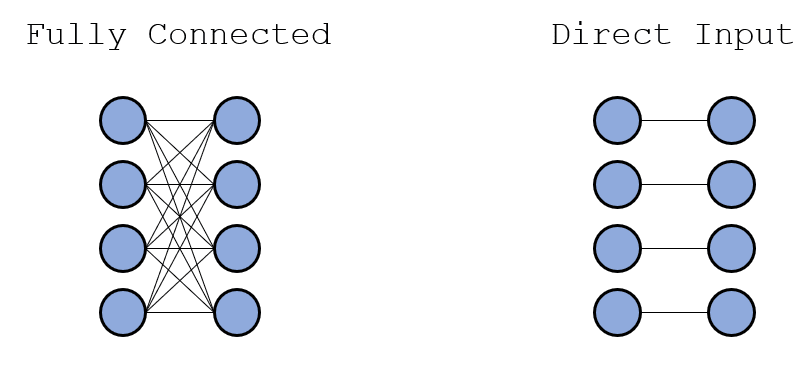
Normally this wouldn’t be an issue, but in our case we want to exactly control the initial activity in our first RNN layer, since in our model the input corresponds to direct stimulation of neurons in this layer. If the input and RNN layers are fully connected as is currently the case, there will be cross-talk between input elements and their target neurons, as schematised below:
In the fully connected case, each neuron in the 2nd layer is a product of all 4 input elements. For our model we want the input layer and first RNN layer to use a one-to-one pattern so that we can directly control the activation of the RNN. Unfortunately, there is no out-of-the-box way to define this connection relationship with Keras so we’ll have to think of a workaround. Let’s implement this first with a simpler case - connection to a non-recurrent layer.
We’ll begin with building this simple model:
neurons = 4
model = keras.models.Sequential()
model.add(layers.Dense(neurons, input_shape=(1, neurons)))
model.summary()
Model: "sequential"
_________________________________________________________________
Layer (type)                 Output Shape              Param #
=================================================================
dense (Dense)                (None, 1, 4)              20
=================================================================
Total params: 20
Trainable params: 20
Non-trainable params: 0
We can see that the input is fully connected with the output since we have 20 parameters in the dense layer (4x4 input connections + 4 bias terms). We can also see that the input is not exactly reproduced in the output dense layer because of this connectivity with a quick test:
print(model.predict(np.ones(1, 4)))
[[-0.79105026  0.09893554  1.4398389  -0.5700609 ]]
The weights between the 4 input elements and the 4 outputs in the dense output layer are represented by a 4x4 matrix describing each connection weight. What if we manually replaced that matrix with a 4x4 identity matrix? (Identity matrix is 1 on the diagonal and 0 everywhere else, a matrix multiplied by an identity matrix of the same size equals the original matrix):
# force weights, kernel weights are identity matrix
weights = model.layers[0].get_weights()
input_weights = np.eye(neurons, neurons)
bias_weights = weights[1]
model.layers[0].set_weights([input_weights, bias_weights])
Above, we get the weights from the first layer of the matrix (the input weights and the bias terms). We then set the first layer input weights as the identity matrix, and keep the bias weights the same. If we repeat the same test:
print(model.predict(np.ones((1, 4))))
[[1. 1. 1. 1.]]
We have the desired result! Our input layer is directly represented in our output.
Let’s now write some code to simulate the training process on this simple network and give us some output metrics
# create a dummy dataset
data_n = 10000
train_x = np.random.rand(data_n, 1, 4)
train_y = train_x + 1

print('pretrain weights: ', model.weights[0], model.weights[1])

# train
model.compile(
   loss="mse",
   optimizer="sgd",
   metrics=["mse"]
)

history = model.fit(
   train_x, train_y, batch_size=64, epochs=10
)

print('trained weights: ', model.weights[0], model.weights[1])
Before training we get get the expected result of the input weights corresponding to the identity matrix:
print('pretrain weights: ', model.weights[0], model.weights[1])

pretrain weights:  <tf.Variable 'dense/kernel:0' shape=(4, 4) dtype=float32, numpy=
array([[1., 0., 0., 0.],
       [0., 1., 0., 0.],
       [0., 0., 1., 0.],
       [0., 0., 0., 1.]], dtype=float32)> <tf.Variable 'dense/bias:0' shape=(4,) dtype=float32, numpy=array([0., 0., 0., 0.], dtype=float32)>
But after training:
print('trained weights: ', model.weights[0], model.weights[1])

trained weights:  <tf.Variable 'dense/kernel:0' shape=(4, 4) dtype=float32, numpy=
array([[1.1834619 , 0.18346326, 0.18346316, 0.18346334],
       [0.18353002, 1.1835296 , 0.18352997, 0.18353006],
       [0.18180324, 0.18180329, 1.181803  , 0.18180329],
       [0.17997868, 0.17997865, 0.1799786 , 1.1799785 ]], dtype=float32)> <tf.Variable 'dense/bias:0' shape=(4,) dtype=float32, numpy=array([0.62174916, 0.62174857, 0.62174875, 0.6217486 ], dtype=float32)>
They’ve changed! Although we initially set these weights to the identity matrix, the training algorithm shifted them on each iteration. Keras does allow us to hide certain weights from the training process with trainable=False in the layer definition, but for the case of the RNN this would hide the recurrent weights as well which we don’t want. Instead we will take advantage of Keras’ custom constraints which we can direct to specific groups of weights. Normally these constraints would be used to e.g. regularise or normalise weights after weight updates, but here we will simply brute force the weights to our desired values:
# custom constraint to hold weights at user defined value
class HoldWeight(tf.keras.constraints.Constraint):
 """Constrains weight tensors to a set value/matrix"""
 def __init__(self, set):
     self.set = set

 def __call__(self, w):
   return self.set
Here we created a new class that inherits from the Keras Constraint class. This class takes an argument set which will be our desired weight values. We override the method __call__ and return our desired weights in place of the updated weights w.
We can apply this to our Dense layer as follows:
model.add(layers.Dense(neurons, input_shape=(1, neurons), kernel_constraint=HoldWeight(np.eye(neurons, neurons))))
Applying the same test on this model after training:
print('trained weights: ', model.weights[0], model.weights[1])

trained weights:  <tf.Variable 'dense/kernel:0' shape=(4, 4) dtype=float32, numpy=
array([[1., 0., 0., 0.],
       [0., 1., 0., 0.],
       [0., 0., 1., 0.],
       [0., 0., 0., 1.]], dtype=float32)> <tf.Variable 'dense/bias:0' shape=(4,) dtype=float32, numpy=array([0.99961793, 0.99961793, 0.99961793, 0.99961793], dtype=float32)>
We can see that our input weights remained as the identity matrix, and only the bias weights were altered.
Now we can put all this together and create the teacher-student approach we discussed earlier. First creating the teacher network:
import tensorflow as tf
from tensorflow import keras
from tensorflow.keras import layers
import numpy as np
import matplotlib.pyplot as plt
from keras.callbacks import ModelCheckpoint

# parameters
neurons = 10
n_generator = 1000000

# construct the teacher network
teacher_model = keras.models.Sequential()
teacher_model.add(layers.Input(shape=(1, neurons)))
teacher_model.add(layers.SimpleRNN(neurons, use_bias=False,
                                  return_sequences=True,
                                  kernel_constraint=HoldWeight(np.eye(neurons, neurons))))
teacher_model.layers[0].set_weights([np.eye(neurons, neurons),
                                    teacher_model.layers[0].get_weights()[1]])
teacher_model.add(layers.SimpleRNN(neurons, use_bias=False))
teacher_model.summary()

# generate teacher output for the training dataset
generator_input = np.random.rand(n_generator, 1, neurons)
generator_output = teacher_model.predict(generator_input)

# plot the first layer recurrent weights
plt.figure()
plt.imshow(teacher_model.weights[2], cmap='hot')
plt.show()
We define a 2-layer RNN network, and use the identity matrix trick on the first layer so that we can directly apply a desired input onto the first RNN layer. Next we create a dataset of random 10-element (corresponding to the 10 neurons in the RNN) inputs in generator_input. We feed those inputs through the network with model.predict() to give the network output from the 2nd RNN in generator_output. Finally we create a heatmap showing the weights between the recurrent layers with teacher_model.weights[2]. We use the index 2 here since the weights are listed in order inside the model, input weights are weights[0], recurrent weights in 1st RNN are weights[1], weights between RNNs are weights[2].
Next, we create the student network and train it on the input-output dataset we just defined:
# set up the student
student_model = keras.models.Sequential()
student_model.add(layers.Input(shape=(1, neurons)))
student_model.add(layers.SimpleRNN(neurons,
                                  use_bias=False,
                                  return_sequences=True,
                                  kernel_constraint=HoldWeight(np.eye(neurons, neurons))))
student_model.layers[0].set_weights([np.eye(neurons, neurons),
                                    student_model.layers[0].get_weights()[1]])
student_model.add(layers.SimpleRNN(neurons, use_bias=False))
student_model.summary()

# set a history callback to save weights after each epoch
weights_file_prefix = "tmp/model_"
student_model.save(weights_file_prefix + "untrained.h5")
checkpoint = ModelCheckpoint(weights_file_prefix + "{epoch}.h5", save_freq='epoch')

# train
student_model.compile(
   loss="mse",
   optimizer="sgd",
   metrics=["mse", "accuracy"]
)

history = student_model.fit(
   generator_input, generator_output, batch_size=1000, epochs=100, callbacks=[checkpoint]
)
This should all look familiar by now. The network architecture is exactly the same as the teacher network. We define a callback to save model snapshots at each epoch, then compile the model and train on the generator_input, generator_output dataset.
We should get pretty good performance after our 100 epochs of training:
Epoch 98/100
1000/1000 [==============================] - 3s 3ms/step - loss: 1.3204e-05 - mse: 1.3204e-05 - accuracy: 0.9763
Epoch 99/100
1000/1000 [==============================] - 3s 3ms/step - loss: 1.2516e-05 - mse: 1.2516e-05 - accuracy: 0.9770
Epoch 100/100
1000/1000 [==============================] - 3s 3ms/step - loss: 1.1846e-05 - mse: 1.1846e-05 - accuracy: 0.9773
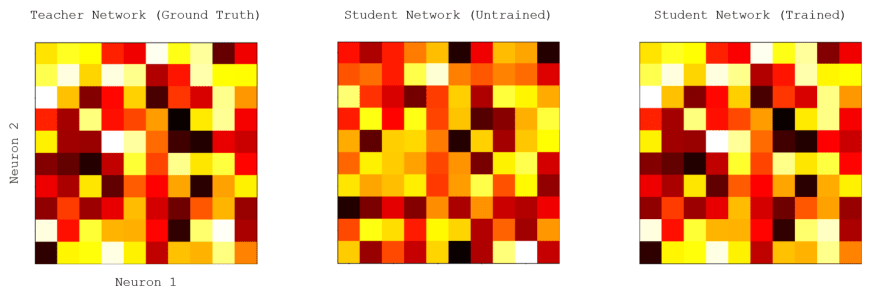
Finally let’s compare the RNN-->RNN weights in the teacher model, the student model before training, and after training:
In each case, we represent the connection strength between the RNNs as a heatmap showing the weight between each pair of neurons. The teacher network generated the training dataset, so those weights are our ground-truth. The untrained student network has a largely dissimilar pattern of weights to the teacher network, while the trained student network has a very similar pattern to the teacher. Therefore, training the student network on the input-output examples from the teacher allowed us to infer the connectivity between the layers in our ground truth. As mentioned above, we can imagine a neuroscience experiment where we replace the artificial teacher network dataset with real recordings from 2 populations of neurons, while stimulating one of the populations. We could then train a student network on this dataset to infer connectivity between the real neurons.







Oldest comments (0)