
As a developer, I’ve recently worked on a Django API that processes large-sized images and videos. The system requires the admin to upload those mentioned files, and since the API is deployed in Heroku, we used to get the TIMEOUT error.
This happens because it takes some time to upload a file that is not light causing Heroku to crash. So, what can we do if we don’t want to reduce the size or the quality of the files?
In this blog post, I will provide a solution for this problem and will explain the flow and tools used. This information will hopefully help you with any working Django project that requires the management of large files.
The software architecture and flow
After discussing different approaches, my team and I decided to maintain the files in Amazon S3 buckets. These are containers where you can store objects (such as images and videos) and access them with fast performance.
As an example, if a Django model has an image attribute, let’s call it profile_picture, then we store the file in a bucket, and store the corresponding URL to that file in the database. So, if the Frontend requires the picture, the Backend returns the corresponding URL for that instance.
But, we don’t want everyone on the internet to have access to the image in the bucket, we only wish for the Frontend to do that. That’s why we have to configure the bucket as private.
Now, we need to answer: if the bucket is private, how does our Frontend access the files in it?. Well, in this case, we have to generate a pre-signed URL, that is a URL to grant temporary access to the file.
Here I will explain the proposed solution:
- Store the system files in private buckets of Amazon S3.
- Frontend and/or Django admin upload the files directly to a private Amazon S3 bucket.
- The Backend stores the corresponding URL of each file.
- When the Django admin creates/updates a file attribute for a given instance, the file is uploaded directly to the bucket, and the corresponding URL is stored in the database.
Explanatory interaction diagram:

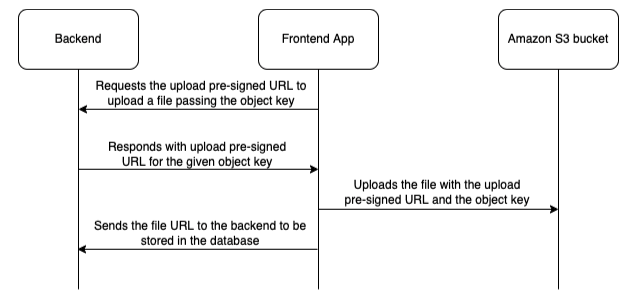
When Frontend is about to upload a file:
- It requests the Backend to get a valid upload URL to upload it to the private bucket.
- The Backend generates and sends the upload URL.
- The Frontend uses the upload URL to store the file in the private bucket.
- After the upload, the Frontend sends the file URL to the Backend to store it for the corresponding file.
Explanatory interaction diagram:
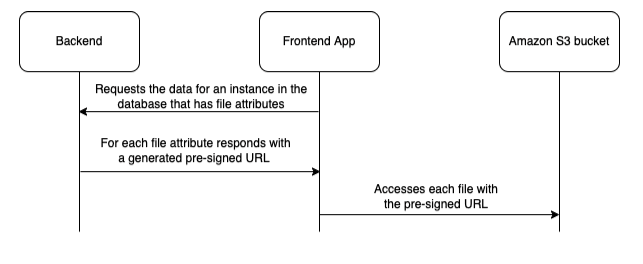
When the Backend sends the URL of a file to the Frontend:
- It uses a function to generate a pre-signed URL so the Frontend can access the file in the private bucket.
Explanatory interaction diagram:
The tools I used
Now that we have defined the solution flow, let’s talk about the tools. The first one I want to mention is django-s3direct, a library to directly upload files to the Amazon bucket from the admin panel. Also, it provides a model field that corresponds to the URL stored in the database.
On the other hand, we will use boto3 to generate the pre-signed URLs that the Backend sends to the Frontend in order to access the file. This library also generates the upload URL to allow the Frontend to upload files without the need of knowing the Amazon credentials.
In the following section, I’ll show the corresponding configurations.
Amazon S3 private bucket
I won't speak about the creation of buckets as there is plenty of documentation available. Next up, I’ll describe the configuration of the bucket to make it private and integrate it with django-s3direct.
Assuming you have already created the bucket and you have a user with access ID, access secret key, and permissions, these are the next steps:
- Log in to Amazon S3 and create the bucket. Make sure you have the permissions.
- Select the bucket, and go to the Permission tab.
- In the bucket policy, paste the next policy:
{
    "Version": "2012-10-17",
    "Statement": [
        {
            "Sid": "AllowPublicRead",
            "Effect": "Allow",
            "Principal": {
                "AWS": "*"
            },
            "Action": [
                "s3:GetObject",
                "s3:PutObject",
                "s3:PutObjectAcl",
                "s3:ListMultipartUploadParts",
                "s3:AbortMultipartUpload"
            ],
            "Resource": "arn:aws:s3:::<name-of-bucket>/*"
        }
    ]
}
- Change by your bucket name.
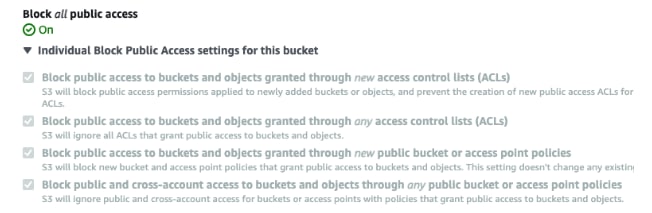
- Now in the same tab, block all the public access to make it private:
- Finally, in the same tab, paste this CORS configuration (needed by django-s3direct):
[
    {
        "AllowedHeaders": [
            "*"
        ],
        "AllowedMethods": [
            "GET",
            "HEAD",
            "PUT",
            "POST",
            "DELETE"
        ],
        "AllowedOrigins": [
            "*"
        ],
        "ExposeHeaders": [
            "ETag"
        ],
        "MaxAgeSeconds": 3000
    }
]
And that’s it, you have configured your private bucket. Keep in mind, if you want to change the policy in the future, first need to uncheck the blocking access.
Django-s3direct library
Now I will explain the use of the django-s3direct library to directly upload the files from the Django admin.
If you have a model that has a file attribute, when you change that attribute, this library will directly upload the file from the browser without sending it to the server. This is to avoid the named timeout error.
Let’s go step by step on how to get this configured:
- Install django-s3direct in your project.
- Add the library to your INSTALLED_APPS list in the settings:
# your settings file

INSTALLED_APPS = [
    …
    's3direct',
    …
]
- Make sure you have the APP_DIRS configuration set as True in your TEMPLATES settings:
# your settings file

TEMPLATES = [
   {
        …
        'APP_DIRS': True,
        …
   }
]
- Add django-s3direct urls to the urlpatterns list in your main urls.py file:
from django.urls import include, path

...

urlpatterns += [
    ...
    path('s3direct/', include('s3direct.urls')),
    ...
]
- Add the configuration corresponding to Amazon to your settings (strongly recommended to put the access id and secret key values in environment variables):
# your settings file

# If these are set to None, the EC2 instance profile and IAM role are used.
AWS_ACCESS_KEY_ID = 'your-aws-access-key-id'
AWS_SECRET_ACCESS_KEY = 'your-aws-secret-access-key'
# Bucket name
AWS_STORAGE_BUCKET_NAME = 'your-aws-s3-bucket-name'
# The region of your bucket, more info:
# http://docs.aws.amazon.com/general/latest/gr/rande.html#s3_region
AWS_S3_REGION_NAME = 'eu-west-1'
# The endpoint of your bucket, more info:
# http://docs.aws.amazon.com/general/latest/gr/rande.html#s3_region
AWS_S3_ENDPOINT_URL = 'https://s3.eu-west-1.amazonaws.com'
- Run collect static if needed:
python manage.py collectstatic
- Now you can define in your model a file attribute corresponding to an image or video. Let’s take a look at an example:
from django.db import models
from s3direct.fields import S3DirectField

class Example(models.Model):
    image = S3DirectField(dest='example_destination')
- And, what is example_destination? When you define a file attribute as an S3DirectField, you have to specify the dest parameter. There you have to put the string corresponding to the key in the S3DIRECT_DESTINATIONS dictionary in the configuration.
- Let’s look at an example of the configuration to understand this better:
# your settings file

S3DIRECT_DESTINATIONS = {
   'example_destination': {
       'key': 'images/example-images/',
       'region': AWS_S3_REGION_NAME,
       'acl': 'private',
       'allow_existence_optimization': False,
   },
}
- Inside each dictionary, you can configure a lot of parameters and check the library documentation to know them. - This example has the key where you define the folders where you want to store the corresponding file inside the bucket. You can test that it’s working by creating an instance of the class in the Django admin:
from django.contrib import admin

from example_app.models import Example


class ExampleAdmin(admin.ModelAdmin):
   fields = ('image',)


admin.site.register(Example, ExampleAdmin)
- Now you should go to django admin and you will see something like this:

- Then if you select an image, the library will directly upload the image to the private bucket and store the corresponding URL in the database. The Backend won’t receive a file, just a string URL. After the correct upload, you will see something like:
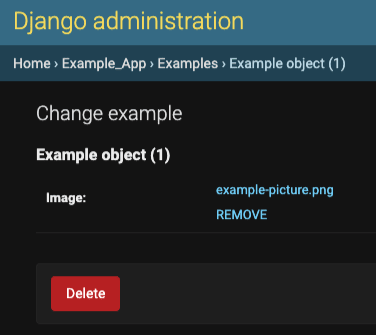
- And the stored URL will have this structure:
https://s3.<region-name>.amazonaws.com/<bucket-name>/<key>/<file-name> - If you click on the name of the picture, the browser will try to open it, but you won’t be able to see it because the bucket is private, and that’s ok. Also, if you click on REMOVE, the file will be removed from the instance but it will continue existing in the bucket.
Customize the name of the pictures
As highlighted, in the S3DIRECT_DESTINATIONS dictionary, you can configure in the key attribute the folders route to store the files corresponding to the given destination.
But what happens when you upload a file with the same name as another existing one in the same folder?
Well, that will overwrite the file, and I assume you don’t want that because it can be the file of another instance in your system.
Here are two tips for this:
- Add a timestamp to the file name to avoid repeated file names in the system.
- Use a slugify function to manage spaces and/or invalid characters in the file name.
If you do that, you can avoid a lot of future problems. Let’s look at an example:
# your settings file
import os

from django.utils import timezone
from django.utils.text import slugify


…


EXAMPLE_DEST_KEY = 'images/example-images/'
TIMESTAMP_FORMAT = '%m-%d-%Y_%H-%M-%S-%f'

def normalize_filename(filename):
   name, extension = os.path.splitext(filename)
   time_stamp = timezone.now().strftime(TIMESTAMP_FORMAT)
   return f'{time_stamp}--{slugify(name)}{extension}'


S3DIRECT_DESTINATIONS = {
  'example_destination': {
      'key': lambda filename: f'{EXAMPLE_DEST_KEY}/{normalize_filename(filename)}',
      'region': AWS_S3_REGION_NAME,
      'acl': 'private',
      'allow_existence_optimization': False,
  },
}
In this example, for each new file, we apply a normalization of the file name. First, we normalize the filename using the slugify function from Django, and then we append at the beginning the timestamp.
If we upload a file with the name image.png, the system will store that file with the form <timestamp>--image.png.
Another example is if we have a file with the name FILE with SPACEs.png, the system will store <timestamp>--file-with-spaces.png. This is super easy to understand and solves a lot of problems.
Now, in this next section, we will see how to return presigned files to the Frontend.
It’s important to note, that this mentioned normalization will be executed only when uploading files in the Django admin. To be consistent, it would be nice to make the same normalization in the Frontend when it has to upload a file.
Boto3 and pre-signed URL
We know how to configure a private Amazon S3 bucket, and how to integrate it with django-s3direct to directly upload a file from the Django admin.
Now, we need to know how to do the following:
- Send a pre-signed URL from the Backend to the Frontend so this last can access the existing file in the private bucket.
- Send a pre-signed upload URL from the Backend to the Frontend so this last can upload a file.
Let’s now look at how we do this using the boto3 library.
Generate and send a view pre-signed URL
Since the bucket is private, if we take a file URL in the database and we try to access it, we won’t be able to. We would then see something like this:

This is why we need to generate a pre-signed URL in the Backend for the corresponding file to be temporarily available for the Frontend. For this I use the boto3 library, let’s look at the used functions:
# some utils file for boto3 functions

from boto3 import Session
from typing import Any, Dict

from django.conf import settings

def get_object_key_from_url(url: str) -> str:
   '''
   Returns the object key for the given url
   '''
   endpoint = settings.AWS_S3_ENDPOINT_URL
   bucket_name = settings.AWS_STORAGE_BUCKET_NAME

   return url.split(f'{endpoint}/{bucket_name}/')[1]


def get_presigned_url(object_key: str) -> str:
   '''
   Returns a presigned URL for the given object key
   '''
   session = Session(
       aws_access_key_id=settings.AWS_ACCESS_KEY_ID,
       aws_secret_access_key=settings.AWS_SECRET_ACCESS_KEY,
       region_name=settings.AWS_S3_REGION_NAME,
   )
   s3client = session.client('s3')
   url = s3client.generate_presigned_url(
       ClientMethod='get_object',
       Params={
           'Bucket': settings.AWS_STORAGE_BUCKET_NAME,
           'Key': object_key,
       },
       ExpiresIn=settings.AWS_PRESIGNED_URL_EXPIRATION_TIME_MINUTES,
   )
   return url
In this example, the function get_object_key_from_url obtains the object key from the file URL. As mentioned, the object key is the route of folders and the file name in the bucket.
Why do we need the object key? We need it to generate the presigned URL of the file. That object key will be used in the get_presigned_url function for that purpose.
The next thing to do is to execute that function when the Frontend makes a GET request and needs to access the file.
There are several ways of doing that, and I’m going to show you one that I find easy to understand:
- Create a property in the model, that corresponds to the pre-signed attribute:
# your models file

from django.db import models
from s3direct.fields import S3DirectField

from example_app.s3_files import get_object_key_from_url, get_presigned_url

class Example(models.Model):
   image = S3DirectField(dest='example_destination')

   @property
   def presigned_image(self):
       return get_presigned_url(get_object_key_from_url(self.image))
- The presigned_image property first extracts the object key for the stored URL and then generates the pre-signed one to send it to the Frontend.
- Now add the property to a model serializer:
from rest_framework import serializers

from example_app.models import Example


class ExampleSerializer(serializers.ModelSerializer):

   class Meta:
       model = Example
       fields = ('presigned_image',)
- This way, if you use that serializer to send the data to the Frontend, it will return a pre-signed URL in the presigned_image field.
A pre-signed URL looks like this:
https://<bucket name>.s3.amazonaws.com/images/<object key>?<lots of needed parameters>
With that URL, the file will be available for the time period defined in your settings as in the example.
Generate an upload pre-signed URL
Last but not least, I’m going to explain how to send an upload URL from the Backend to the Frontend. Imagine we have an app where the users have profile pictures and the Frontend needs to upload the image.
The flow would then look like this:
- The Frontend generates the object key of the image file (recommend adding a timestamp and normalizing the file name as in the example in the previous section).
- The Frontend sends the object key in a POST request to the Backend.
- The Backend takes the object key and generates a pre-signed upload URL.
- The Frontend uploads the image using the pre-signed upload URL.
- The Frontend sends the image URL to the backend so it can be stored in the database.
Let’s look at an example of this function:
def get_presigned_url_dict_to_upload_file(object_key: str) -> Dict[str, Any]:
   '''
   Returns a dict with the necessary data to upload a file for the given key
   '''
   session = Session(
       aws_access_key_id=settings.AWS_ACCESS_KEY_ID,
       aws_secret_access_key=settings.AWS_SECRET_ACCESS_KEY,
       region_name=settings.AWS_S3_REGION_NAME,
   )
   s3client = session.client('s3')

   url = s3client.generate_presigned_post(
       Bucket=settings.AWS_STORAGE_BUCKET_NAME,
       Key=object_key,
       Fields={
           'acl': 'private',
       },
       Conditions=[
           {'acl': 'private'},
       ],
       ExpiresIn=settings.AWS_PRESIGNED_URL_EXPIRATION_TIME_MINUTES,
   )

   return url
Finally, let’s look at an example in a viewset for the action POST to receive an object key and return the necessary information to upload the file.
First, we must define the serializer like so:
from rest_framework import serializers

from example_app.models import Example


class ExampleSerializer(serializers.ModelSerializer):

   class Meta:
       model = Example
       fields = ('presigned_image',)


class ExampleUploadURLSerializer(serializers.Serializer):
   object_key = serializers.CharField()
   upload_url_dict = serializers.DictField(required=False)
Second, we must define the viewset with the corresponding action:
from rest_framework import viewsets, status
from rest_framework.decorators import action
from rest_framework.response import Response
from rest_framework.request import Request

from example_app.models import Example
from example_app.serializers import ExampleSerializer, ExampleUploadURLSerializer
from example_app.s3_files import get_presigned_url_dict_to_upload_file


class ExampleViewSet(viewsets.ModelViewSet):
   serializer_class = ExampleSerializer
   queryset = Example.objects.all()

   @action(detail=False, methods=('post',), url_path='upload-url')
   def upload_url(self, request: Request) -> Response:
       serializer = ExampleUploadURLSerializer(data=request.data)
       serializer.is_valid(raise_exception=True)

       object_key = serializer.validated_data['object_key']

       upload_url_dict = get_presigned_url_dict_to_upload_file(object_key)

       return_serializer = ExampleUploadURLSerializer(
           data={'object_key': object_key, 'upload_url_dict': upload_url_dict,}
       )
       return_serializer.is_valid(raise_exception=True)

       return Response(return_serializer.validated_data, status=status.HTTP_200_OK)
So, after this, we are sending the necessary information to upload the file. And that’s it! We have finished the proposed solution.
I have created a public repo where you can see this little example project to get further insight. If you’d like, you can download it and give it a try for yourself.
Summary
Throughout this blog, I presented a solution for a common problem for developers - managing big files in Django projects that are deployed using Heroku.
I detailed in-depth the defined flow and tools I used, as well as providing some useful tips and examples to help you create a good solution.
However, this doesn’t mean that the workaround we found is the only possible one. But it could very well be the most efficient.
I hope you enjoyed reading and if you have another process that you think is useful, feel free to let us know in the comments section. Thanks for reading!

Top comments (0)